Here’s what you need to know to make a quick, accurate, and effective repair on the technological wonder that is the Nissan fuel injection system.
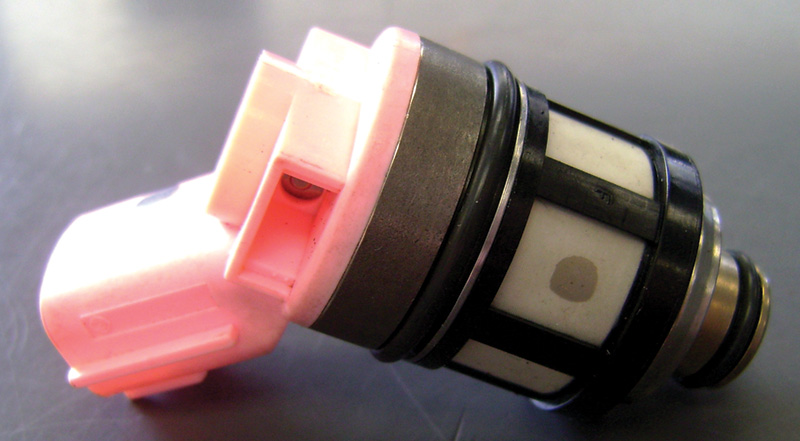
Precise fuel control is more critical than ever to make a smooth, efficient and powerful engine. How can such a simple device be so mysterious for so many people?
The best place to start in understanding what has failed with an electronic fuel injection (EFI) system is to get a strong understanding of how it does what it does. The fuel injection system is intertwined throughout many of the systems in the engine. The biggest problem in diagnosing a fuel injection system issue is that most failures can be confused with failures in many other systems. It is difficult to tell if the engine is running rich because of sticking, leaking fuel injectors or a failing oxygen sensor or exhaust leak causing the ECM to add more fuel. Is a misfire being caused by a failed fuel injector or an ignition system failure? Or the big one; could a rough idle be being caused by dirty fuel injectors? Being able to recognize the difference is the key to quickly diagnosing problems.
The only job a fuel injector has is to allow the correct amount of fuel to pass at the correct time. The inside of a fuel injector is not all that complex. With a little variation between the models, the basic design is the same. A pintle or plunger is moved by a solenoid, momentarily allowing pressurized fuel to pass through very small nozzles, thereby making a fine mist for easy combustion. Such a basic design allows for years of trouble free operation with relatively little maintenance required. With so few failures, injectors are often overlooked as the cause of driveability problems. Technicians have even been known to doubt the integrity of the new ignition coil they just replaced before even considering that the fuel injection might be a problem. Fuel injectors are often the last to be checked after all other systems test good.
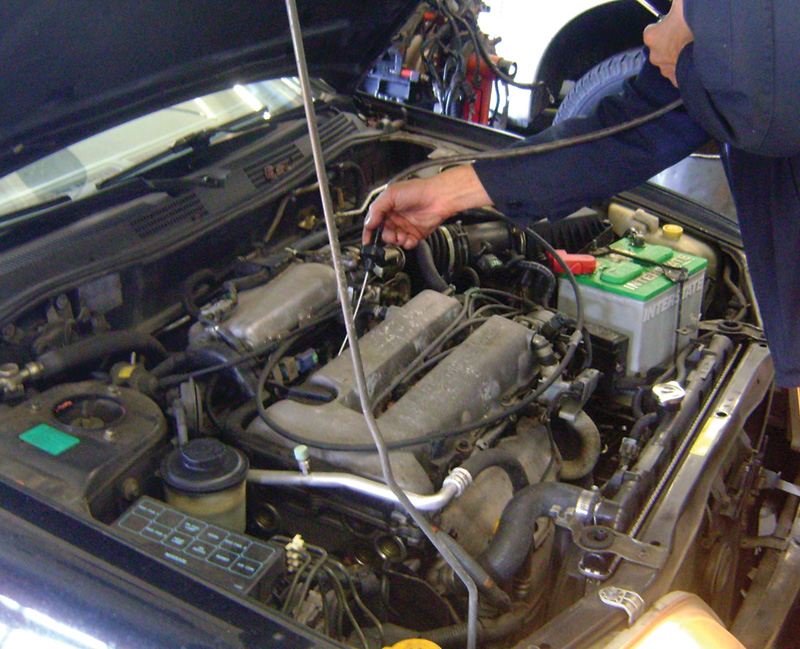
Comparing the sound each injector makes with a stethoscope makes it really easy to tell if one or more is/are opening in rhythm. Once you hear a good injector, a failed one will be obvious by the sound it makes (or doesn’t make).
The fuel injectors are controlled by the ECM, which typically uses a ground side driver to complete the circuit, opening the injector. That is to say it switches the ground side of the circuit on and off to open and close the injectors. This allows for the injectors to have a shared battery positive fuse while still being triggered individually. Although some older fuel injected motors used throttle body injection, like the late ‘80s and early ‘90s Nissan pickups and Pathfinders for example, most fuel injection systems in our shops today will be electronic port fuel injection or direct cylinder fuel injection in the later models.
These systems fire the injectors separately for each cylinder and require individual wires from each injector to the ECM as well as individual drivers for each injector inside the ECM. This method of controlling the fuel flow is simple enough that failures between the ECM and injectors are not very common and usually involve some physical damage to the wiring harness, like water intrusion or a rodent chewing on the wires. Deciding if you have a ECM/control side issue or an injector/fuel side problem is an important step in getting to your solution, but keep in mind it is possible for the latter to cause the former. If an injector is shorted internally it is possible for the excess amperage to damage the wiring harness or worse yet even damage the ECM driver.
A great way of testing to determine if the injectors are firing is with a simple tool from your local parts house; the mechanic’s stethoscope. By attaching a long rod to a stethoscope you can listen to the injector as it makes a ticking sound when it pulses. It should sound like tiny blacksmiths beating on anvils inside the injector body, and a muffled sound or no noise at all is a solid indication we have a problem with that injector.
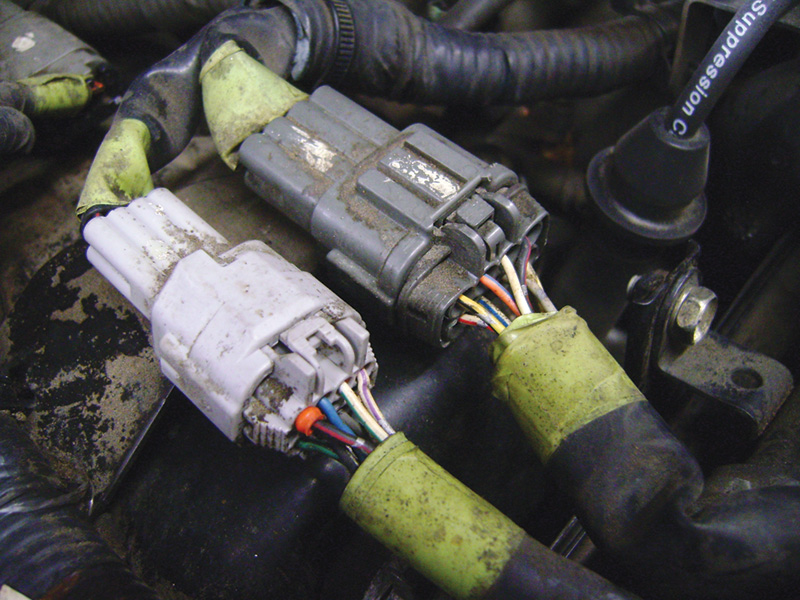
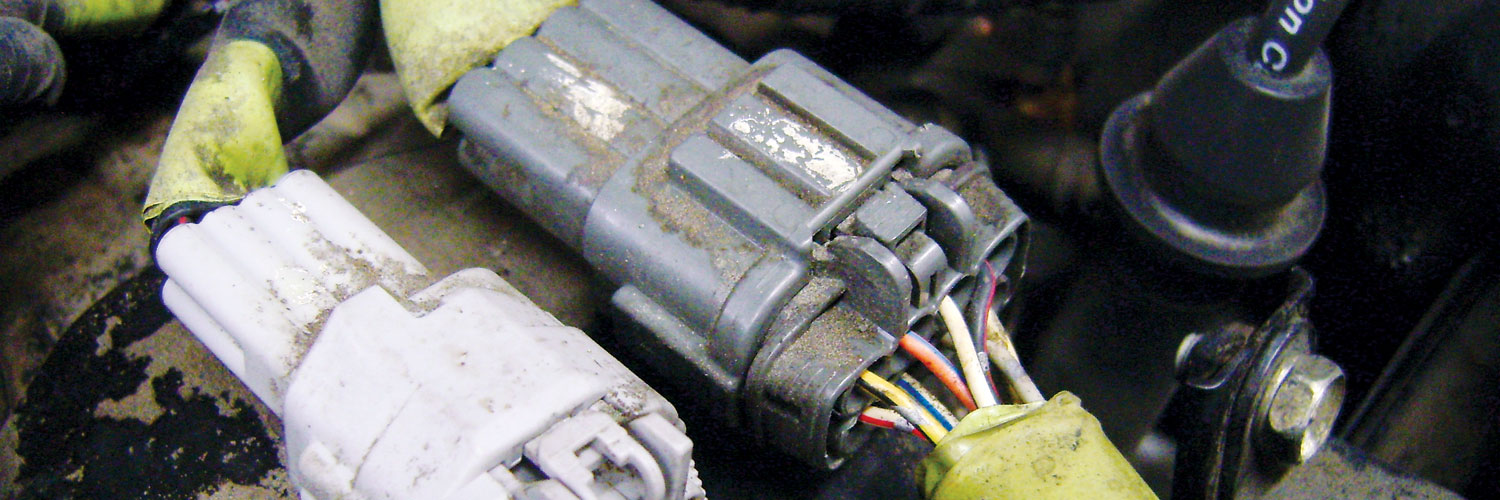
On the front of the right valve cover this fuel injector harness connector is the perfect place to test the electrical integrity of all the injectors quickly and easily.
In the case of a cylinder misfire, simply comparing the difference in noise between injectors will give you a pretty good idea if one isn’t firing. Unfortunately there are some limitations to this method. In direct injected engines, like the MR16DDT in late model Jukes for example, you won’t be reaching the injectors to test with a stethoscope due to their location deep in the cylinder head. Also most V-6s have the intake plenum covering half the injectors making them difficult, if not impossible, to reach.
This doesn’t mean that you should have to take the engine apart to test the system. With a wiring diagram in hand you will often be able to identify a convenient place to back probe a connector and read the injector pattern on the ground side of the injector circuit. Since there are subtle differences between different engines and the vehicles they are in, it would be difficult to show every system in this brief article, but let’s consider the 3.3L engine in the early 2000’s Frontier. There is a pair of connectors on the front of the right valve cover that provide easy access to both injector banks. The connector on the valve cover is easy to access and has all the wires you will need to test. The black/red wire should read battery voltage and not waver much while the engine is running. Next test for ground on the white wires with various colored stripes; they are the ground side to each cylinder (your wiring diagram will help identify the cylinders).
Although you may be able to see the pulsing voltage with a digital multimeter, a graphing multimeter will give you a better picture of what’s happening. If you see the voltage pulsing you know that your injectors are at least making contact electrically. This doesn’t mean that fuel is flowing out of the injectors but it does indicate that half of the system is working.
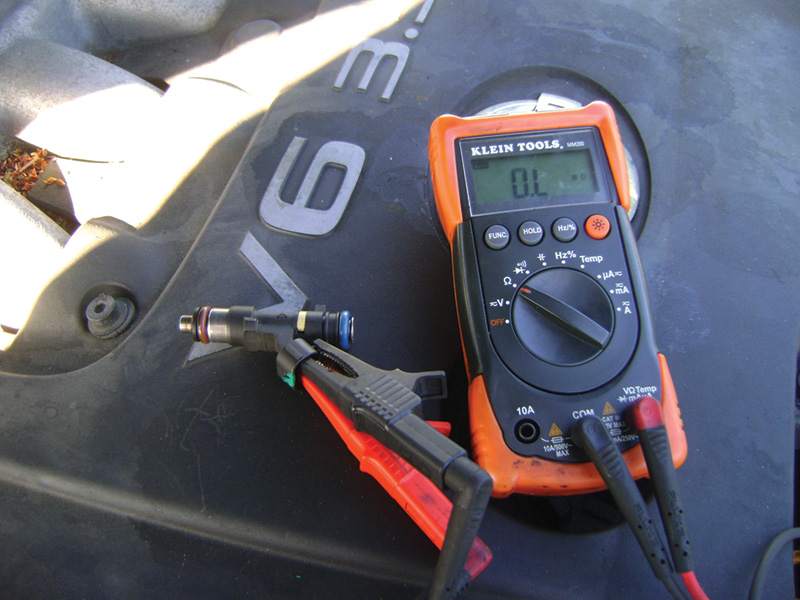
We’re pretty sure this is the cause of the misfire. With an open circuit inside the injector, this one will have to be replaced.
Should you not see a pulsing ground/voltage you just happen to be in the right place for the next step in your diagnosis. These same connectors can be separated and you can easily test the resistance of each of the injectors right there. Simply test resistance between the black/red wire and each of the white wires in the same connector. Resistance will typically be between 12-14 ohms, however you don’t typically need to look up the specifications. The chances of having more than one injector with high or low resistance is not very likely. Simply compare the resistances of the other injectors and you should have a pretty good idea if you have a problem. Say four of the injectors are at 12-13 ohms and one is at 45 ohms and another at 1.5k ohms. You can bet which two are causing your problem. As a side note it is very important that you continue to backprobe the connectors throughout this process, even when they are unplugged. Using a pin in the face of the connector can damage the terminals and cause big headaches later in your diagnosis.  Â
Should you find an injector that isn’t making any noise, the next step is to check for injector pulse. This is done with a tool called a “noid light†connected to the fuel injector electrical connector, that will flash with every pulse the ECM sends to the injector. In the old days mechanics would connect a standard test light between the injector leads. Although this is typically “safe†it is not as safe as using the right tool. The noid light is designed to be used here and has the correct terminals to connect to the fuel injection connector. Using a test light with pins or exposed metal surfaces has the potential of accidentally shorting across the connection and may draw too much amperage through the driver, damaging it. Damaged drivers mean replacing the ECM, so keep that in mind when doing any work with the injector harness. Â
When testing with a noid light it’s important to keep in mind that this is not a confirmation that the injectors are actually spraying any fuel. All this is telling you is that the computer is commanding them on and that the wiring is in working order. A failed or clogged injector can be identified directly with the noid light. If the injector doesn’t tick and the noid light does flash, it’s a pretty good indication you’ve got a failed injector. With a noid light that doesn’t light up with the engine running, you will be checking for power to the injector, wiring issues or, the worst case, a failed driver in the ECM. Dim or intermittent flashing may indicate extra resistance in the injector circuit. Shaking the harnesses and connections should help identify the problem.
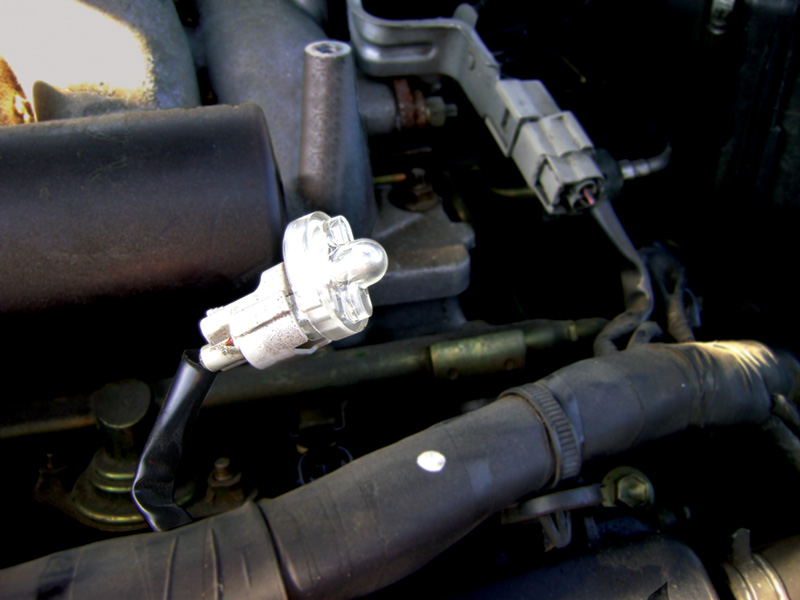
This is a must have tool for anyone hoping to diagnose fuel injection problems. Using this at the fuel injector connector will quickly tell you if your problem is on the control side or the fuel injector side. Be sure to watch the noid light for more than a few seconds as a failing injector driver may work for a short time before failing.
A very solid way to test if fuel is actually flowing through the injector is to do a fuel injector balance test. This is basically a flow test that is performed with the injectors in the vehicle. The actual method of performing this test will vary depending on the engine configuration. To describe it simply; a fuel pressure gauge is connected to the fuel rail and the fuel pump is activated to set the pressure in the rail to the normal regulated pressure. A fuel injection pulse tester is then connected to each injector in turn that will pulse the injector for a set amount of timed pulses (for example 50 pulses of 10 milliseconds) and then you observe how much the fuel pressure drops as each injector is activated. You should observe approximately the same fuel pressure drop with each injector pulsed.
If the pressure drop is much less, you know that particular injector isn’t letting enough fuel through. It may be clogged or restricted. An injector that drops more fuel pressure might indicate a sticking pintle or possibly a leaking injector. If all of the injectors have the same flow it is a good sign that your injectors are working properly.
If you find your fuel pressure dropping before you pulse the injectors if may indicate a leaking injector.
Even if you don’t find an injector with restricted flow during a balance test, or a defective spray pattern, a thorough system cleaning may still be an important step in the diagnostic process. Take the example in the TSB NTB01-033a. This TSB suggests that, after standard diagnostic procedure, performing a fuel injection cleaning may resolve poor runnability including misfire codes (P0301, P0302, etc.).
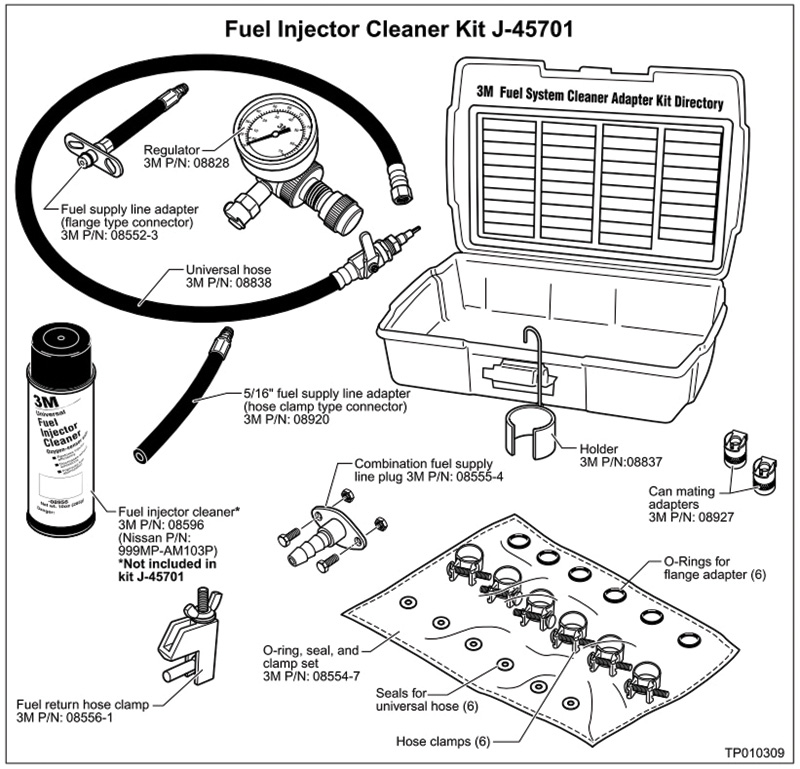
This kit has been thoroughly tested and will clean dirty injectors without damaging the internal fuel injector parts. TSB NTB01-33a gives you instructions on how to use the kit and safely clean your injectors. If the injectors are beyond cleaning, replace them with genuine Nissan injectors. Rebuilt and aftermarket injectors may have you doing the job twice.
Vehicles with poor idle, poor fuel economy and catalytic converter failures are all great candidates for fuel injector cleaning. This doesn’t mean putting a bottle of cleaner in the gas tank. This means connecting a special fuel supply system and disconnecting the vehicle’s fuel pump.
Most shops have some form of machine that can do this kind of cleaning. However, Nissan has researched the issue and has determined there is a specific cleaning system that will not damage the system components in Nissan fuel injection systems. The fuel injector cleaning kit is J-45701 and uses a 3M cleaning product (Nissan P/N 999MP-AM103P) in a pressurized can. The kit is basically a fuel pressure regulating system that can control the 100 psi nitrogen compressed fuel in the 3M can and deliver it to the fuel rail. By running the engine with the 3M can supplying the fuel to the fuel rail directly, all of the cleaning power is going to go through the injectors. These are very strong chemicals cleaning the injectors, so it’s a good idea to be careful with the exhaust fumes while performing the service.
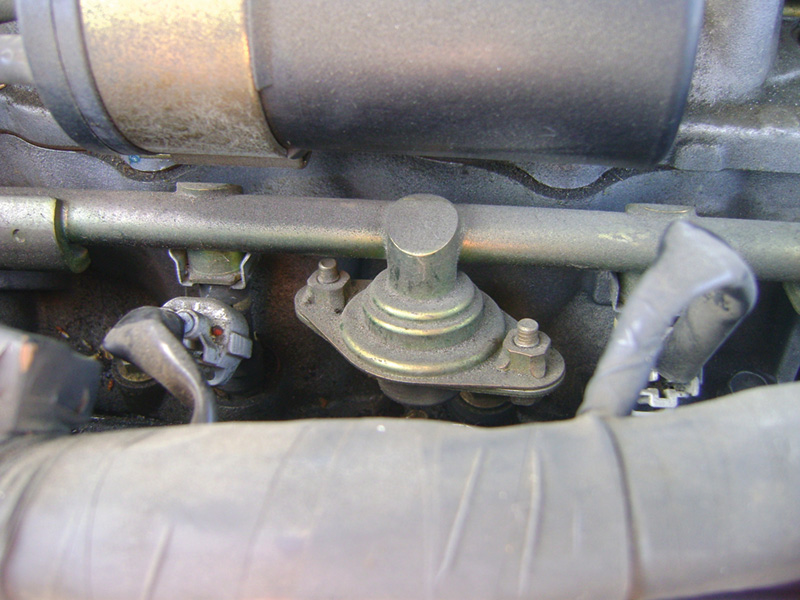
When the damper fails internally it begins to act like a speaker being driven by pressure in the fuel rail. Simply replace it to solve this noisy problem.
Engine misfires and poor fuel economy aren’t the only problems you can have with the fuel injection system. It is not at all uncommon for the fuel rail to actually make noise. There is a device on many fuel injection systems called a damper. The damper acts like a shock absorber for the fuel system. At low engine speeds the fuel pressure will fluctuate rapidly as each injector opens, causing a pulsing in the fuel rail. This can actually be surprisingly loud and obnoxious. Although many models can be affected, there is a TSB covering the VQ35 engines in the 2004 to 2007 Quest, Altima and Maxima specifically for this problem. Once you know to check, this problem is easily solved. Use a stethoscope to confirm the damper is the source of the noise, then replace it. It looks just like a fuel pressure regulator but doesn’t have any vacuum hoses going to it.
Poor mileage, misfires or odd noises can all be caused by different problems with the fuel injection system. Getting familiar with the diagnostic methods in fuel injection will help you be a better technician. The more you test and find the system working properly the more you will recognize when something isn’t working the way it should. Fuel injection doesn’t have to be a mystery. It’s really a pretty simple system when you think about it. Use the right tools and a little bit of logic and you’ll have it figured out in no time.


0 Comments