
Direct injection (DI) has started to become commonplace among most vehicle manufacturers. Audi, however, has offered direct injection engines since the mid 2000s on all of their engine models.
Gasoline Direct Injection (GDI) is the next step in the evolution of the fuel injection system used since electronic fuel injection became popular in the 1980s. The standard “port injection†or “indirect injection†system was widely adopted and is still in use today, but direct injection will most likely become the standard as emissions regulations become tighter.
Audi uses the terms FSI, TFSI, and TSI to denote their direct injection systems. Turbo Fuel Stratified Injection is a stratified or homogeneous fuel mixture that is stoichiometric, meaning the optimal amount of fuel and air are provided for each combustion cycle without waste. Not too lean, not too rich, just right.
The primary difference between direct injection and port injection is the relocation of the fuel injectors from the intake port to instead inject fuel directly into the combustion chamber. Fuel injection can be much more tightly controlled by injecting fuel directly into the combustion chamber. Direct injection can also greatly increase power and, most importantly, lower fuel consumption and contribute to more complete combustion, resulting in lowered emissions levels.
A common rail high pressure fuel system is employed in Audi direct injection engines as well. This is a necessary step in direct injection to ensure a constant fuel supply pressure. By increasing the fuel injection pressure, the injected fuel can be more finely atomized, which in turn creates a more efficient and complete combustion cycle.
Audi fuel supply systems operate at up to 30,000 psi. In comparison, port-injected engines generally operate at a measly 40-90 psi. As a result, these high-pressure systems can be extremely dangerous if damaged or improperly handled.
To generate the required fuel pressure for their direct injected engines, Audi uses High Pressure Fuel Pumps (HPFP). These are either driven off the timing chain or an additional lobe located on the camshaft. Early direct injection engines had many issues with premature camshaft wear and HPFP failure.
It’s important to be cautious with the fuel injector o-rings. These can be damaged during re-assembly and will quickly become a high-pressure gasoline leak! It’s wise to use a light lubricant on the rubber o-rings to aid in assembly. Do not apply lubricant to the Teflon seal at the base of the fuel injector. This can damage the Teflon and create sealing issues.
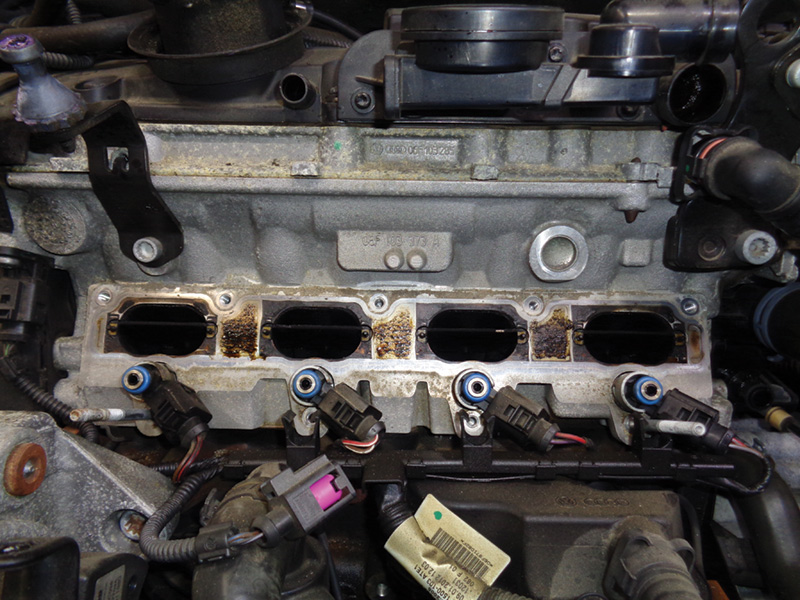
There are almost no negatives to the use of direct injection. However the primary issue with direct injection engines is the unavoidable carbon buildup. As air is being pulled into the engine, it must pass through the intake ports and across the intake valves on its path to the combustion chamber. Any foreign material that is in the air charge entering the engine can build up in the intake tract. On older port-injection engines, the fuel injector positions allowed them to constantly spray the back of the intake valves and lower intake, with fuel constantly cleaning them. This all but eliminated carbon buildup on these engines.
Due to the crankcase ventilation design Audi employs, blow-by from combustion and any additional crankcase gases are recirculated into the intake charge. These crankcase gases consist primarily of unburned hydrocarbons and oil vapor. As these gases and oil vapors solidify, they become a sticky black carbon mess. Carbon buildup can affect everything in the intake manifold. This includes sensors that can become blocked or damaged from oily carbon buildup. It’s not uncommon to have failed MAP sensors and oil soaked/failed air mass meters.
Carbon buildup can also cause binding issues with intake runner flaps if so equipped. These can build up carbon to the point of seizing completely or limiting movement, which can set intake runner control faults. When performing a de-carbon service, it’s wise to inspect and carefully clean changeover valve flaps and linkage if necessary.
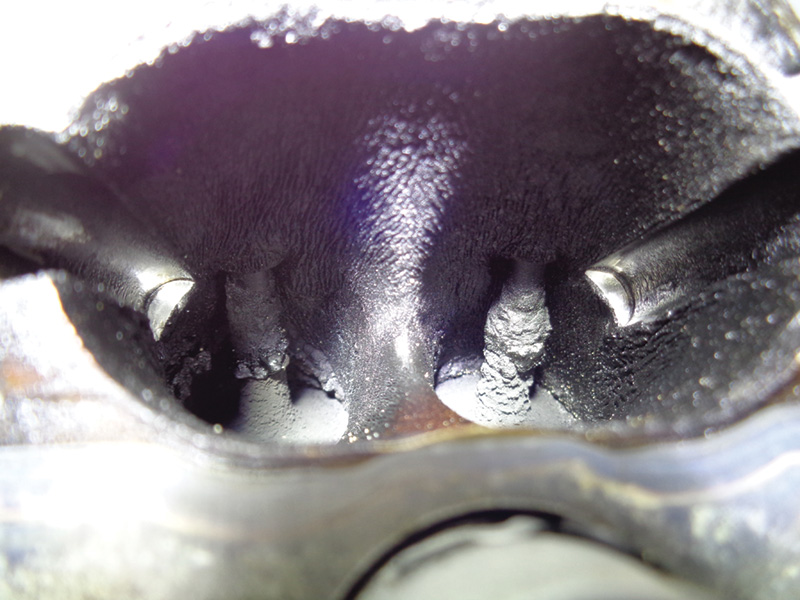
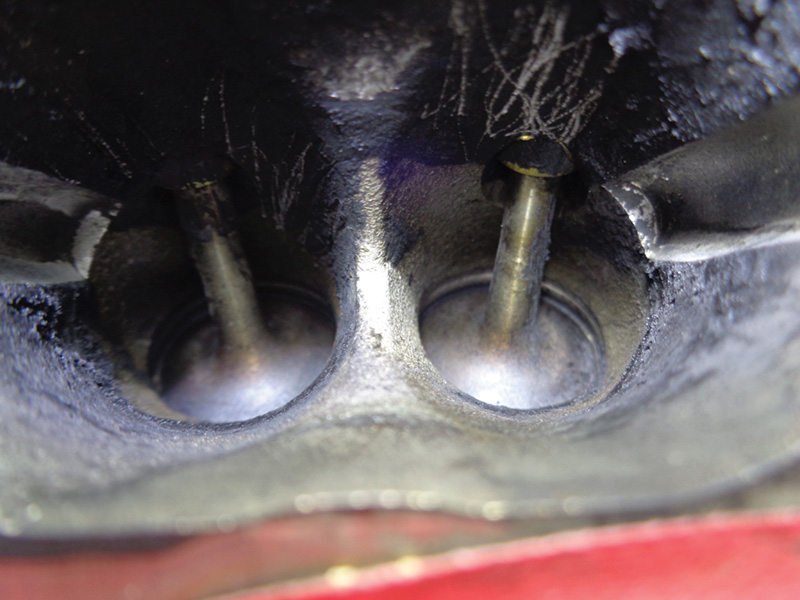
This buildup becomes a problem when it begins to impede air flow into the combustion chamber. Carbon buildup on the backs and stems of the intake valves and lower intake tract are the most disruptive to air flow entering the engine. Because Audi relies on a homogeneous, or stratified, fuel/air mixture, upsetting this finely balanced mixture will affect the combustion cycle. As carbon buildup gets worse, blocking more air flow, misfires will begin to occur.
Misfires from carbon buildup can be felt most often at idle. Under full and part load, the engine can usually overcome the mixture imbalance. At idle, air flow into the engine is already at its lowest point; lowering it further can quickly cause a rough running sporadic misfire condition.
Rough engine running after cold start is the number one symptom of carbon buildup on an Audi direct injection engine. Excessive carbon buildup on the valves and valve stems can prevent the valves from seating when cold, lowering compression and causing misfires.
When diagnosing a misfire on an Audi vehicle, don’t forget about possible coil failure. There have been many part updates on Audi ignition coils, and they still continue to die. If you only have misfires on one or two cylinders, it may be wise to swap around the suspected faulty coils to see if the misfire follows the coil. This can eliminate carbon buildup from your diagnosis.
Fuel injector failure, although uncommon, is still a problem on many Audi direct injection engines. A faulty fuel injector will generally cause a dead misfire on affected cylinders. In certain cases, a slightly leaking fuel injector can set a rich running fault. This could lead many technicians down the rabbit hole suspecting faulty air mass meters or oxygen sensors while ignoring the real culprit.
Most often, the injectors become stuck open, constantly spraying fuel into the cylinder. This can usually be visually examined by inserting a borescope into the spark plug hole. Gasoline usually wets the top of the pistons or can even puddle up in the cylinder. In extreme cases, a bad injector will literally have gasoline pouring out of the tailpipe!
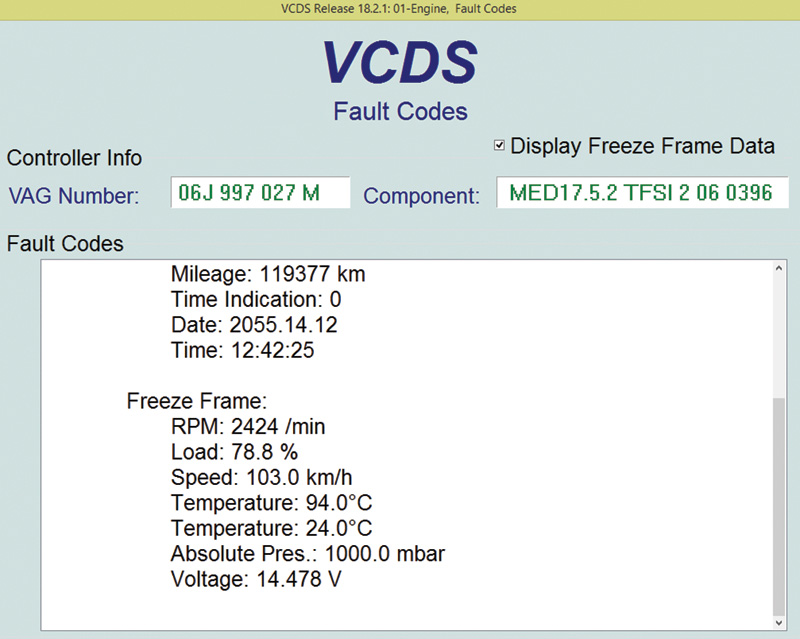
With factory level scan equipment, additional data can be gathered from the Engine Control Unit (ECU) from when the fault was set. Freeze frame data can be invaluable in diagnosing carbon buildup as well as many other driveability complaints.
This data generally includes engine rpm, engine load, coolant temp, ambient temp, engine vacuum, and voltage. A misfire fault set under heavy engine load is generally not related to carbon buildup. This is more likely a failing ignition coil or fuel injector. The coolant temp and ambient temperature can help you determine carbon buildup issues. If the coolant and ambient temps are the same or very close when the misfire fault sets, you know you have a cold start misfire. At this point in your diagnosis, a borescope may be necessary to further investigate the extent of the buildup.
On most engines it’s possible to extend a scope down the intake toward the intake ports. The tricky part is getting the camera where you need it without blocking the lens with carbon. On early 2.0t engines, the intake air temp sensor can easily be removed for borescope access.
Many companies offer induction services to soften and eliminate carbon buildup without requiring intake manifold removal. These can be hit or miss and often require multiple treatments to make small improvements. These induction cleaners usually require injecting the cleaner through a port on the intake manifold in order to soften the carbon buildup. This can be a risky procedure due to having the engine running while performing this service. Stalling out, hydrolocking, and dieseling can occur. Sounds risky!
The only sure way of eliminating carbon buildup is by manually removing it with either picks or a walnut shell blaster. The blaster absolutely produces the best end results. Intake valves and lower intake tracts usually come out looking brand new after a de-carbon service.

The 2.0t engine is the most common to require a de-carbon service. Generally, every 60–80K miles they should be inspected and have a de-carbon service, depending on driving characteristics. Usually, short-trip driven vehicles get carbon buildup much faster than highway-driven vehicles. Audi V6 engines as well as the direct injection VR6 engines suffer from carbon buildup.
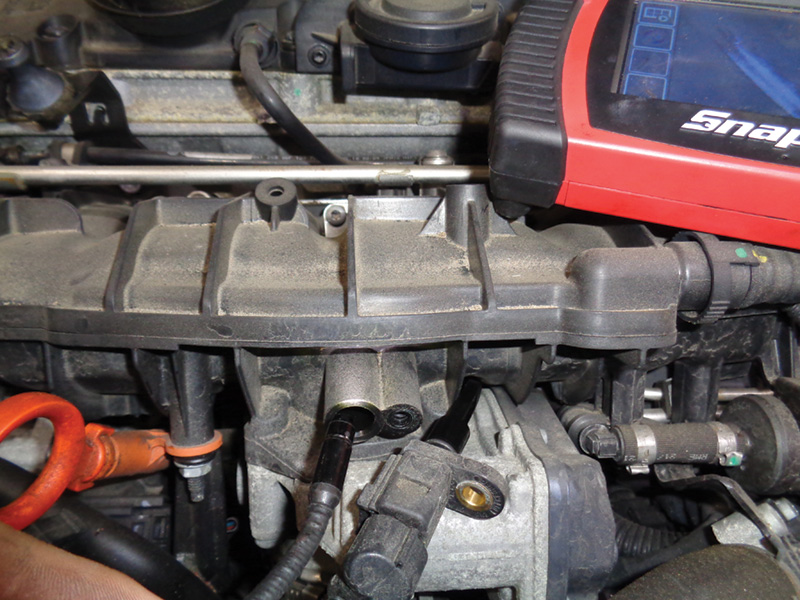
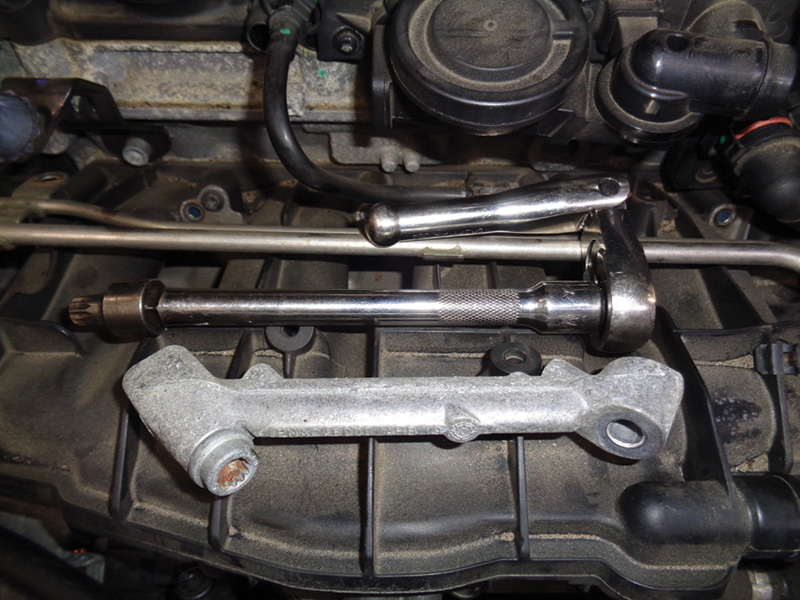
The intake manifold must be removed as well as any exposed fuel supply system components during a de-carbon service. It’s imperative to protect all exposed engine components during this process. If any foreign material enters the fuel or air supply system, it can be catastrophic. Always cap or tape off boost tubes, fuel supply lines, and vacuum lines. Preparation is critical here. Protect everything.
Most commonly damaged on Audi vehicles during a de-carbon service are fuel injectors. These can become clogged or even damaged during the removal and installation process. Be careful not to damage the Teflon seals on the tip of the fuel injectors. Do not apply chemicals or lubricants to the Teflon seal on the injectors. They are easily damaged by chemicals. The o-rings on the base of the fuel injectors are rubber, and assembly lubricant can be applied to aid in reassembly.
The intake runner system on the manifold also requires caution. These intakes have a very high failure rate. Most commonly, the position sensor fails, which usually requires an entire new intake assembly. After removal or replacement of the intake manifold, basic settings must be run for the intake runner control. This ensures proper intake runner calibration. Failing to execute this adaptation will set a fault in the ECU. Throttle body alignment is also required for most engines.
Through VCDS software or an equivalent factory level tool, basic settings can be accessed by selecting 01, Engine, and enter Basic Settings by entering Group 4. Under Basic Settings is a list of available adaptations. This may vary, depending on engine, model, and year.
With the intake manifold removed, the de-carbon process can begin. Always ensure the intake valves are totally closed on the cylinder you are cleaning. Slowly turning the crankshaft by hand is your best bet here. If you’re lucky, you will have more than one cylinder sealed at once.
After ensuring the valves are closed, this can be verified by spraying brake cleaner or penetrant spray into the cylinder you are cleaning. It should hold and not drain away. This will also aid in softening the carbon for removal.
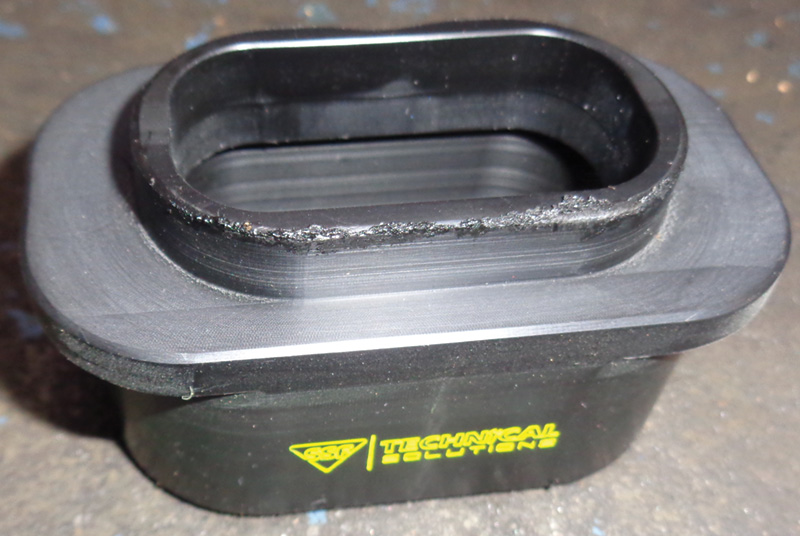
Intake port adapters are an absolute necessity during the de-carbon process. Having an adapter allows a tight fit on the intake port to avoid unintended shell dispersal. Many companies offer port adapters. It’s also possible to modify an old intake manifold to aid in cleaning. Be aware! The plastic on 2.0t intakes is thin, and the blaster can damage and even power through the intake if you’re not careful.
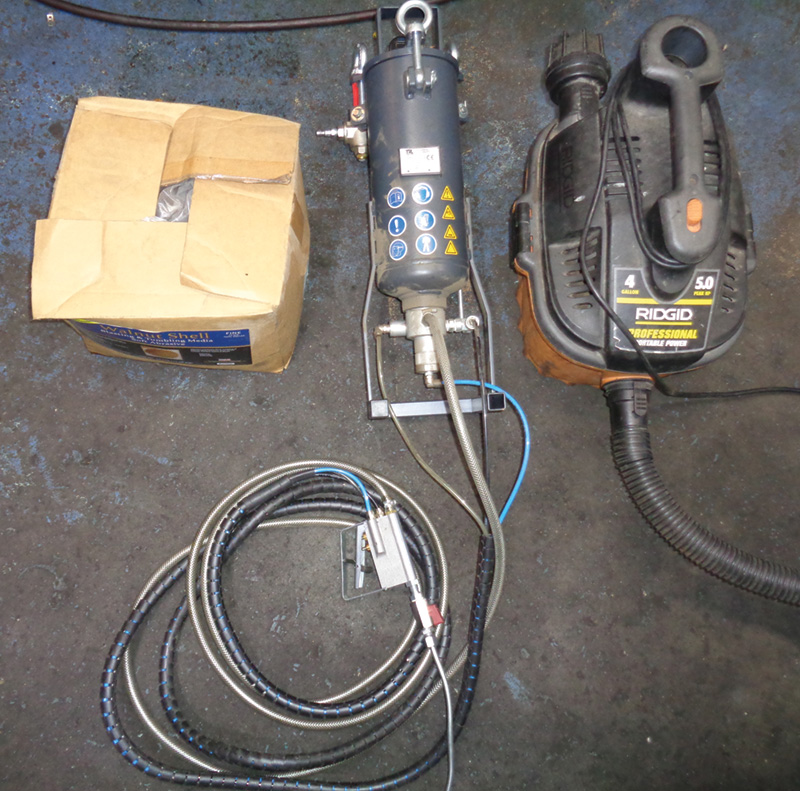
During the de-carbon process, it’s important to have a reliable media blaster. Cheap options are available but can become a headache. Less expensive media blasters usually clog constantly and require constant repairs. If you invest in a nicer unit, it can make the repair much smoother and faster. Most nicer media blasters have anti-clogging purge lines that minimize clogging risk. When using walnut shells, always go for fine or medium fine grit. This aids cleaning and anti-clogging as well.
It’s also necessary to have a clean vacuum during the de-carbon process. That means clean out the vacuum before filling it with walnut shell material. You will go through a lot of walnut shell material during the cleaning process, and it can be re-used if sifted properly. Inexpensive metal sifters are available to quickly separate foreign material from usable media.
Carbon buildup needs to be removed from the base of the valves as well as toward the stem and up the intake port. This usually requires more than one pass with the blaster to completely clean. Due to intake port design, this can be tricky on certain engines. An example of this is the direct injected VR6 engine that has a deep curve in the intake port design. This is where different wand adapters can come in handy to access these tricky port layouts. It can become a time-consuming process of repeatedly cleaning and inspecting to ensure clean ports.
Always be aware of the media blaster wand position during use. Unintentionally removing the wand from the port adapter during cleaning can make a huge mess. These blasters can quickly damage paint and anything else that comes across their path as well, so be careful with this tool.
After the de-carbon process is completed for all cylinders, cleanup time can begin. Vacuum and air blast every errant piece of walnut shell material possible, while always protecting any exposed engine and body components. A single piece of residual shell material can clog a fuel injector or damage other components.
After removing all the air flow-robbing carbon from the intake ports, your direct injection Audi will run great again. Don’t forget to clear faults and run adaptations after the service to ensure a complete repair.
Download PDF


0 Comments