
The Victim: 2008 Touareg with VR6 FSI
Body Shop Mistakes – As if! (Part 2)
Primary and subsequent images are a story of what is seen and noticed during a diagnosis and at times some things can be missed. On this occasion, the body shop caused the error, didn’t follow recommendations and the only factor remaining was “the person that has access to the ON button†— which that happened to be yours truly.
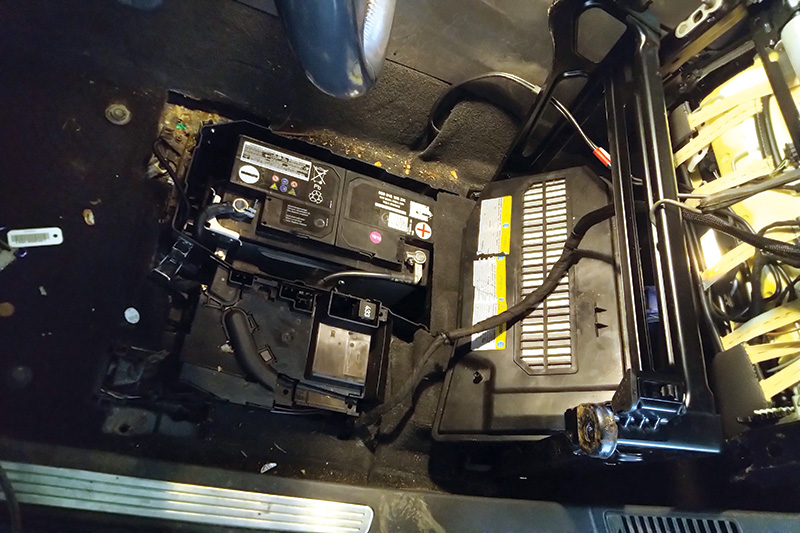
What about the photos and what is missing? View the front “Triple Square†(spline drive) seat frame
bolts that are covered in rust.
Know that it was a chore to remove them.
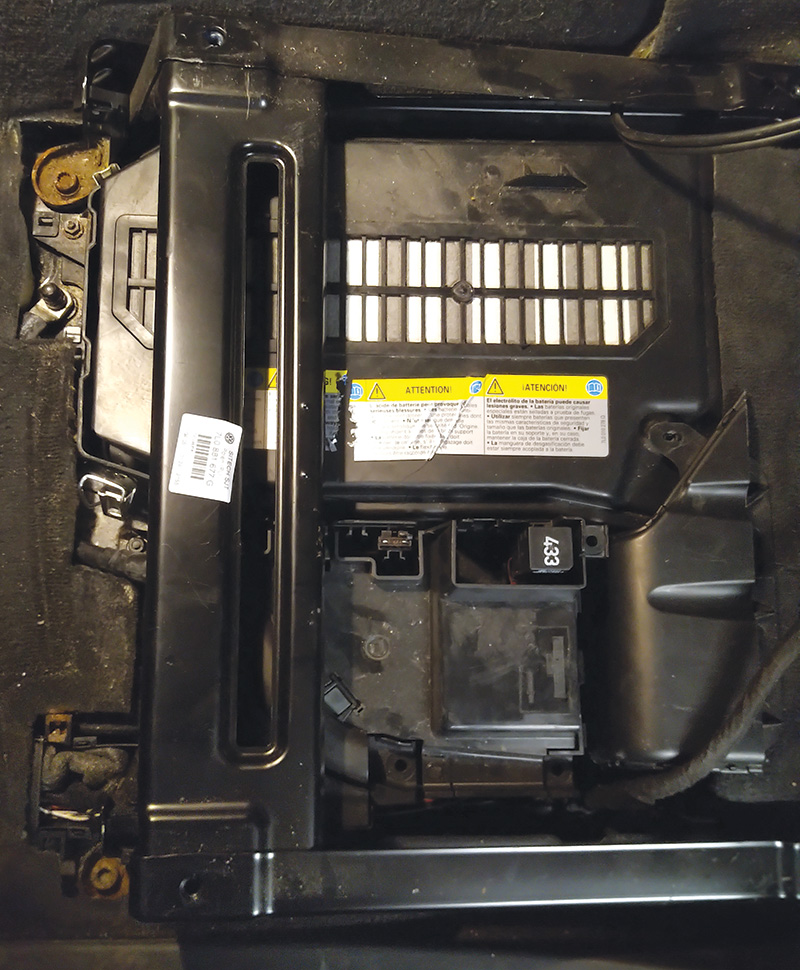
With the seat removed and frame out of the way, the entire fuse panel and battery were exposed for easy access. Unfortunately, there were some plastic parts damaged when someone attempted to remove the battery from the floor with the seat partially in place.
The diagnosis continued relentlessly, except for something that was missing!
The battery cover and fuse panel cover were also removed for an inspection.
Back to those photos (later the next day).

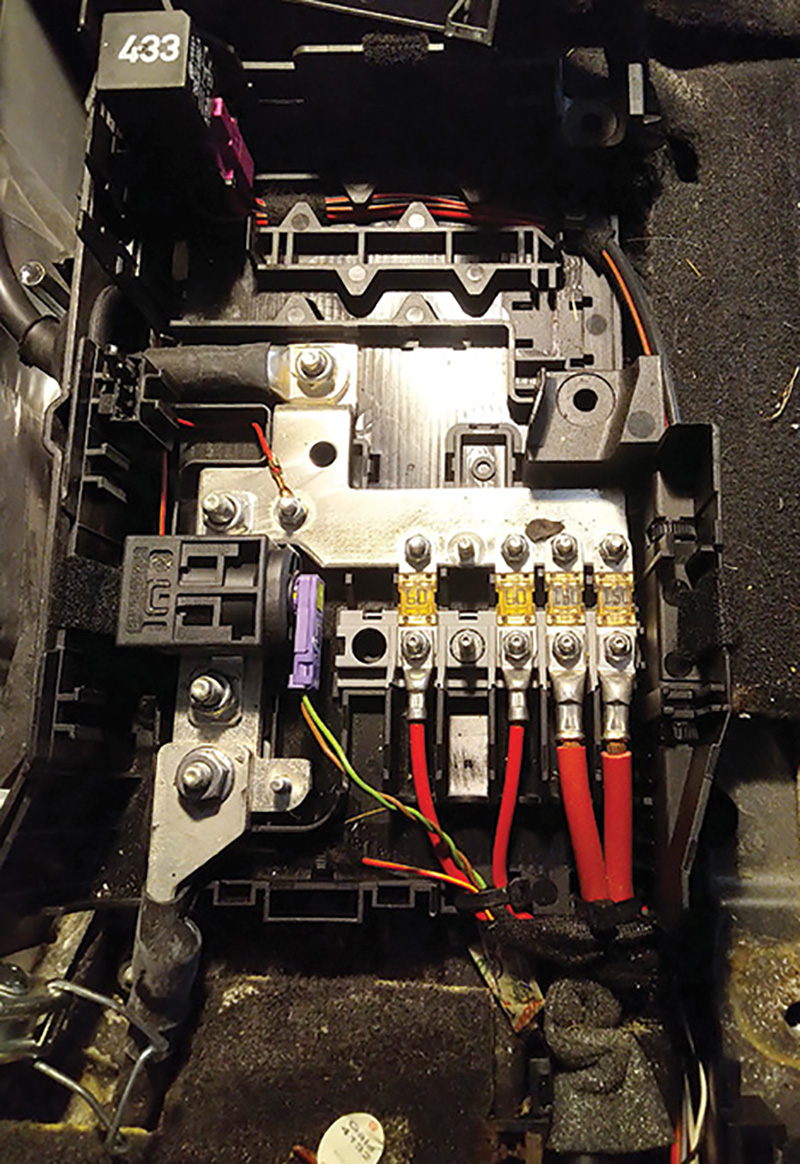
What is with that fuse holder and why would VW allow a hot connection to be exposed in that manner? What does that fuse circuit control and what was its designation?
With ElsaWin, a factory schematic and fuse panel layout were far more detailed and we had an epiphany at the moment. As if!
The drive back to the Lab, coffee in hand, became a relentless focus.
Match the three images on the following page – See what was missed.
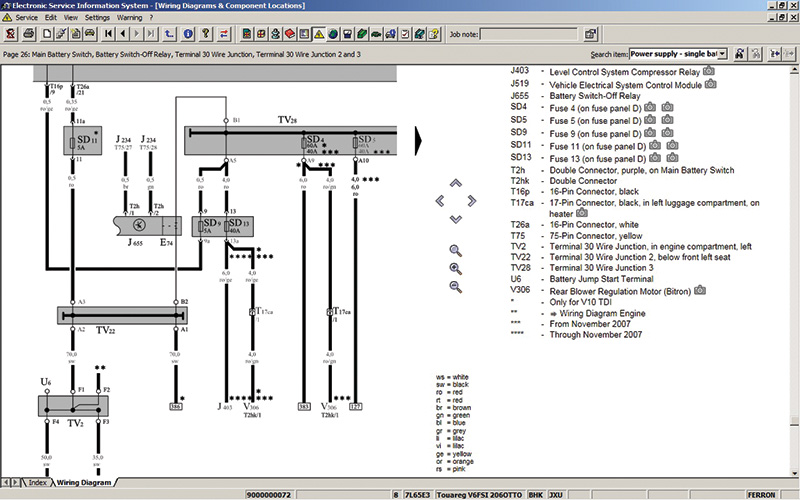
SD9 is designated as a 5 amp fuse for J519 Vehicle Electrical Control Module Terminal 30.
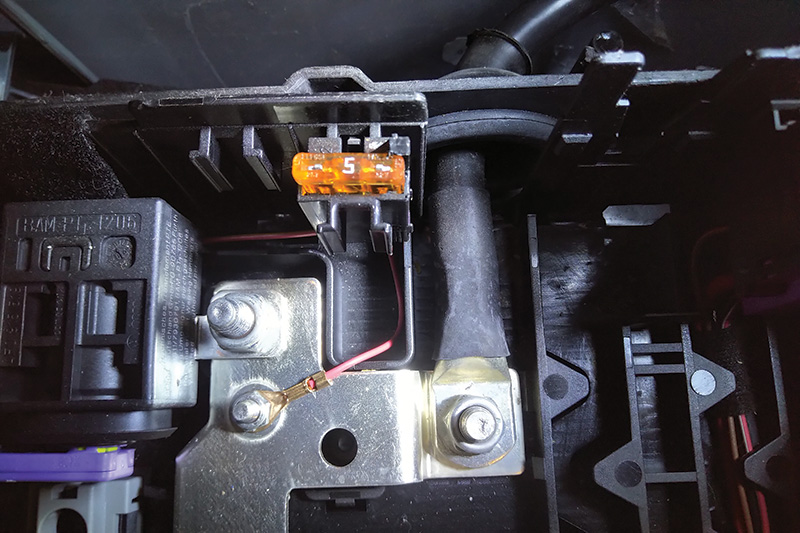
This time the fuse panel was lifted and carpet peeled back slightly. There it was — this 5 amp fuse well hidden from view and the epiphany took another turn. It certainly took a lot of work at the body shop to dislodge a hidden fuse from under the driver’s seat while shielded with a plastic protective cover.
While all of the “lab†work was being tested and progressed, multiple VCDS labels were edited to match this Touareg. The editing became crucial to ensure the identification of the parameters that were in the displays. The editing was especially helpful but it took up a tremendous amount of time, repeat testing, and thought. It was worthwhile, however.
The Energy Management system and the corresponding values changed in a dramatic fashion. With the editing and now testing the system with the “missing†fuse, none of the faults returned for address 05 and 09. Functions with address 16 worked perfectly.
The result was: the washers and wipers now operated as intended. Energy Management values were controlled and operated correctly because of that missing fuse.
The following is a detailed look at how Energy Management behaved and, be aware: this model Touareg only has one battery. High end models have another battery under the spare tire area.
So what really changed and what is the lesson?
- The body shop learned to not touch these systems (there is difficulty in believing that).
- Go back to the scene of the crime.
- If it doesn’t fit Ohm’s law, ask Lewis Black for an opinion.
- Read the data, something is missing and, if in doubt, write the script descriptions.
Where was the proof?
At Central Electrics and measured value 020 field 2, the earlier scan provided no voltage reading or a description. With the fuse removed and without a description, the reading would have never been evident. View image “Management test 1†in Body Shop Mistakes, Part 1, published last month on AutomotiveTechInfo.com.
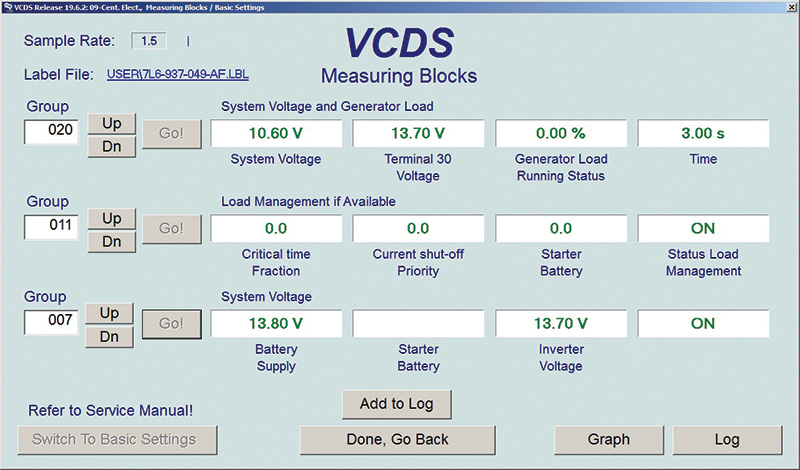
Another description is value 011 field 4 with changes when management is active.
How does Energy Management behave?
The simplest test is to create a parasitic draw with the active systems within the vehicle that has an energy management system.
Ignition key cycles and patience are factors and notice the decrease in the SOC (State Of Charge). Key cycles update the critical algorithms of how and when controllers shut down. This mention is because of one intrusion and that will be the scan tool.
The scan tool will keep some controllers alive with the key removed or turned off.
Therefore, cycling the key more than once over time when measuring an energy management system is directly proportional to how much the battery is discharged compared to the cycles and “held-onâ€
status of the scan tool.
Watching and listening to this Touareg was interesting when lights turned off, the radio turned off, seat heaters turned off, and the speed of the heater motor decreased quickly.
As if a 5 amp fuse created all these problems AND disabled both washer systems!
What does the Energy Management ID look like?
Now the difference is noticed at measured value 020, field 2. There is an identifier that describes the missing fuse. Group 007, fields 1 and 3 are also back to normal voltage.

Included is a test to “kill the battery†and watch Energy Management activity.
KOEO with VCDS, exterior and interior lighting enabled, the heater fan is at high speed, seat heaters enabled, rear windscreen heater enabled, radio/MMI with the CD and Pavarotti singing Nessun Dorma (No One Shall Sleep) at high volume. Now it’s working!
What voltage changes were seen at address 05 and 09? Was this missing fuse the cure?
Pay attention when testing Central Electrics with Energy Management. Dropping battery voltage and a few key cycles will show a difference with the related fields over time.
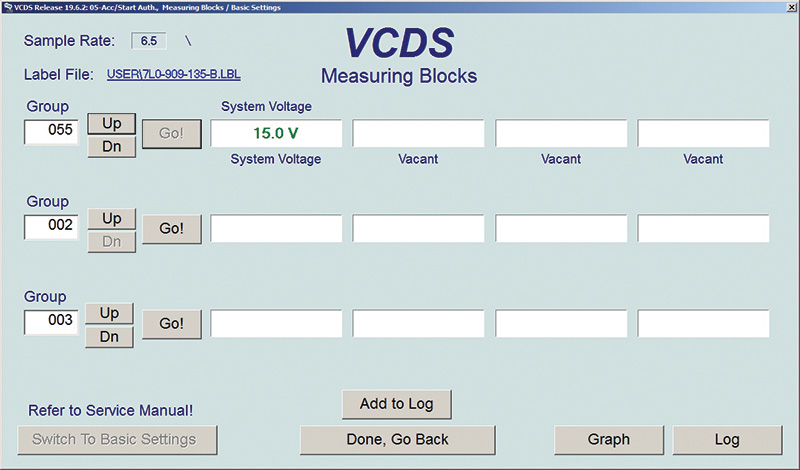

The measured value at group 055, field one was normal compared to 17.7 V. Look at the very first image related to the KESSY (Address 05 Start Authorization).
The measured values at group 022 with fields 1 to 3 were also normal compared to 17.75 V. Look at the earlier images and match these known good values to the defective values in the earliest part of the article.
An additional text is later included within the label at group 022, the heading will be “Voltage and Key Cycles – Recording.â€
Fields 1 through 3 indicate the last voltage recording with a key cycle and the last field is the actual key cycle count.
Resetting the counts is accomplished at Adaptations function 10 with a key cycle.
What are the baseline numbers with a system that is active? These last two images (Address 05 & 09; next page) should be considered a close baseline.
What was learned?
If the body shop touched it, go back to the scene of the crime.
Buzz box battery chargers are a disaster in the making.
If the voltage descriptions are not correct compared to Ohm’s law, take another look at what this article describes.
Learn to write/edit a label, test it and save it in C:\Ross-Tech\VCD\Labels\User.
Part 3 continues because of another existing problem with the rear gate wiring damage at the rear right side hinge.
Rear lift gate harness – As if! (Part 3)
Added to this article is one more outstanding issue; that concern was with an earlier fault that was repeating constantly.
Address 46 Central Convenience
01503 – Bulb for 3rd Brake Light (M25) 009 – Open or Short to Ground – Intermittent
With the seat assembly and lower panels attached, with a “hockey stick†pushing the brake pedal, interestingly, the third brake light would only work if the harness at the rear hinge was slightly pushed by hand. As if!
The body shop agreed to remove the interior panels to access the harness from the tilting glass windscreen and the side/upper interior/roof panels.
Caution: It is a lot of work to remove those interior panels.
The madness was to be at the body shop as the panels were close to being removed and the harness ready for removal and repair.
What was found?

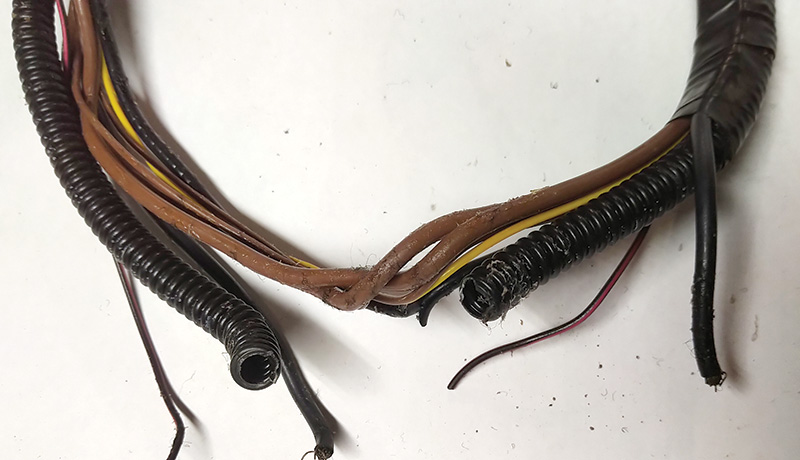
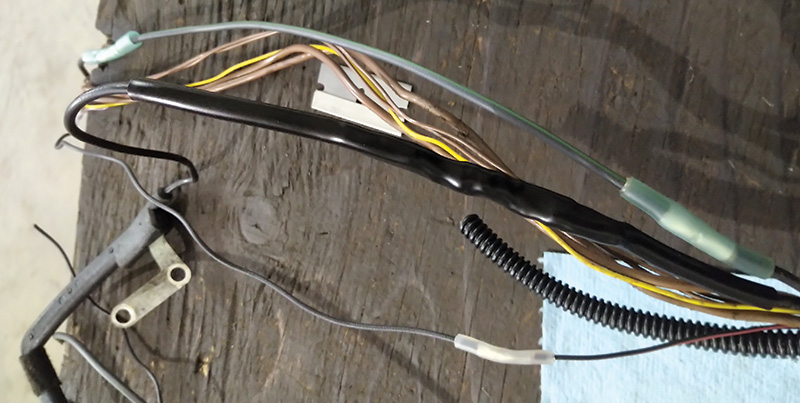
The washer hose cracked on the way out but, with a closer inspection, the power B+ wire for the rear window heater, brake light B+, and the Convenience Antenna were also damaged. (See “Primary damage,†on page 1.)
With any repair of this type that moves around a hinged assembly, replace the wire(s) before and after the movement of the hinged assembly. Use crimp and shrink connections on the harness for a perfect and robust repair.
Luckily, the cutting wasn’t at the hinge, the damage was to the interior side of the roof panel just before the hinged curve. It was still prudent to replace the major wiring front and rear of the hinged assembly with new wired splices.
As the harness was opened, a photo for length and taped positions was kept as a record. We kept the harness relatively taught to maintain the position. This harness is applied under the rear spoiler, behind the panel under the glass and through a roof opening.
The radio harness does not follow the curve of the hinge. The harness travels straight into the body and resides under the spoiler. The washer tube also follows from the interior body and under the spoiler. The washer connection is directly attached to the rear center brake light assembly via stainless tubing.
With the correct dimension wire and crimp/shrink splices, the pieces that bend at the hinge were replaced. Using the photos, the correct tape positions were an aid and definitely helped to install the harness with minimal effort.
The radio harness (antenna for Comfort Control) is a coaxial component and can be repaired. The choice was made to attach the center core with the clear/white 22 – 24 AWG crimp/shrink splices. The grounded weaving was attached at either end with crimp barrels and wrapping new copper wire. A long piece of shrink tubing was slipped over the harness and heated after the repair was accomplished.
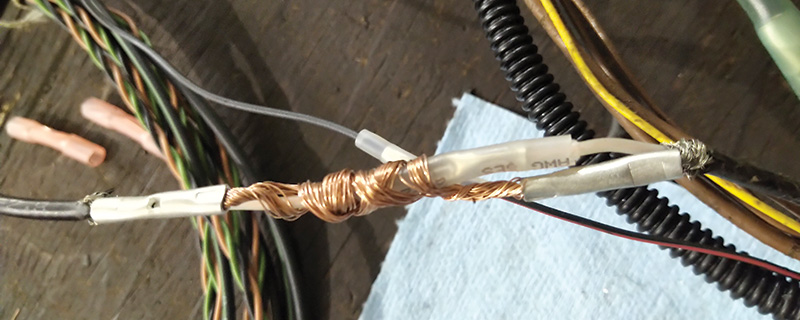

The washer tube repair was completed last and plastic line was heated/softened with a heat gun and pushed the corrugated tubes together. Later it was sealed with “The Right Stuff.â€
Why did this harness become damaged? At the hinge there is a rounded plastic protector clipped to the hinge, but it also has an exterior cover that keeps the shape of the harness and holds it in place. That plastic piece was lodged between the protector and the hinge.
It was a disaster over time. As if!
It reminds me of the last verse of Nessun Dorma No One Shall Sleep: “At dawn, I will win!â€
Download PDF


0 Comments