
Get ahead of shifting complaints
The modern day Mercedes-Benz automatic transmission is a complex, efficiently-engineered marvel with a harmonious synchronization of digital electronics, mechanical gears, and hydraulics. These characteristics deliver a proven drivetrain that rivals none. But what happens when things get out of kilter? Transmission diagnostic trouble codes, rough shifting, stuck in gear or skipping gears? Equipped with a factory-compatible scan tool and some knowledge, you don’t have to be fearful of taking on these issues in your shop. Some might be solved with a simple fluid and filter change or a software update. Sometimes it’s as simple as educating the customer on how the system operates. In this article, we’ll take a look at some of the common issues associated with today’s transmissions.
Before we get started, we need to point out the fact that without either a XENTRY Diagnostics system or at least a J2534 v05.00 API tool (preferably with a 4CAN channel), as well as a subscription to the Mercedes-Benz ISP Portal (formerly known as STAR TekInfo) you won’t be able to do much in the way of diagnosis and certainly no programming or SCN coding.
722.9 Transmission
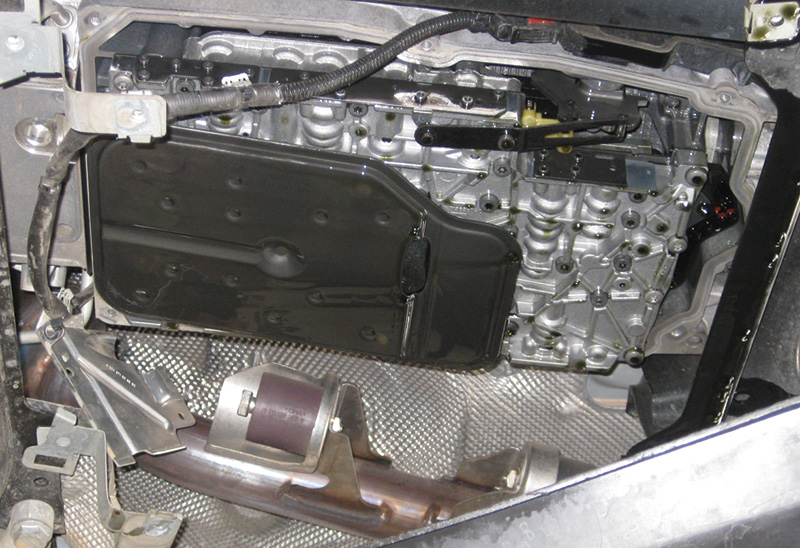
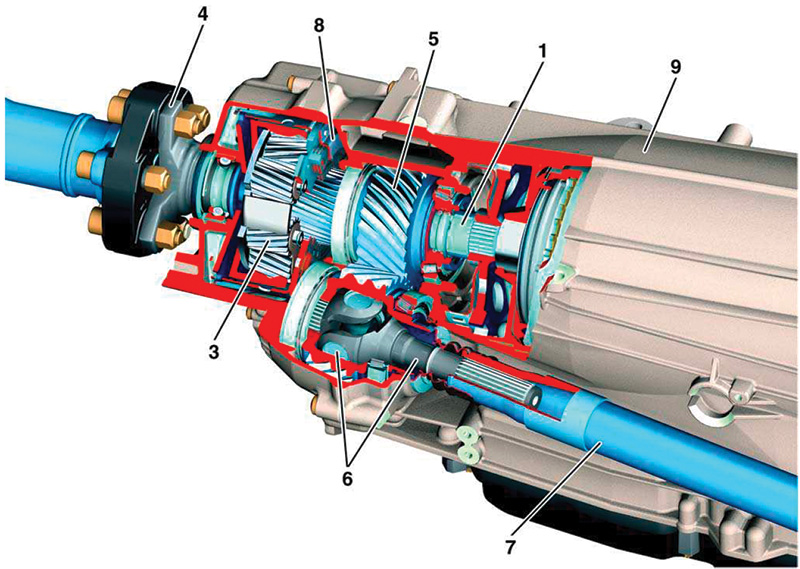
One of the most popular transmissions in the Mercedes-Benz line, the 722.9 NAG2 is also the one that often you will find that a module replacement or software update solves a lot of drivability problems. This transmission is an electronically controlled automatic transmission with 7 forward gears and 2 reverse gears. The ratios for the gear stages are achieved using planetary gear sets. All the transmission functions and components for this transmission are combined in one assembly module. The integration of the electric controller unit (VGS, Y3/8) in the transmission means that the interfaces to the wire harness have been minimized. This improves the shift quality, increases the service life and reliability, and also has the added bonus of lower maintenance costs.
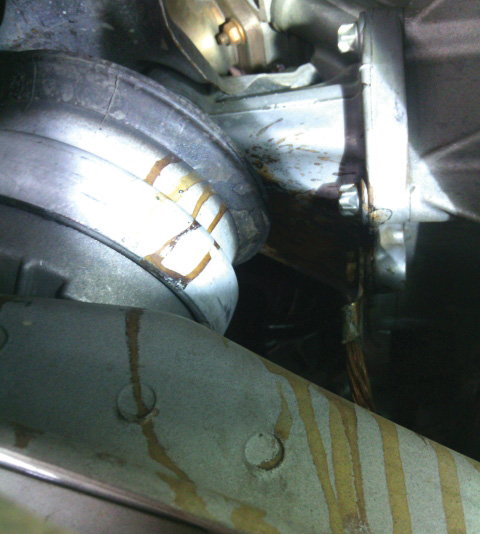
The famous plug connection at the transmission housing where it enters above the pan is a spot that can routinely cause some issues. Obviously a module update isn’t going to fix that, but if you have CAN communication errors with the VGS, check the plug, especially on the 722.6 NAG1 transmissions found in older models. Many times you will find it leaking and a thorough inspection of the electrical contacts may reveal the source of your communication error. Also important, check the other ends of the harness: fluid can wick all the way up the harness at times even into the ECM connector.
Torque Converters
One possible complaint that may turn up in your bay is a car that has a shudder, often described as an ignition misfire under partial load. Another possible complaint is when a faulty torque converter lockup operation seems like the throttle is not working. This may be due to a self-protection feature to keep the transmission from overheating, or it’s waiting for the converter to lock up before returning to normal throttle. A scan and thorough inspection of the engine reveals no actual ignition or fuel problems.
This vehicle has the 722.9 7-speed transmission. With a factory scan tool, complete a quick test and look for any relevant transmission fault codes. Using the freeze-frame data and torque converter actual values, try to determine when the fault occurs, gear range, torque etc. Temporarily deactivate the torque converter lockup solenoid then road test to verify that the issue is with the torque converter. The menu on the scan tool may read something like “Closing of torque converter lockup clutch.†If no further shudder is found after deactivating the torque converter you now have narrowed down the culprit. The issue is due to failed or improper torque converter operation. There could be a malfunction at the torque converter lockup clutch or the torque converter lockup clutch valve, as well as a worn lockup clutch in high-mileage vehicles.
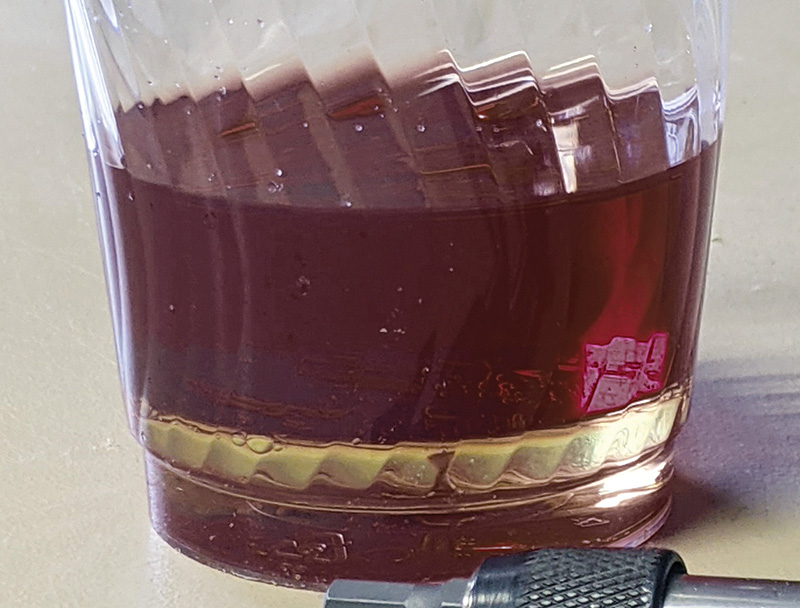
Before condemning the torque converter, check the basics, such as fluid level. Verify the correct transmission fluid is being used, perhaps by questioning the customer if any fluid has been added, and checking the dipstick seal isn’t broken. The incorrect fluid can damage both seals and clutches in the transmission. Also verify that no coolant contamination exists. Use the glycol test procedure in DTB P-B-27.55/50g (or later), or take a sample and put it in a clear container and let it sit for a few minutes. The coolant will separate out and be visible at the bottom of the transmission fluid. This can be caused by a faulty transmission cooler, so be sure to identify and address the root cause. Note that service bulletin LI27.20-P-046908 advises that in Model 211 E-Class vehicles with the 722.6 transmission, worn fluid can cause shuddering. After verifying the fluid isn’t contaminated with coolant, perform a fluid flush to restore proper operation.

Check the transmission pan for metal contamination. If a significant amount of metal is found in transmission, it may be time to recommend complete replacement, and be sure to flush the system thoroughly. Verify all software is updated for the transmission control unit. Re-adapt the torque converter and transmission shift points with the scan tool. It is important also to verify that there are no issues with the engine or transmission mounts, as these have been known to cause shift or judder complaints.
If your customer’s concern is more of a slipping issue or the vehicle doesn’t appear to accelerate normally, read the torque converter slip speed. See bulletin LI27.20-P-057339 for more information. This bulletin states that a slip speed of 10 or lower is good, and if a slip speed higher than 10 over a long period with active actuation (e.g., highway driving) is found, there is probably a fault in the torque converter lockup clutch, which means the torque converter needs to be replaced.
For vehicles with transmission production dates of April 2011 to August 2015, see service bulletins LI27.20-P-064558 (passenger cars) and LI27.20-P-055758 (vans, but only to December 2013 production). These bulletins address a complaint of poor acceleration, and will store codes FC 2783 (Friction power of torque converter lockup clutch is too high) or FC 0741 (Actuation of torque converter lockup clutch not possible) in the transmission control unit. This can affect all 722.9 transmissions (7G-TRONIC PLUS) from the listed production months. The two fault codes can also occur in combination with rpm sensor faults, but these are unrelated to this complaint.
The possible cause is increased wear of the torque converter bearing bushing, due to a rough microsurface of the journal at the transmission end. The solution is to polish the transmission input shaft using a special 15 µm polishing film (available from Mercede-Benz) and replace the torque converter, except in vehicle with engine M271, where a software update might provide a remedy. If you have these fault codes and complaint, it is important to follow the instructions from the service bulletins (they both deal with this topic) carefully, as we don’t have the space to deliver complete details here. Also note that replacing the torque converter requires it’s lifecycle data to be reset.
Sensors
Customer concern: check engine light is on with erratic shifting, sometimes going into limp mode (‘stuck in gear’). Customer can shut the vehicle off and, after restarting, shifting may be normal for a short period of time. After performing a test drive to verify the concern, a thorough inspection should be performed including a fluid check and history of maintenance. Scan tool diagnosis reveals DTCs 2767 and 2768 (Y3/8n2 Internal speed sensor (VGS) is faulty) and possibly others. Y3/8n2 is also known as the RPM sensor. It is important to consult the XENTRY Tips article LI27.50-P-049710 as this has specific instructions pertaining to this and several other codes.
Follow the guided test steps in XENTRY and you may be directed to replace the electrohydraulic controller unit. It should be noted that in some cases there is a repair kit available when directed to do so, which is detailed in Mercedes-Benz WIS (Workshop Information System) document AR27.19-P0220B. It is also important always reinstall the solenoid valves to their original positions, otherwise the calibration mismatch will trigger poor shifting. If you have to replace a solenoid, re-learning the solenoids along with proper programming will have the transmission shifting properly again.
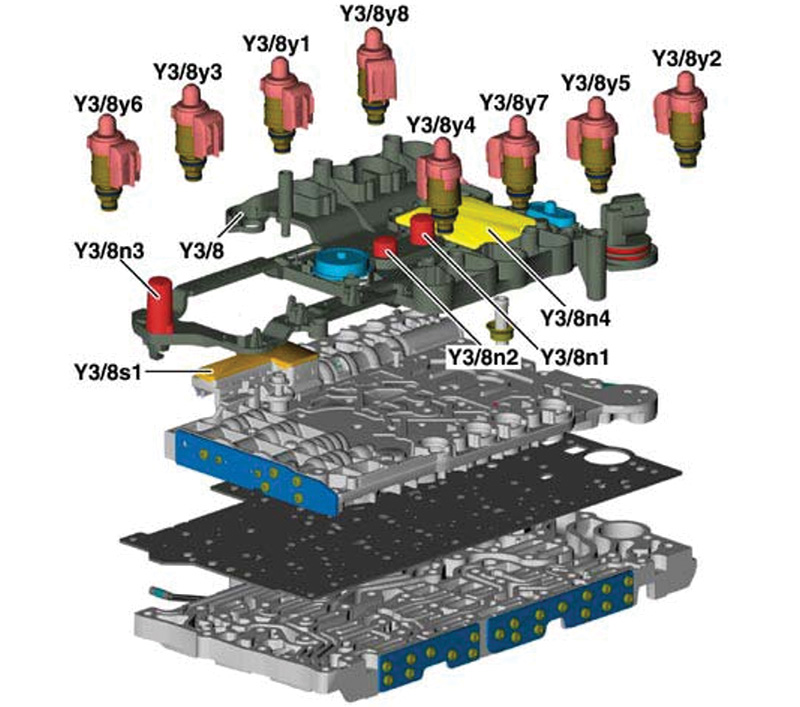
The transmission control unit and sensors are part of the valve body. Replacement requires an online connection with Mercedes-Benz to perform module coding and flashing of the control unit software. Replacement of just the control unit per the service bulletin differs from a complete valve body replacement as the adaptation data, coding and valve body calibration data can be transferred from the old VGS control unit to the new VGS control unit. This data from the old VGS control unit is temporarily stored in the XENTRY Diagnosis unit by processing one of the above codes, and by using the same XENTRY system to perform initial startup of the new unit the data is transferred. Failure to do so will result in the necessary data not being transferred and improper transmission function.
Here is important information to note when replacing a transmission electro-hydraulic control module: on some models, it is crucial to consider any fault codes for the respective model year and note the presence or absence of an auxiliary oil cooler. It is therefore necessary to inspect models with or without auxiliary oil coolers before ordering the transmission electro-hydraulic control unit when the vehicle production date is after 01/2007. The auxiliary oil cooler in models with Engine 273 and Engine 642 is in front of the radiator and air-conditioning condenser and is connected in series with the existing oil/water cooling system of the radiator. Failure to do this may prevent Star Diagnosis from correctly programming and coding the valve body.
Connectors
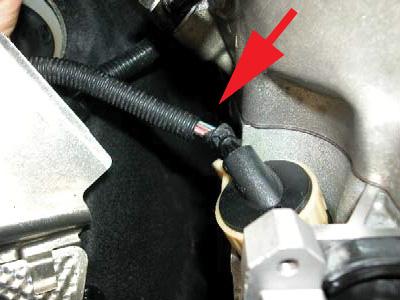
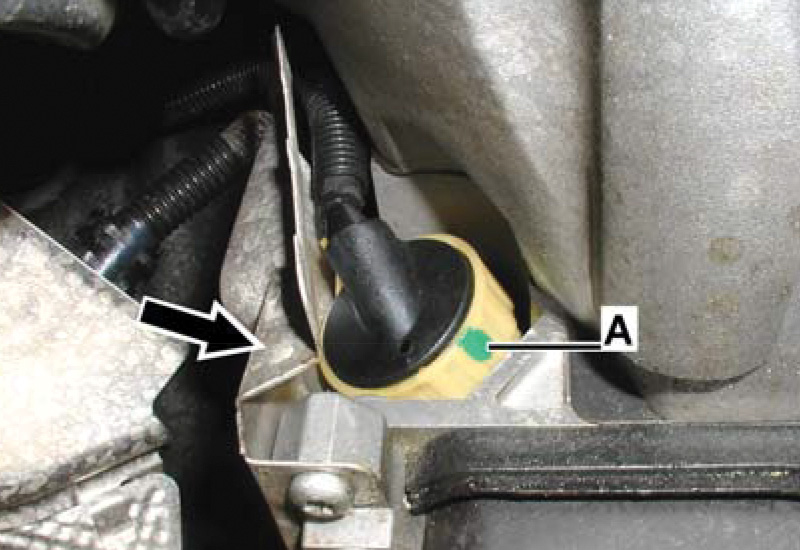
As we mentioned previously, the electrical connector to the automatic transmission was notorious for developing a leak, which can not only result in low fluid levels (itself a cause for some complaints) but also poor electrical contact. You also need to check the wiring harness for possible fluid contamination and correct it, using contact cleaner spray and compressed air, if found. When you replace the connector and its O-rings, be sure to check that the wiring harness is routed in a completely tension-free manner, with sufficient slack to ensure the wiring never pulls on the connector.
Juddering or Shuddering
Not every complaint of juddering or shuddering is caused by the transmission. It could be entirely mechanical, or an engine control concern. Conduct a thorough inspection including a short test for codes. If your diagnosis doesn’t turn up anything surrounding the transmission it’s time to look at other possibilities.
- Inspect all engine and transmission mounts.
- Inspect all sub frame and differential mounts.
- Remove driveshafts and operate/inspect flex joints or U-joints to detect any binding. Mark drive flanges on disassembly so that they are matched on reassembly.
- Consult WIS for a description of the transfer case on the 7-speed transmissions, as faults here can cause shuddering complaints.
- Further tests should be conducted by referencing bulletin LI28.00-P-051499. There is diagnostic tree that specifically deals with judder complaints.
- If the transfer case is the cause of the vibration or noise, be aware that the transmission and transfer case may only be sold together as an assembly.
Communication
Many times your quick test may turn up a communication error with the transmission control unit. To narrow this down, remove the electrical connector from the 722.9 transmission. Using a voltmeter test for battery voltage between pins 4 and 5. Leave the voltmeter ground connected to pin 5 and connect positive lead to the communication wires at pins 1 and 2. DC voltages should be about 2.4 and 2.6 volts with the CAN Bus active. If the voltages are incorrect, check the wiring and CAN potential distributors.
On pins 1 and 2, use a lab scope to verify a correct-looking CAN signal pattern on both CAN high and CAN low. If the signal appears distorted or missing, use the wiring diagram for the model in question to inspect the wiring between the CAN Bus and the transmission. If you find you have correct CAN signals, power, and ground, suspect a faulty control unit. As with all intermittent problems, verify that the fault reappears after clearing any codes.
About Fluids
The 5-speed automatic transmission 722.6 and the 7-speed automatic transmission 722.9 up to transmission production date June 21, 2010 use only transmission oils meeting MB-specification sheet 236.14, such as Mercedes-Benz part number A001 989 68 03 10. The 722.9 versions built after June 21, 2010 use only transmission oils meeting MB-specification sheet 236.15, such as A001 789 78 03 09. Note that other transmission models, such as the newer 725.0 NAG3, use a completely different oil altogether, so be sure to verify the correct fluid for the job, as explained in the article “The Right Stuff†elsewhere in this issue. In all cases, visit the MB BeVo web site (just search “MB BeVo†to find it) to verify the part number.
It is important to note that the two types of 722.9 transmission oil are not compatible with each another and cannot be mixed. The later oil can be identified by its blue color as opposed to the previous which is red. Your local Mercedes-Benz dealer’s parts department may be able to sell you fluid in bulk if you have larger containers to store it in.
There is one exception you should be aware of: transmissions, electrohydraulic controller units and torque converters made available through the parts department are checked at the production plant with FE ATF-134 only, which is blue. These parts may exhibit traces of FE ATF-134 and are not cause for concern. Simply fill the system with the corresponding fluid for the model you are servicing.

Check the TSBs
Every model in the Mercedes-Benz lineup has different engineering characteristics, and there is a wealth of information available with an ISP Portal subscription and XENTRY Diagnostic system. Always consult every available bulletin and repair manual to be sure to have the latest information. In some cases, an internet search can turn up useful information, but if it’s not from Mercedes-Benz, be careful because not everything in the internet is accurate.
So there you have it: Many of the causes of the most common transmission performance complaints have long since been identified and are published as service bulletins. Of course, never forget the basics before starting an expensive repair, where an extra 10 minutes checking can save hours of labor. Careful research and the right tools can lead to one satisfied customer after another which, if you think about it, is everyone’s goal.


0 Comments