
The world’s greatest fictional detective, Sherlock Holmes referred to electricity as “the high priest of false security.†Thankfully, electrical devices are much more reliable now than they were during the late 1800s in Victorian London. These days, electrical systems are very reliable indeed, and this is demonstrated by how well they hold up under very demanding conditions in today’s automobiles.
Take an engine’s ignition system for example. A six-cylinder engine turning at 4000 RPM has 12,000 ignition firings per minute. That’s 200 sparks every single second. A 10-year-old ignition coil will likely have somewhere around 3 billion cycles on its clock! It’s amazing how reliable these parts are. However, no matter how well engineered and how well a thing is made, nothing lasts forever.
This article will focus on Toyota’s ignition system. We’ll cover system operation, the best testing methods, and typical failures. We’ll be focusing on Toyota’s Direct Ignition System (DIS), sometimes referred to as Coil On Plug (COP), since that’s what you’ll find on the majority of Toyota cars currently.
Key Players
Toyota has built their reputation on consistency. A key part of the Toyota Way doctrine is to use standards whenever possible, in part to create that consistency. This makes learning about Toyota ignition systems easy; the signal and part names have remained consistent since Toyota’s early electronic ignition systems all the way through to the latest model years.
The following is a list of the key input and output signals in Toyota’s ignition system. Once you learn these, you’ll be able to quickly understand any Toyota ignition system with a quick read over the information on Toyota’s Technical Information System (TIS).
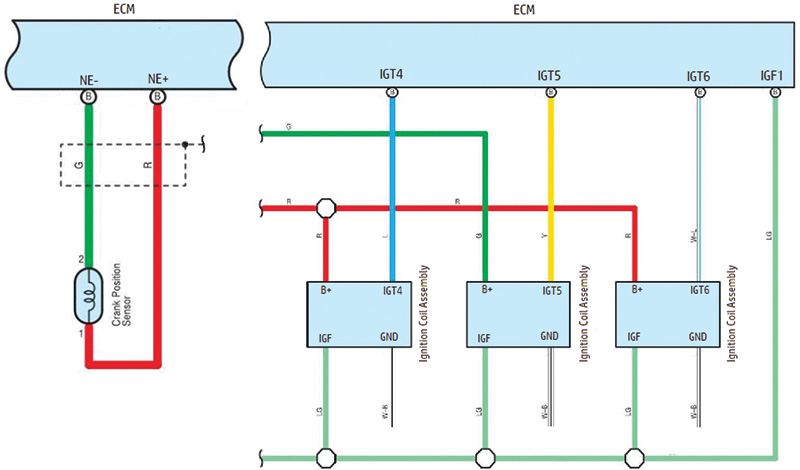
NE +/NE – (Crankshaft Position Sensor Signal)
The NE signal holds information about crankshaft speed and position. It can be produced using different sensor designs and distributed with different circuit layouts, but it’s used for the same purposes, such as ignition timing, misfire detection, transmission operation, or any other system that needs crankshaft speed and position data.
Toyota favors variable reluctance (VR) sensors for their crankshaft position sensors on both older and newer vehicles. The VR sensor consists of two components: a reluctor and a pickup. The reluctor looks a bit like a gear, with protruding teeth, and it’s connected to the crankshaft. The pickup is a stationary two wire sensor and is mounted to the block. When a reluctor tooth passes the pickup, the pickup generates an AC voltage. The ECM monitors the changes in voltage to determine the speed and position of the crankshaft.
Toyota recommends using an oscilloscope to test the crankshaft sensor. Connect the oscilloscope’s positive lead to NE+ and the negative lead to NE-. The signal should be measured as close to the ECM as possible, so the entire circuit is tested, not just the sensor. However, this may not always be practical, depending on ECM location. Toyota includes waveform examples on TIS, which you can use to compare against your own measurements.
G/VVT (Camshaft Position Sensor Signal)
The G or VVT signal provides camshaft position information to the ECM. The ECM uses this signal in conjunction with the NE signal to determine which cylinder is at TDC on the compression stroke. On older cars without variable valve timing, the service manual calls it the G signal. On newer cars with VVT, the service manual calls it VVT. This data is critical to determining camshaft angle, ignition timing and fuel injection timing.
The camshaft position sensor generates the G signal. Older engines may only have one cam position sensor, located on an intake camshaft. On V6 and V8 engines, one bank may not be monitored and the ECM assumes that the cam timing is correct. Newer engines have a cam position sensor for each camshaft.
There are two styles of cam position sensor. Older cars have a VR sensor, just like the sensor used to create the NE signal. Newer cars use a 3-wire Hall effect sensor, which produces a digital signal, typically a 5V square wave. Once again, TIS has example waveforms for you to compare.
KNK (Knock Sensor Signal)
The knock sensor is another important input for the ignition system. Four-cylinder engines usually have a single knock sensor. V6 and V8 engines have one sensor for each bank. The ECM continuously monitors the knock sensor signal. If the ECM detects knocking, it will retard the ignition timing until the knock is no longer present or its adjustment limit is reached.
IGT (Ignition Timing Signal)
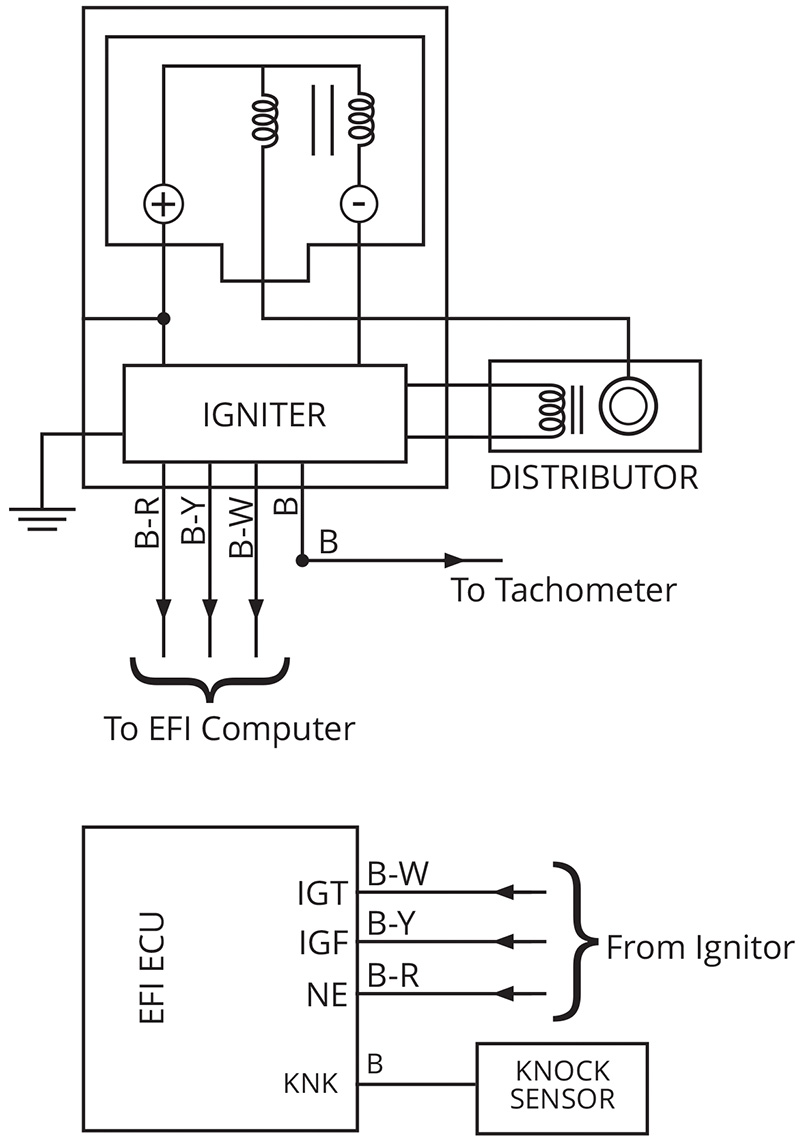
IGT is the ignition timing signal. It’s a 5V square wave pulse generated by the ECM and sent to the igniters. Modern Toyota vehicles have one ignition coil for each cylinder. Each coil has an integral igniter.
Every time the ECM sends an IGT pulse to an igniter, the igniter opens the ignition coil primary circuit, and the ignition coil produces a spark for the spark plug. The ECM can control the ignition timing by controlling the IGT pulse.
IGF (Ignition Confirmation Signal)
The ECM uses the IGF signal to confirm each ignition coil has fired after it sends an IGT pulse. The ECM supplies a 5V reference voltage on the IGF circuit shared by all coils. Each time a coil fires, its igniter pulls the IGF 5V reference voltage to ground.
If the ECM doesn’t receive an IGF pulse in response to an IGT command, a P035x ignition coil code will set for the cylinder with the missing IGF pulse. The ECM will also likely turn off the fuel injector for that cylinder to prevent damage to the catalytic converter.
Testing Methods
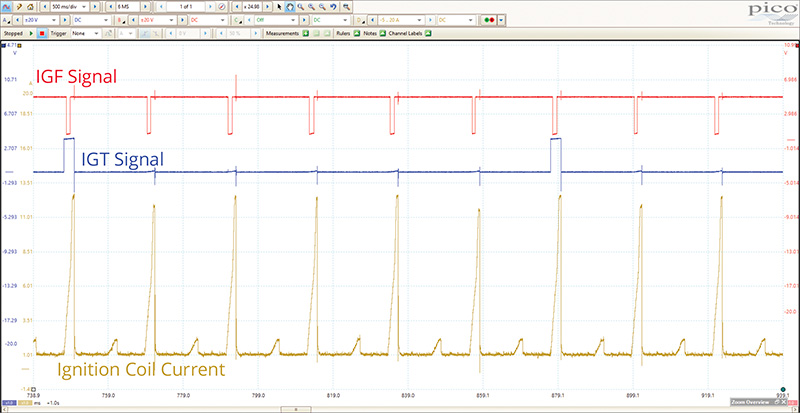
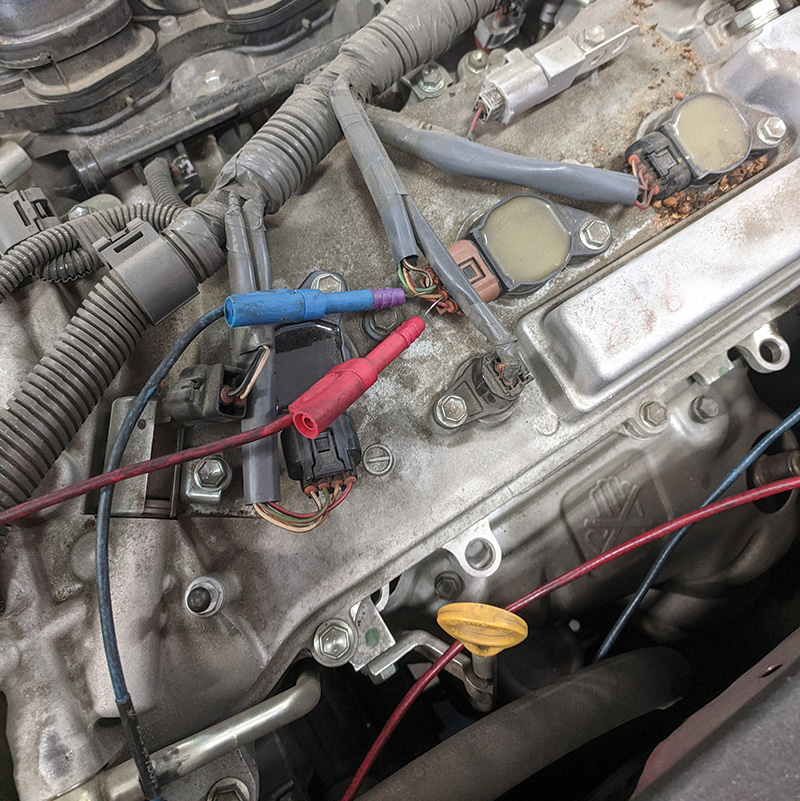
The best non-intrusive method of testing a Toyota Direct Ignition System requires a lab scope with at least three channels. (See “IGT & IGF Signals with Coil Current.â€) The three channels should be connected to the vehicle as follows:
- IGT signal at an ignition coil, preferably the suspect cylinder.
- IGF signal at any coil because they share a common circuit.
- Amp Clamp on power or ground feed to the ignition coils.
This testing method gives a bird’s eye view of the ignition system and will allow all ignition coil current ramps and IGF signals to be monitored. Fuel injector current can often be viewed during this test as well, if the fuel injectors are powered by the same fuse as the ignition coils.
This method is not possible on all vehicles, however. Certain models and years don’t use a dedicated fuse for the ignition coil power feed. If the power feed circuit can’t be accessed easily, it may be possible to connect the amp clamp to the ground side of the coils at a common ground location.
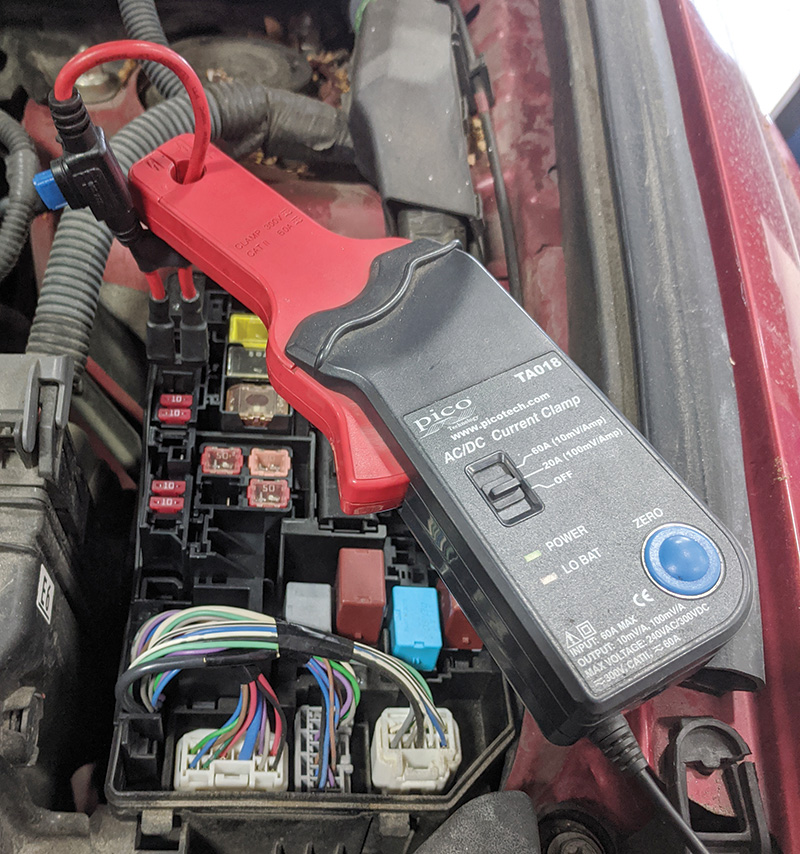
The primary windings cannot be directly accessed for testing due to the igniter being part of the circuitry inside the DIS ignition coil, so the only option for primary ignition testing is ignition coil current with an amp clamp.
The secondary ignition can be tested intrusively using a spark tester or secondary lead extension. However, these methods disturb the components and removing an ignition coil to install a spark tester or secondary lead extension could temporarily ‘fix’ a spark leakage issue. A non-intrusive option to test the secondary ignition would be an inductive pickup wand like PicoScope’s COP wand.
Types of Failures
Ignition system failures can be grouped in two basic categories: input failures and output failures. Input failures can come in a variety of sensor or wiring problems. Input problems can also be a result of incorrect repair or inadvertent damage during engine repairs. For example, damaging the reluctor teeth on a crankshaft sprocket during a timing belt replacement.
Output failures are typically either an ignition coil failure, a spark leakage issue due to carbon tracking, or a faulty spark plug. Areas that are prone to rodents getting under the hood of vehicles may also see wiring damage to the ignition coil circuits. The symptoms of these failures can range from a single cylinder misfire to a no start condition, or various drivability and performance concerns.
Input Failure Example
One example of an input failure is from the following 2009 Tacoma with a 1GR-FE 4.0-liter engine. The symptoms for this truck were the check engine light being illuminated and an extended cranking time. Hooking up a lab scope to the crankshaft sensor and both camshaft sensors resulted in the “2009 Tacoma Cam – Crank Waveform†shown on the previous page.
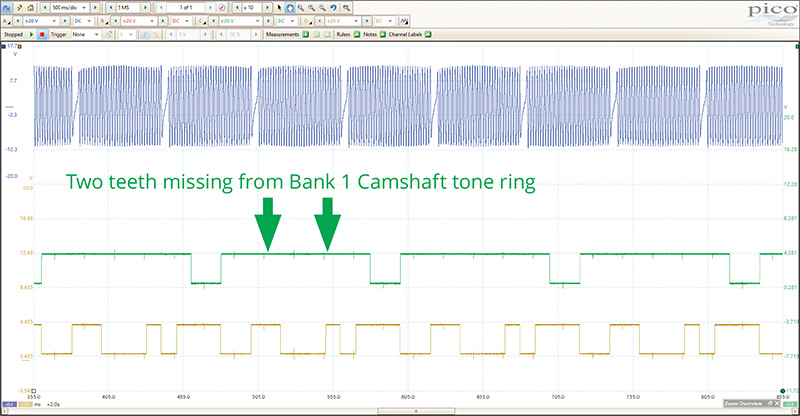
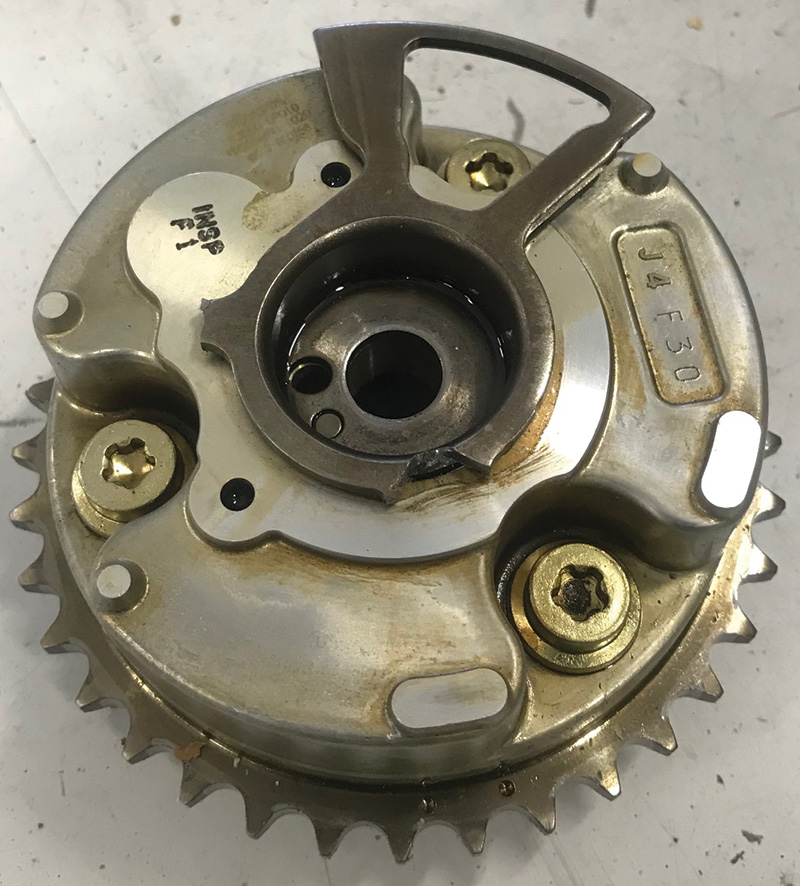
The variable reluctance crankshaft sensor is shown with the blue trace and the Hall effect camshaft sensors are shown by the green and gold traces. The capture clearly shows two missing pulses from the green camshaft sensor trace.
The magnet on the camshaft sprocket originally had three protrusions. Two had broken off (see “Cam gear with broken tone ring†on previous page), which explained the two missing pulses in the waveform. This signal is used for injector timing and ignition timing. The truck was able to start without a proper signal, but it caused an extended crank while the ECU searched for the expected sensor output, and of course a trouble code once it realized the sensor output was incorrect.
Output Failure Example
The image on page one (“Ignition Boot Spark Leakage…â€) and the carbon tracking on the spark plug (right) are examples of an output failure. These components were taken from the same cylinder on an engine that would misfire under a load.
Vehicle Case Studies Sienna With a Bad Coil
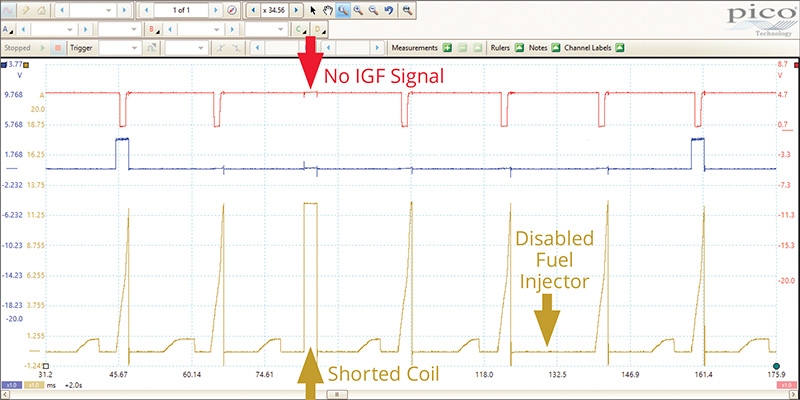
This first vehicle study is taken from a 2006 Sienna with a 3.3L V6 3MZ-FE engine. This vehicle had a single cylinder misfire and the check engine light was flashing. The faults present were a P0305 and P0355 for a Cylinder 5 Misfire and Cylinder 5 Primary/Secondary Circuit. In this transversely mounted V6 engine, cylinder 5 is on the rear bank covered by the intake plenum.
With the preferred testing method of using three channels of a lab scope the problem can quickly and easily be identified. There is no need to swap components to a different cylinder to see if the fault will follow. The waveform clearly shows that Cylinder 5 ignition coil is completely shorted, with no gradual ramp up to the current flow. The shorted coil has resulted in no IGF confirmation signal. The ECM then sets the P0355 Primary fault and shuts down fuel injector operation for that cylinder.
RAV4 Coil Refuses to Confirm
The final vehicle study comes from a 2007 RAV4 with the 2GR-FE V6 engine. The owner of this vehicle was concerned that the check engine light was on and the engine was intermittently running a rough at idle. A fault scan using Techstream revealed a P0354 Cylinder 4 Primary/Secondary fault, but it also showed individual misfire faults pending for all six cylinders.
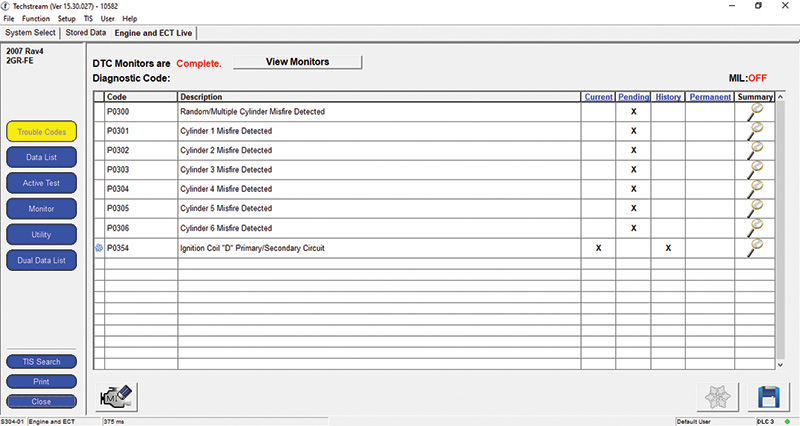
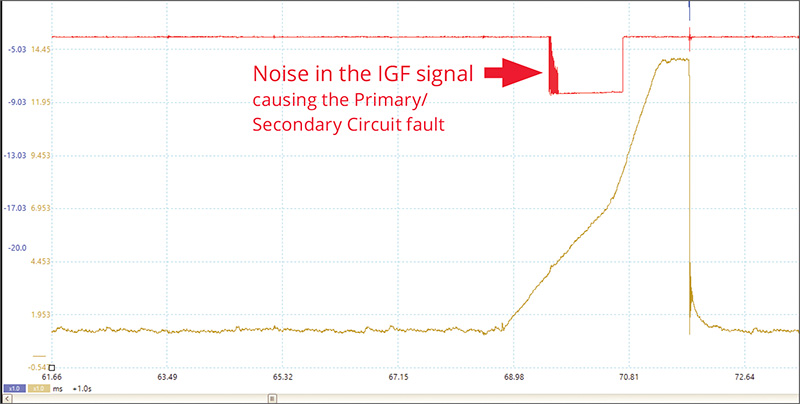
Using the same testing method of an amp clamp on the ignition coil fuse and two channels on the IGT and IGF signal wires, the following waveform was captured. The image shows the cylinder 4 ignition coil current-limiting ability has failed. The coil is drawing 14 amps of current, when all the others are at 12 amps or less. This excessive current affects the IGF confirmation signal for this coil, keeping in mind that the IGF signal is created by circuitry inside the ignition coil.

Zooming in on one of the Cylinder 4 ignition event shows the IGF signal breaking down. Ultimately, the real cause of the misfire on this vehicle was the IGF circuit inside the cylinder 4 ignition coil. The excessive coil current caused the IGF signal to break down which the ECM interpreted as an ignition failure and disabled the fuel injector resulting in the intermittent rough running this RAV4 was experiencing.
The misfire detection system often flags misfires for several cylinders, or even all the cylinders, when a primary circuit fault code is present. The best practice in this situation is to focus testing and repair efforts toward the cylinder with the primary fault code. In most cases, the remaining misfires were sympathetic faults flagged incorrectly and will not return.
Given the increased reliability of electronics, and logical methods of deduction available to today’s technicians, We think that Mr. Holmes surely would have changed his mind about electricity. He may have even traded his trademark pipe and hat for an oscilloscope! And if asked what he thought of electricity, his response just might be, “Elementary, my dear Watson!â€

0 Comments