
Vehicle studies that highlight key points to remember when working through the diagnostic repairs that come into the shop every day.
Astronaut Garrett Reisman tells an incredible story of quick thinking and problem solving while he was on a spacewalk to install a new antenna on the International Space Station. Once the antenna was attached to the boom extension arm it needed to be plugged in quickly to power the internal heater circuits. Everything was going according to plan, but when trying to plug in the antenna heater, the connectors would not fit together. No matter how hard he tried to push on the two halves of the connector they would not fully seat and click into place.
With only a few minutes to spare before the multimillion-dollar antenna would freeze in the subzero temperatures of low earth orbit, Garrett came up with a plan. He knew that the sun would soon be back in view as the space station continued in its orbit. When the sun’s rays peaked around the edge of the earth below, he held the receiver side of the connector out in the sunlight, while shading the other half inside his glove. The heat from the sunlight caused the receiver half of the connector to expand allowing the two pieces to finally clicked securely together.
Most of us will never experience the thrill of problem solving at that extreme level but reading the clues and nailing down a difficult intermittent problem in record time can sure feel like it. The following vehicle studies highlight key points to remember when working through the diagnostic repairs that come into the shop every day.
Frozen Sequoia
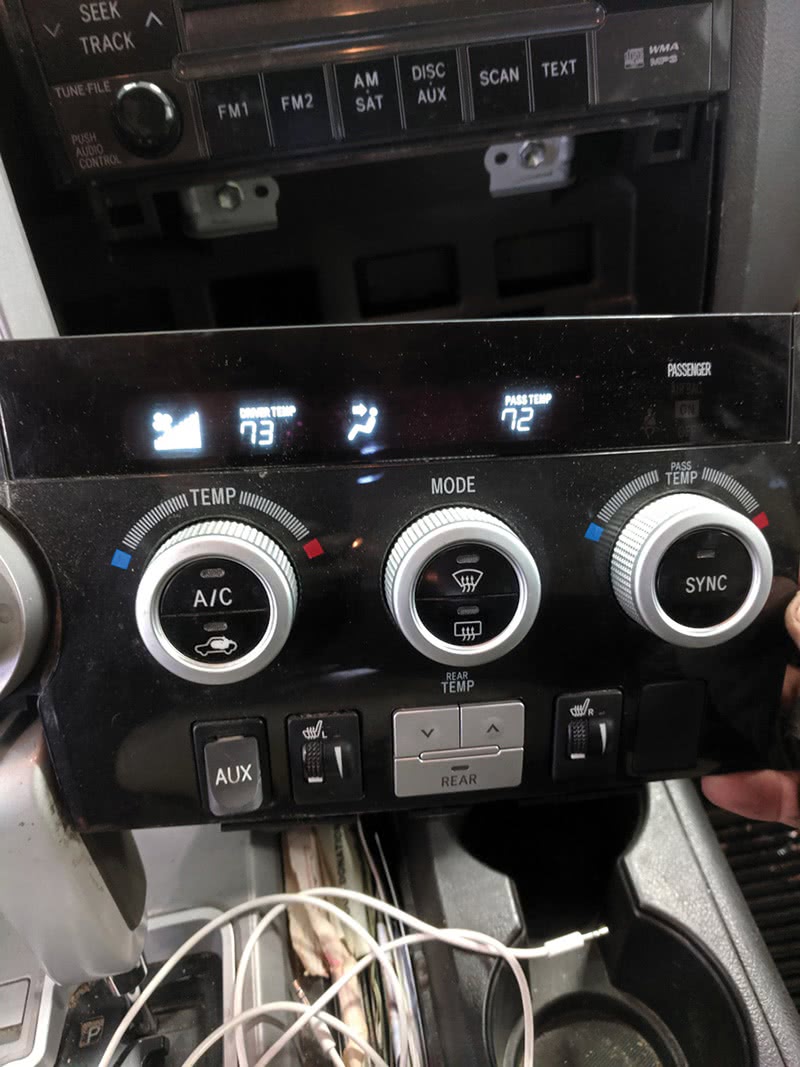
Let’s kick things off with a 2008 Sequoia with an unusual HVAC issue. The air conditioning and blower had abruptly stopped working on this SUV. The settings last selected on the HVAC control panel were displayed, but the system didn’t operate and the settings couldn’t be changed.
The scan tool was able to communicate with the HVAC control module, and two codes were found. However, both were solar sensor faults that will display any time codes are pulled with the vehicle indoors and weren’t related to the current problem.
Maybe the HVAC was just stuck in an endless loop and needed to be reset. But that didn’t turn out to be the case. Disconnecting the battery cable and allowing the capacitors to discharge made no difference; it was still stuck.
The technician’s first thought was that the control panel must be bad, but he knew that thinking would likely get him into trouble. At this point he decided to go over the wiring diagrams to get a clear picture of the whole HVAC system.
Toyota calls the HVAC control module the A/C Amplifier, and it has multiple input sensors and output controls. The front control panel is connected to the Amplifier with a single-wire LIN bus. It was clear that there were a lot of possibilities of what could be wrong. A failed input sensor may be bringing down the module, or perhaps wiring damage in the dashboard somewhere as there was evidence of rodents in the cabin air filter.

The technician was mentally preparing himself for a long drawn-out battle with this Sequoia, when he noticed something on the wiring diagram that gave him pause. A small component he overlooked at first: the Rear A/C Control Assembly.
He believed in always starting with the easiest to access components when looking for an input or network problem, and the rear controller would be the easiest place to start. The rear controller was on the back of the center console and was easy to overlook, but right away he could see an issue. The ‘LO’ button appeared to be pressed in further than the rest of the buttons. Upon further inspection it was clear that a liquid had been spilled onto the control panel as all the buttons were hard to press and would stick in various positions.
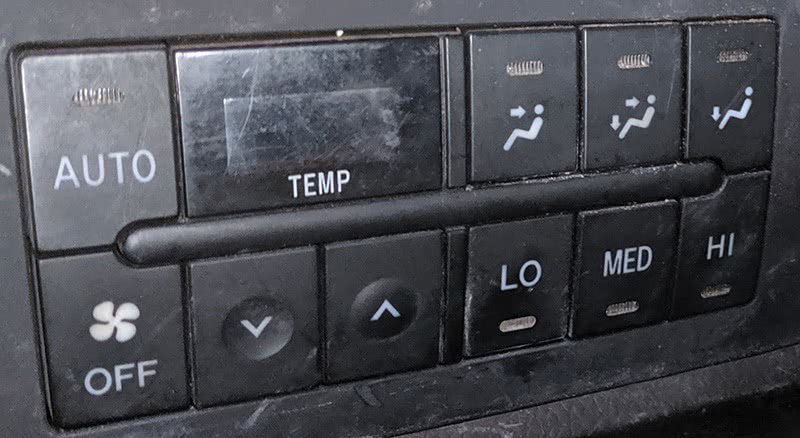
The buttons on the rear control pad work as momentary switches which should return to a rest state after being pressed once. The rear controller is also connected to the AC Amplifier by LIN, and having a button being stuck in the ON position froze the logic in the module. A generous amount of contact cleaner was able to free the sticky buttons and normal operations were restored to the air conditioner, blower motor, and display.
Thinking about the complete HVAC system, instead of focusing only on the current symptoms allowed the tech to diagnose the Sequoia quickly, prevented hours of lost time tearing apart the dashboard, and kept unnecessary parts from being installed. Also, keeping an open mind about the clues that are discovered is essential. After finding the rodent debris in the cabin filter, it would have been easy for the tech to become solely focused on wiring damage in the dash, leading him down a deep dark rabbit hole.
Lexus No Start
Tracking down a no start can be a difficult proposition, especially when the vehicle only acts up once every couple of weeks. This was the case for a 2007 Lexus ES350 that was brought into the garage for an intermittent no crank no start.
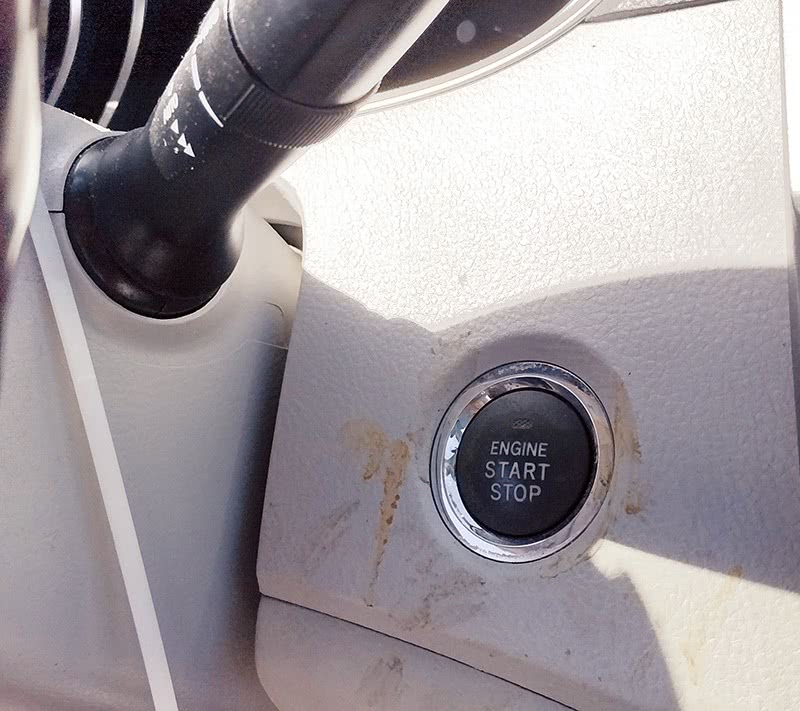
The owner of the Lexus described the frustrating symptoms. Occasionally, when he tried to start his vehicle by pressing the push start switch nothing would happen. This happened very randomly and after several attempts the engine would finally start and operate normally. He also stated that a couple times the engine had started, but after one or two seconds it would stall.
The technician started with a battery test and checking the terminals and starter connections. He also confirmed that the shift linkage was fine on the transmission, and nothing was restricting the cable from moving fully into the park position.
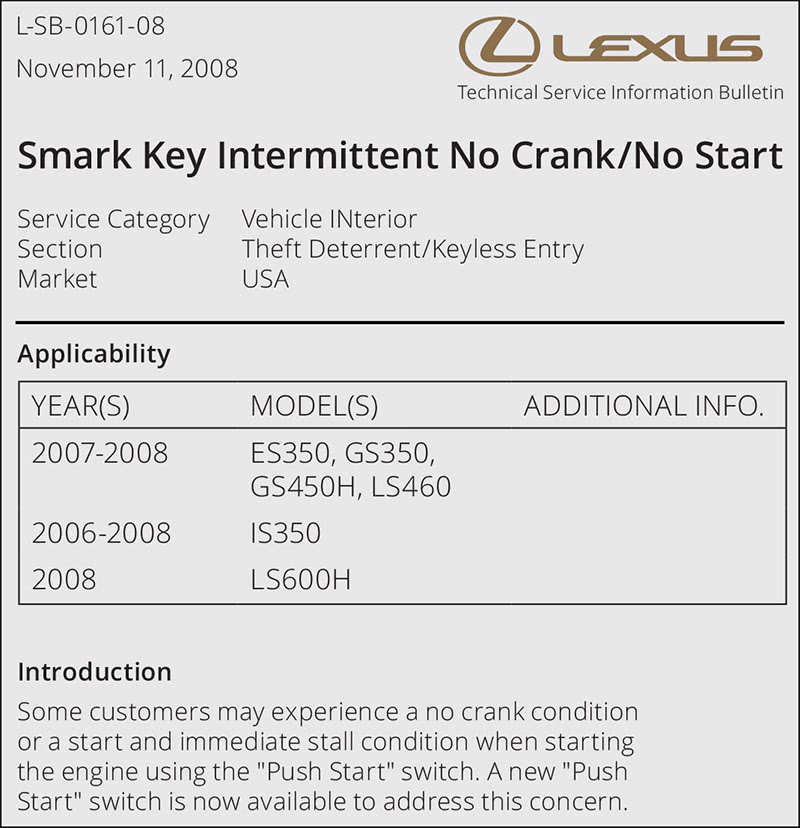
After the basic under hood checks and a health check of all the modules turned up no clues, the technician went through service information for any relevant documents. The search was fruitful and turned up a Lexus service bulletin, number L-SB-0161-08 for a Smart Key Intermittent No Crank/No start.
The tech verified that the bulletin applied to this vehicle by checking the VIN number against the table in the bulletin. The bulletin fit the symptoms exactly, even describing the possibility of the engine starting and then immediately stalling. The corrective measure was to install an updated Push Start switch, part number 89611-30020.
The owner of the vehicle was an older gentleman and a retired GM auto technician. He was quite skeptical of all the new technology that was on vehicles now, twenty years after he retired. He was skeptical that the switch would fix his non starting issues. He wanted to wait on the repair to see if it got worse.
Worse it did get, and finally his stubborn resistance subsided. We ordered the updated part from a Lexus dealer and installed it. After a week the owner called to report the symptoms hadn’t recured and that he considered the problem fixed.
One installation note for the push start switch is to be very gentle with the dash and use only plastic panel tools. There was a Lexus service campaign for several models and year ranges for dash boards issues of cracking and becoming soft in direct sunlight. So, use great care, and don’t replace the switch right after the vehicle has been sitting in the sun for hours.
In this case, while the updated Push Start switch was not a guaranteed repair, all the clues pointed to it correcting the issue. The alternative was starting the vehicle with multiple pieces of testing equipment attached potentially for weeks before tracking the problem down to the Push Start switch.
Rough Running 4-Runner
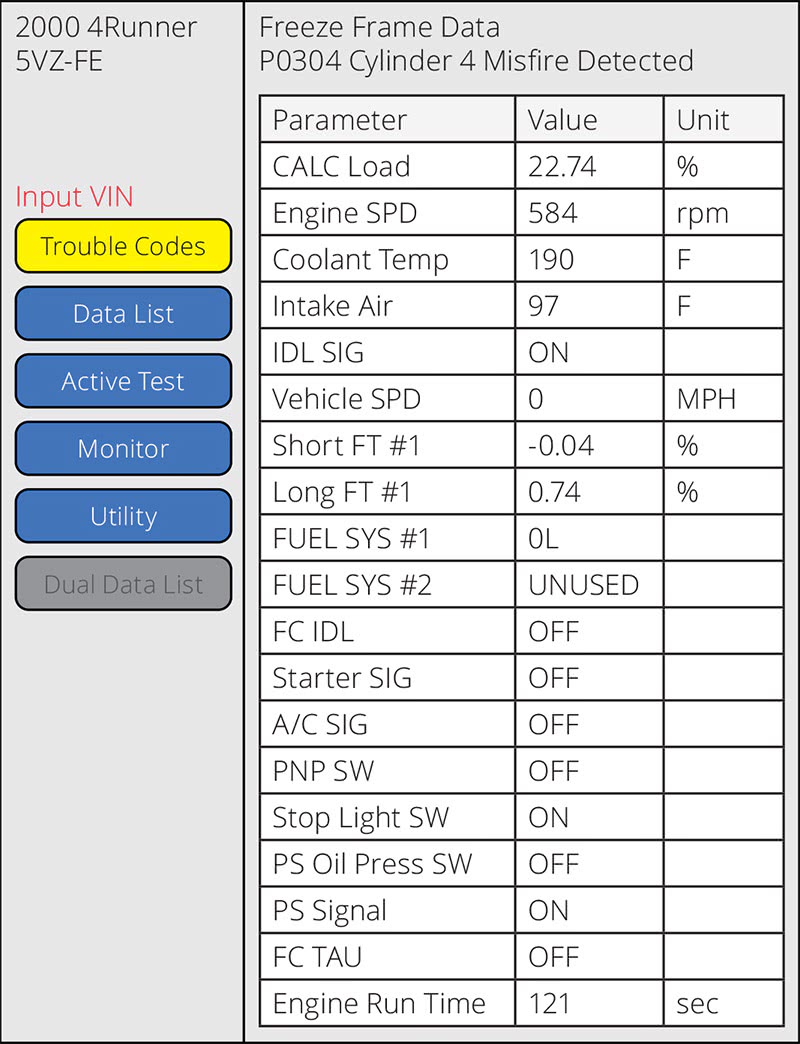
A Toyota 4-Runner with a 3.4L V6 came in for a flashing check engine lamp and running rough at times. This SUV had been to the shop many times and was well cared for, but it did have 297K miles on the odometer. The vehicle ran fine during the road test, but the check engine light was displayed.
The tech found a P0304 (cylinder #4 misfire) using the Techstream to pull codes. The freeze frame data for the misfire fault contained a couple interesting clues. The Mode 02 data showed the vehicle was fully warmed up with a coolant temperature of 190°F, and that the engine had just been started, since the run time was only 121 seconds. These were valuable pieces of data and the told the technician that the misfire was present after a hot soak condition. He knew that these same conditions would need to be recreated to have the best chances of finding this intermittent misfire.
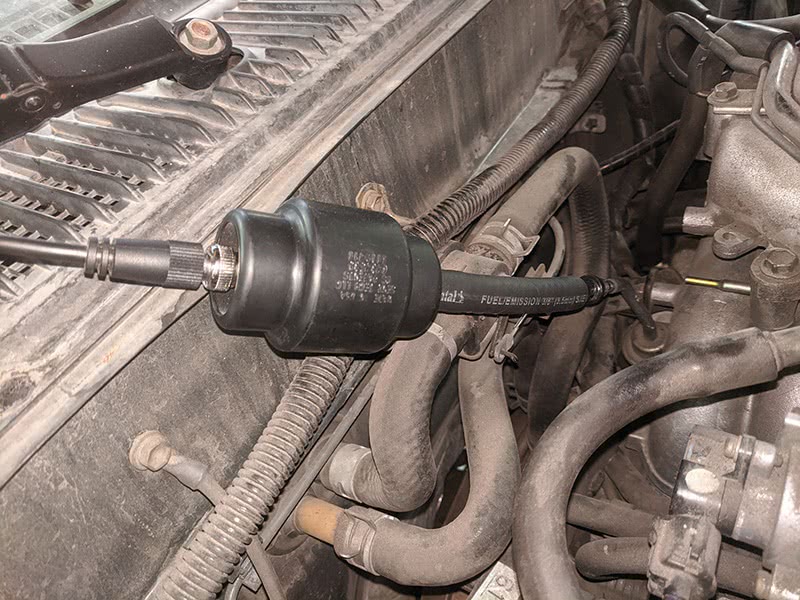
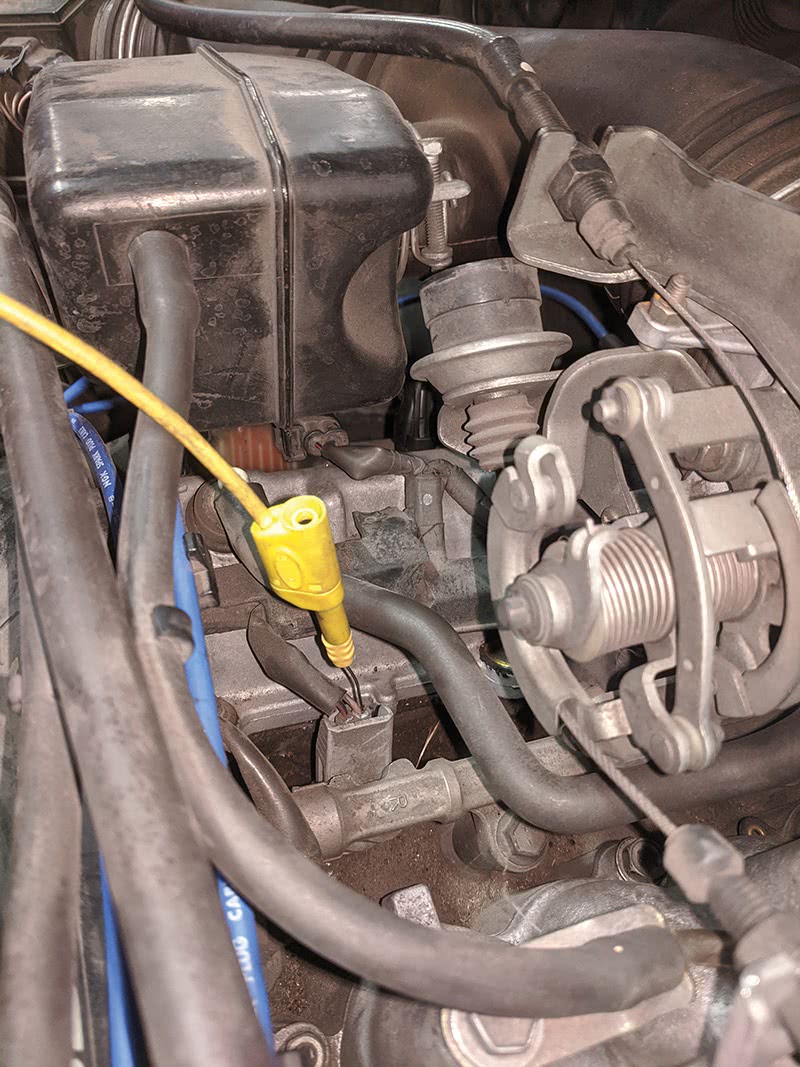
The ignition wires and spark plugs had recently been replaced, so the suspicion was initially placed on the fuel injectors. A lab scope was connected to the vehicle using a pulse sensor on the fuel pressure regulator vacuum port, and the control side of the cylinder one fuel injector.
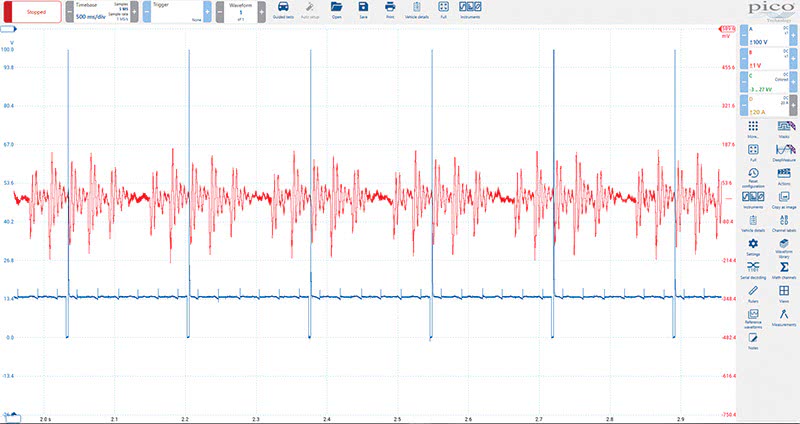
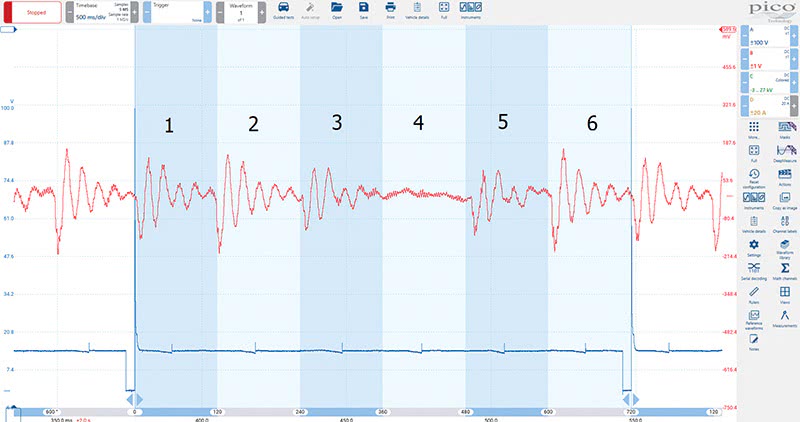
The engine was run until it was at operating temperature and then shut off. With the hood shut, the vehicle was left to heat soak for 15 minutes. Upon restarting the engine, the misfire was present and the following scope capture was collected. With five full engine revolutions on the screen a repetitive pattern emerged. Zooming in and using phase rulers with six partitions makes the offending cylinder clear. There was no response from the pulse sensor when the cylinder four fuel injector was fired.
The owner of the 4-Runner decided to replace all six injectors due to the high mileage. After the injectors were replaced with new O-rings and plenum gaskets the codes were cleared and the hot soak condition was recreated once more. This time the SUV started after sitting for 15 minutes and didn’t misfire at all.
While the external vacuum-controlled fuel pressure regulator is a thing of the past on most vehicles,
this technique can still be used. On traditional multi-port fuel injected engines, a pressure transducer installed on the fuel line will show the pressure drop as each injector is fired. This method is more accurate as well, since it is the actual fuel pressure that is being measured.
For gasoline direct injected engines the fuel pressure is much too high for transducers, but the fuel rail pressure sensor signal can yield possibilities for testing. It would be best to practice these techniques on properly running engines first and be sure to use an oscilloscope with a high sample rate and zoom functions to capture as much detail as possible.
A Slippery Tacoma
What do a slipping transmission and a shade tree mechanic have in common? Read on to find out.
A silver Tacoma PreRunner came in the shop on a quiet Wednesday morning. The owner described the symptoms of a slipping transmission to the service manager and said he had hooked up his code reader and there were some transmission codes stored. Diagnostic time was approved, and the truck was dispatched to a technician who was more than happy to stop cleaning his tools and get to work.
After reading through the work order the tech was surprised that this Tacoma would have a problem with the transmission as the mileage was relatively low. He had several customers with Tacomas with over 300K miles who still had no transmission issues. The facts didn’t lie though, the trans was slipping and there were three fault codes related to shift and pressure control solenoids stored in the ECM.
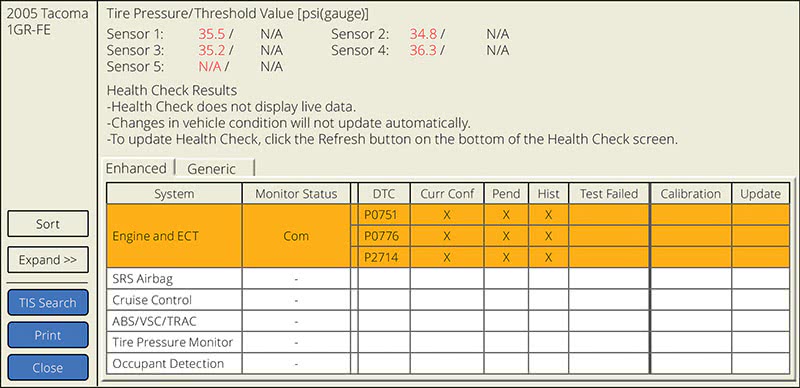
There was a P0751 Shift Solenoid A Stuck Off, a P0776 Pressure Control Solenoid B Stuck Off and a P2714 Pressure Control Solenoid D Stuck Off. All these codes were similar in that they point to a mechanical issue with a solenoid, the valve body or the transmission itself.
With the road test complete and the symptoms confirmed, the technician pulled into the service bay and lifted the truck up to the top lock on the rack. With flashlight in hand, he inspected for leaks or damage but found none. Everything looked factory fresh. Next the tech removed the overflow plug from the bottom of the trans pan to get an idea of the fluid level, but none came out.
Somewhat puzzled, he started to lower the truck back down when something caught his eye, a clean new oil filter. With a theory beginning to form, the truck was lowered all the way to the ground. Checking the oil level providing more validation to the technician’s hypothesis. The oil level was significantly overfull, but it did not look like it had been recently changed.
The owner hadn’t mentioned anything about a recent oil service, but during a follow up phone call he reluctantly admitted to changing his own oil right before the symptoms started. After being informed he had actually drained the transmission fluid and then overfilled the engine with oil he was quite embarrassed.
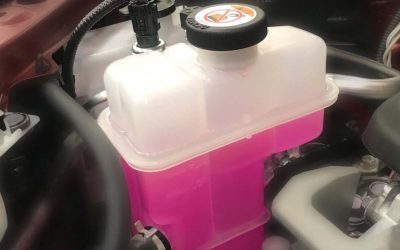
In the end the oil was drained and the correct amount added, and the transmission was refilled following the service procedure. With the truck lifted on the hoist the engine was run until the desired transmission fluid temperature was reached, and then the OE fluid was added to the refill plug until it dripped out of the overflow plug.
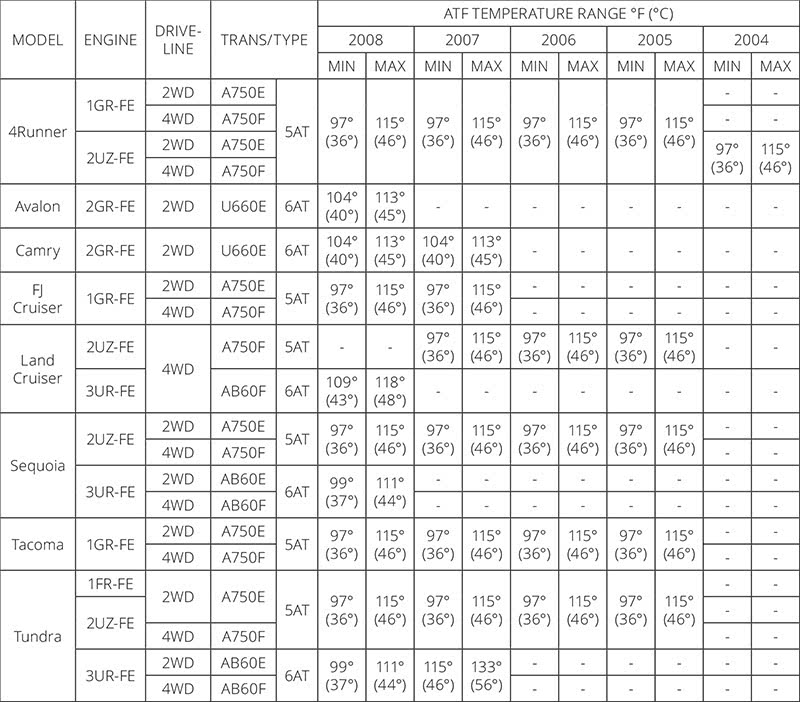
Toyota has released a service bulletin (T-SB-0129-08) with auto, truck and SUV temperature ranges which applied to this Tacoma.
With both fluid levels corrected and transmission faults cleared, the truck was taken out for a final drive. The shifting was normal, and no warning lights had returned. The owner had dodged a bullet on this oil service gone wrong, learned a few lessons and got his transmission fluid changed as well.
Often, pausing to reflect for a few moments during a diagnosis can prevent getting off track and save time in the end. Toyota refers to this reflection time with the Japanese word Hansei. Hansei is a key part of The Toyota Way: Toyota’s set of principles that guide their manufacturing and business operations.
Toyota uses Hansei at key points throughout the vehicle design process and at the end of any project to reflect on how things went and to improve the process for the future. This can be a valuable tool for technicians as well. Pausing to reflect at several points during a diagnosis can bring clarity to the overall picture of what is wrong with a vehicle.
Not all diagnostic jobs can be 15-minute victories but staying true to the process and reflecting on what was learned and mistakes that were made along the way will put the odds in favor of any technician.

0 Comments