
May we have your attention please?!…
We interrupt your regularly scheduled article full of technical information and case studies to bring you Quick Tech Tips. These tips are designed to save valuable time and energy. You may already be familiar with some of these tips. In that case, please share them with a learning tech in the shop. Supporting learning techs is a great way to increase shop productivity and reduce costly errors. Now, without any further ado, on to the tips!
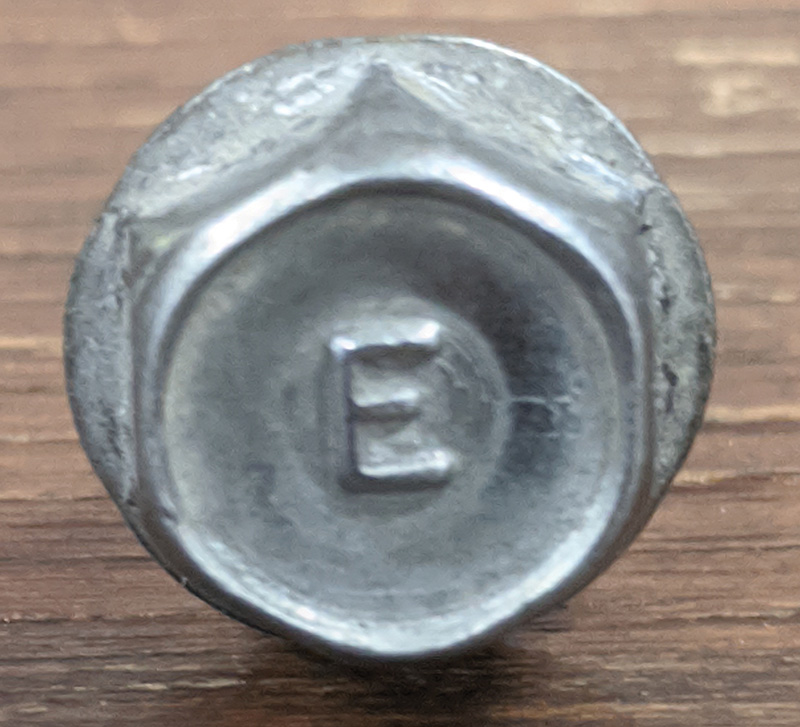
a, b, c, d, E Bolt
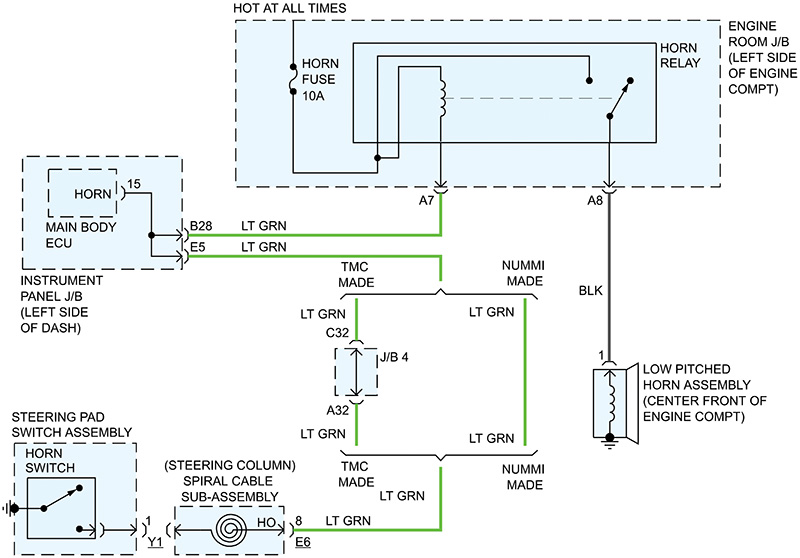
This first tip is relevant for technicians in both the repair and collision sectors. E bolts have been in use for quite some time now, but not all technicians are aware of them. An E bolt is a conductive bolt specifically designed to ensure proper grounding through the threads. They are denoted by a capital letter E on the head of the bolt.
E Bolt
The more complex and interconnected modules and circuits become on vehicles, the more critical a reliable and continuous ground connection becomes. Disconnecting an E bolt, splice pack, or other ground wire without first disconnecting the negative terminal at the battery can damage electronic components. A module that has a power source, but no ground path for that voltage can be permanently damaged.
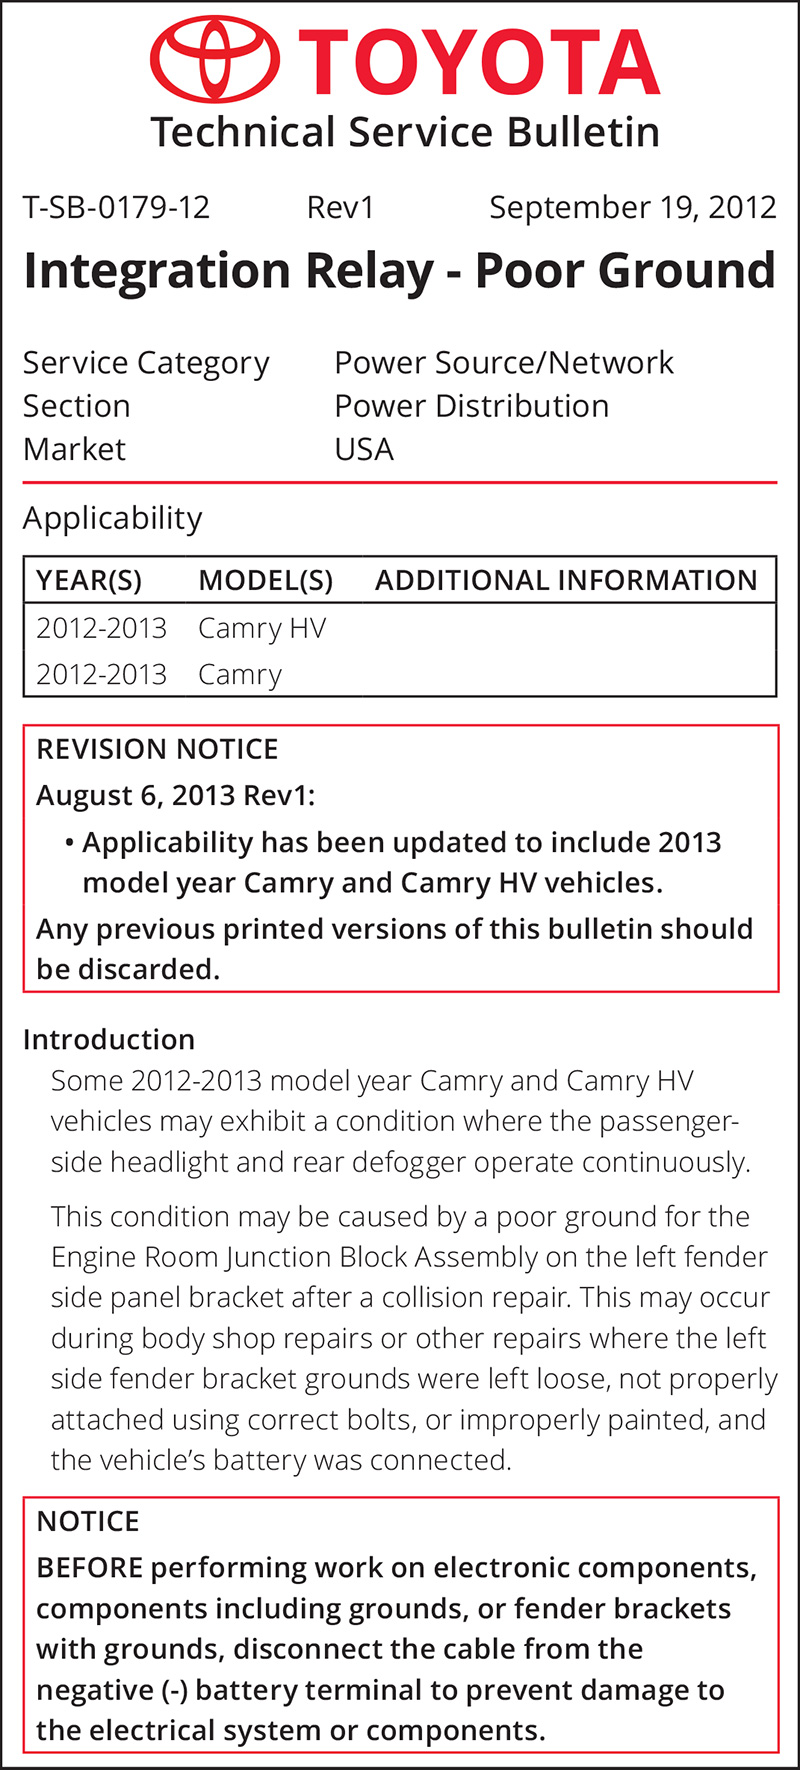
The Toyota technical bulletin “T-SB-0179-12 – Integration Relay – Poor Ground†covers a specific E bolt example for the 2012 and 2013 Camry. If the ground wire bolts on the left front fender bracket are removed before the battery is disconnected, there can be circuit damage resulting in the passenger headlamp and rear defogger operating continuously.
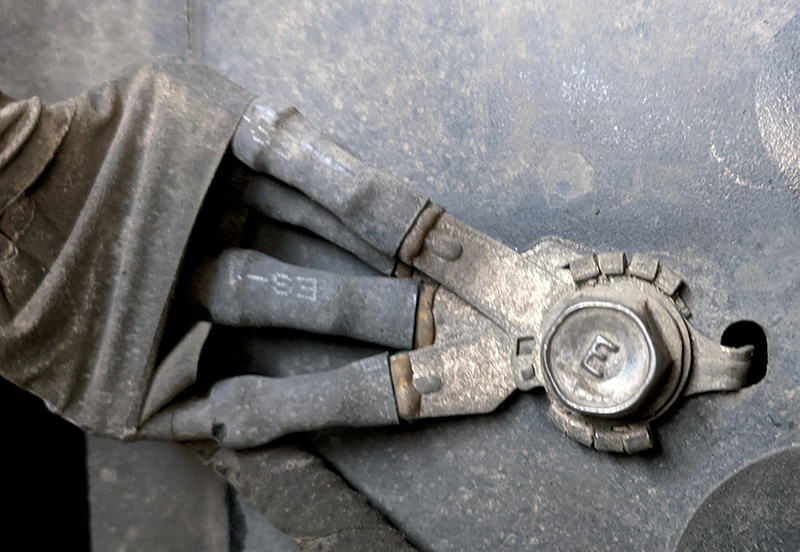
There’s a companion collision repair information bulletin for the same vehicles which covers the procedure in more detail. The bulletin requires the use of E bolts not only for the ground wires, but for the apron bolts as well since they are also part of the ground path.

Proper torque is critical when installing an E bolt. The bolt needs to hold the ground terminal tightly and it needs to cut through any oxidation that may be present. Always consult service information or technical bulletins for the proper torque specifications.
A ground terminal should be installed over clean bare metal. Any paint or oxidation should be removed from the area the terminal will contact. Once the terminal is bolted in place with the E bolt, coat the area with corrosion protection material to prevent rust.
The best practice is to disconnect the negative terminal of the battery anytime a ground wire needs to be removed or a module is disconnected. This simple step can prevent costly damage to electronic circuitry and save valuable shop hours.
Where a Car is Made Makes a Difference
The acronym NUMMI stands for New United Motor Manufacturing, Inc. NUMMI was a joint venture between Toyota and General Motors in Fremont, California. The plant was a success right from the start, in contrast to the 1986 Michael Keaton film, “Gung Ho.†The film was released two years after the NUMMI plant opened and depicts a Japanese takeover of an incompetent American auto plant.
The introduction of the Toyota production system at NUMMI was exactly what American auto makers needed. The NUMMI plant remained successful up until 2010 when it was shut down after GM filed for bankruptcy, and Toyota decided not to continue operating the factory solely. Tesla bought the plant later that same year and has continued operating it ever since.
TMMC refers to Toyota Motor Manufacturing Canada, and was the first plant to manufacture a Lexus brand vehicle outside of Japan. Originally opened in 1988, the plant continues to win awards for excellence and sustainability. TMMC is made up of three different plants: North, South and West. The North and South campuses are in Cambridge, Ontario, and the West campus is a short drive away in Woodstock. The three plants combined build the Toyota Rav4, Rav4 Hybrid, Lexus RX350, RX450h and soon the Lexus NX luxury SUV.
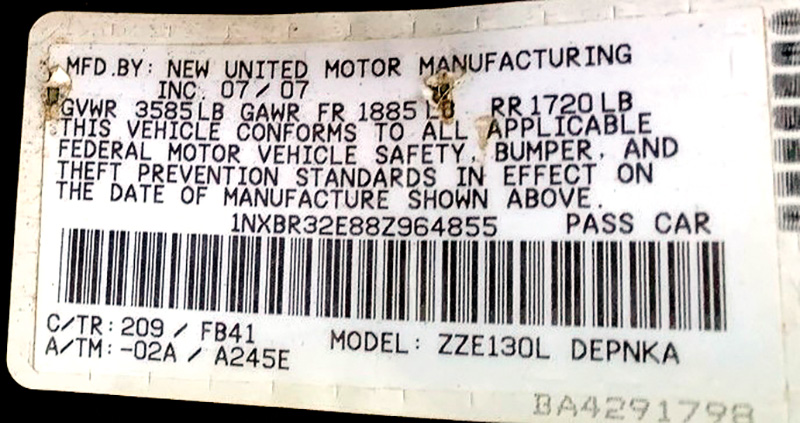
The Toyota Corolla was built at both NUMMI and TMMC during the years 1988 to 2010. Service Information and wiring schematics for these vehicles have side notes designating NUMMI or TMMC made. These notations indicate where the vehicle was built and should not be overlooked, as they make distinctions between optional equipment on a vehicle or wiring color and connector changes. This information can easily be found on the certification label in the driver’s door jamb. The top line of the label will state the manufacturing plant where the vehicle was assembled.
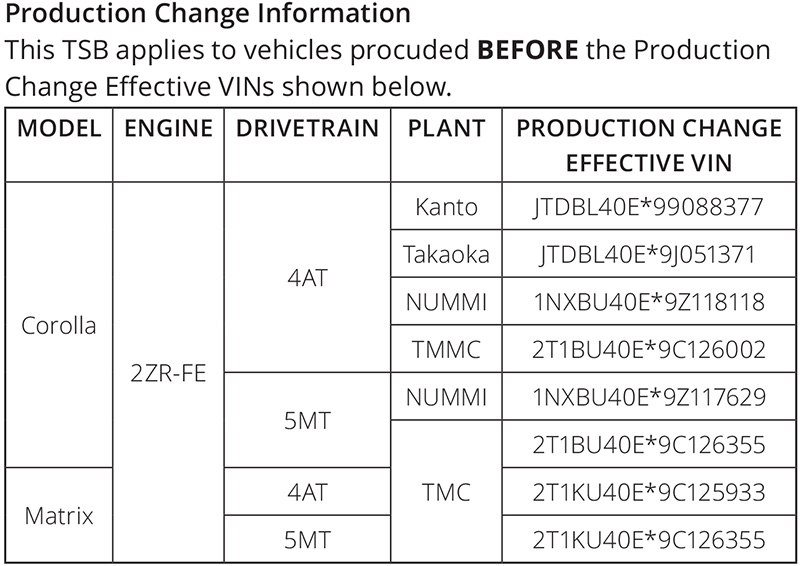
Where a vehicle was manufactured can also be helpful information when looking at technical bulletins, as they will often list the plant name as criteria in a Production Change Information chart.
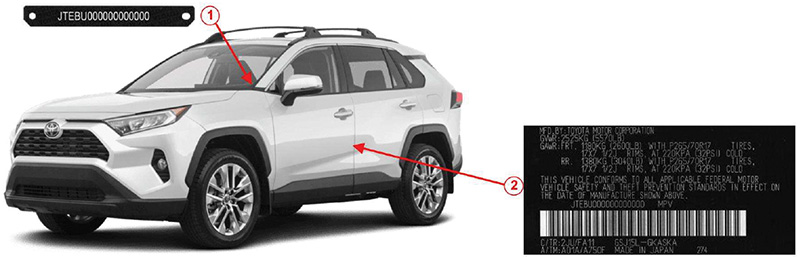
Certification Label
The certification label, found on the driver’s door or on the B-pillar holds several pieces of valuable information. We all know to look for the VIN number, production date and tire sizes on this label. As mentioned in the previous tip the manufacturing plant where the vehicle was built can be found on the top line of the label.
There’s more information on the certification label that not everyone is aware of though. At the bottom of the label there are a set of letters below the bar code. The letters are C/TR and A/TM. These letters stand for Color, Trim, Axle and Transmission respectively. These are option codes for the vehicle.
This information can be very helpful when verifying driveline components or ordering a bottle of touch up paint, and if you are trying to determine what transmission is in a Toyota vehicle, look no further than the certification label.
No Wiper, No Washer, But No Problem
Before spending too much time on a Toyota SUV with complaints of limited rear hatch functionality, make sure the back door glass initialization process has been performed. Some of the concerns caused by this would be no rear wiper operation, no rear washer operation, limited power back door operation, or no back door glass one-touch function.
These issues can be caused by the battery terminals being disconnected, a discharged battery, or by a weak battery where cranking voltage dropped extremely low. Low system voltage can cause the initialization memory to be lost.
Look for other clues of low system voltage on the vehicle, for example the clock has been reset, one-touch functions for the front windows are also nonoperational, or incomplete Readiness Monitors in the Engine Control Module.
There may also be fault codes logged in the Body Control Module along with the functionality concerns. The codes may be rather ambiguous, in one case a “B1241 – Body #1 ECU Switch Circuit Diagnosis,†or the fault may direct you to the problem area, for example “B2221 – Back Door Jam Protection Sensor.†In either case, do not assume there is a circuit issue, or a sensor issue. Start with the most basic checks first.
The initialization process is quick and easy to verify. First, start with the ignition on and the engine off. Then, push the back door power window switch to the “DOWN†side to open the window. Push and hold the back door power window switch to the “UP†side until the window closes. Continue holding it for approximately 1 additional second after the window is fully closed.
Check for proper operation of the “one-touch open/close†functions by pushing the switch briefly to the “DOWN†and “UP†positions. The jam protection function becomes active through this initialization procedure. At this point, all back door functions should be restored and the fault codes, if there were any, can be cleared from memory.
If the functions have not been restored, then further testing would be needed. Toyota has addressed this initialization procedure with service bulletin “PD082-06 – Initialization of Back Door Window During PDS.â€
The Back Door ECU doesn’t know what position the window is in until the initialization is performed. Therefore, the rear door functions are restricted until the initialization is complete. Verify all initializations have been performed before diagnosing any faults with the door locks, windows, or sunroof. This will prevent wasted time trying to test a concern that is due to initialization memory being lost.
Missing the (Zero) Point
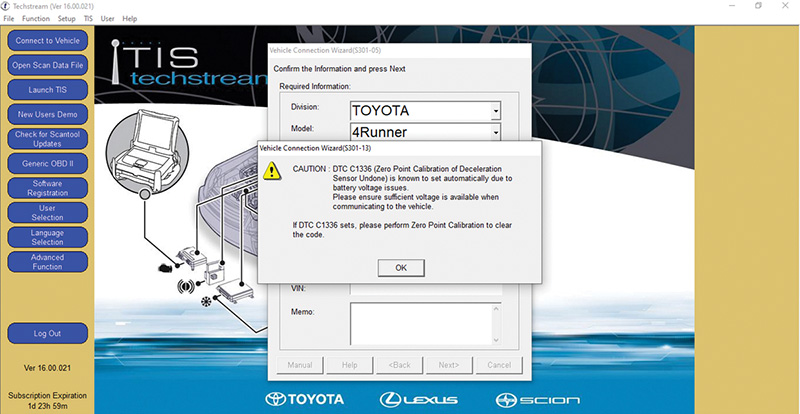
This quick tip covers several Toyota vehicle models with intermittent VSC and TRAC lights illuminated. The lights may be on solid or flashing. Often the lights will be off when the vehicle is first started, but when the shifter is moved out of the “Park†position the lights turn on. There may be fault code “C1336 – Zero Point Calibration of Deceleration Sensor Undone†logged in the ABS module, or there may be no faults present.
These lights are on because the Zero Point Calibration has been lost. The most likely reason for the calibration being lost is low system voltage. System voltage is critical for the ABS module, Deceleration Sensor and Steering Angle Sensor to operate correctly. This is a strong indicator that the battery is weak. There may also be a charging system issue or a drain on the battery.
Techstream will bring up a caution notice through the Vehicle Connection Wizard on applicable vehicles. The models that are most susceptible are the 4Runner, Highlander and Tundra.
On certain Toyota and Lexus models, the Zero Point Calibration can also be lost when fault codes are cleared. It is always best practice to road test a vehicle after any repairs affecting the anti-lock brake system, clearing fault codes, or disconnecting the battery.
If there is any suspicion that the Zero Point Calibration has been lost then it is best to perform the calibration process to ensure proper operation and to avoid the vehicle returning to the repair facility.
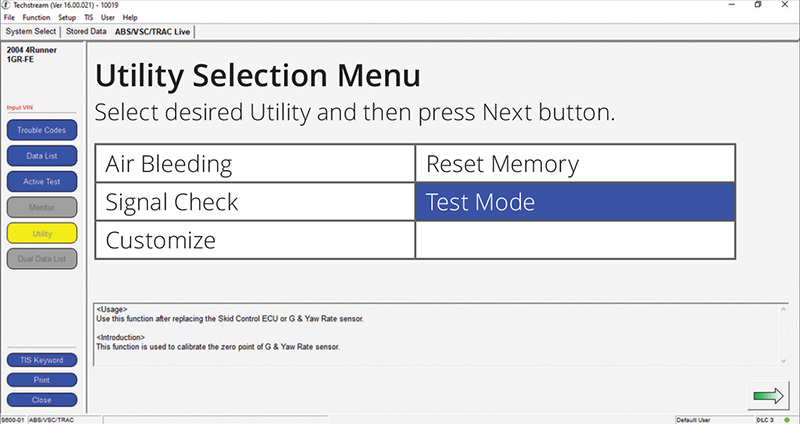
The calibration is easy to perform with Techstream. The first step is to clear the memory using the Reset Memory option under the Utility section. Some older model years require the negative terminal to be removed briefly from the battery to clear the memory. Once the memory has been cleared, then the Test Mode function needs to be run to relearn the calibration. Test Mode is a software function that only takes a few minutes to complete.
Toyota has addressed these issues in the service bulletin “BR001-04 – Zero Point Calibrations.†The bulletin states that Zero Point Calibration of the Steering Angle Sensor, Yaw Rate Sensor and the Deceleration Sensor must be performed after replacing or repairing steering related parts.
VDS
The Vehicle Description Section (VDS) of the Vehicle Identification Number (VIN) is comprised of the 4th through 8th digits. The VDS is referred to in many technical bulletins to determine if the bulletin applies to a certain vehicle. Also, when reprogramming control units, the VDS is often required information to select the correct calibration.
TIS, TIS, TIS
The Technical Information System (TIS) is Toyota’s online service information database. Toyota has put a great deal of thought and effort into TIS. There is a wealth of vehicle-specific information and general training information available, including service bulletins, repair manuals, wiring diagrams, and technical training.
With two day, monthly, and yearly subscription options, it is very affordable for any shop. Access to TIS is included with a subscription to the Techstream software. Techstream integrates seamlessly with TIS and creates a very powerful combination. The TIS database can be accessed directly through Techstream, and search results are filtered by keywords or any fault codes that are present.
A couple of the many aspects of TIS are the New Car Features (NCF) and General > Setup > Work Procedures > When Disconnecting or Reconnecting Battery Terminal.
The New Car Features section highlights new technology that is present on a specific model and year vehicle. It provides an excellent overview of system operation, and it is a great place to look first when dealing with unfamiliar components.
For example, the 2005 Tacoma New Car Features manual describes how the active wheel speed sensors are able to detect forward and backward rotational movement of the tires. The speed sensors contain two Magnetic Resistance Elements, or MREs which work together with the magnets embedded in the inner race of the hub bearing to produce distinct voltage patterns depending on the rotational direction of a wheel.
The General > Setup > Work Procedures > When Disconnecting or Reconnecting Battery Terminal section is a quick way to find out what you’ll need to do if the battery is disconnected. This is a great reference tool that can be used to prevent a vehicle from returning to the shop because the auto windows functions are not working properly, or the power back door will not open.
As with any new program or website, TIS needs to be used to become familiar with the how the information is categorized and laid out. We recommend navigating through the TIS website during shop down time to get comfortable finding the data you need. Then you will know right where to look when you are in the middle of a diagnosis or repair and the pressure is on.
We hope these Quick Tech Tips have been enlightening and that they will save you time and effort. We appreciate your attention and we now return you to your regularly scheduled broadcast.
By Jordan Hill

0 Comments