
Many shops look at diagnostics as a necessary evil, only offered to retain customers and profitable service and maintenance work. This doesn’t have to be the case though. When done correctly, diagnostics can add to the overall productivity of a repair shop! Yes, there will always be some difficult jobs that come into the shop and eat up hours, but a strong diagnostic process will keep those to a minimum.
This article will show how diagnostic clues can be linked together to create a complete vehicle picture, which will save time and make for quick diagnosis. Sometimes clues are obvious, and other times they can be subtle and easily overlooked. But watch for those subtle clues! Missing one can lead to wasted time and money. Diagnostic work often requires expensive tools and equipment, but sometimes the only requirement is concentration and a keen eye for detail.
However, this article needs a disclaimer. The goal of diagnostic testing is not to be the first one in the class to put their hand up with an answer, or the first one to finish and turn in the test. The goal is to get the correct answer, not the first answer.
The 411 on a 301
The subject, a 1996 Toyota Tacoma, presented with a Check Engine Light and a hard start concern. The owner of the truck stated that “The only noticeable difference is on start up. The vehicle takes longer to start and sputters when firing up.†After an uneventful road test, the truck was pulled into the service bay and Techstream was connected. The Health Check results showed only one code stored, a P0301 cylinder one misfire fault.

This Tacoma had been well maintained and was in good condition despite being advanced in years and mileage (the odometer having just passed the 350,000 mile mark). In fact, the owner had expressed the intention of hitting half a million miles with the truck.
The engine started up fine and was running well. The only indication of a problem was the illuminated Malfunction Indicator Light. More information was needed at this point, so it was time to check the Freeze Frame Data.
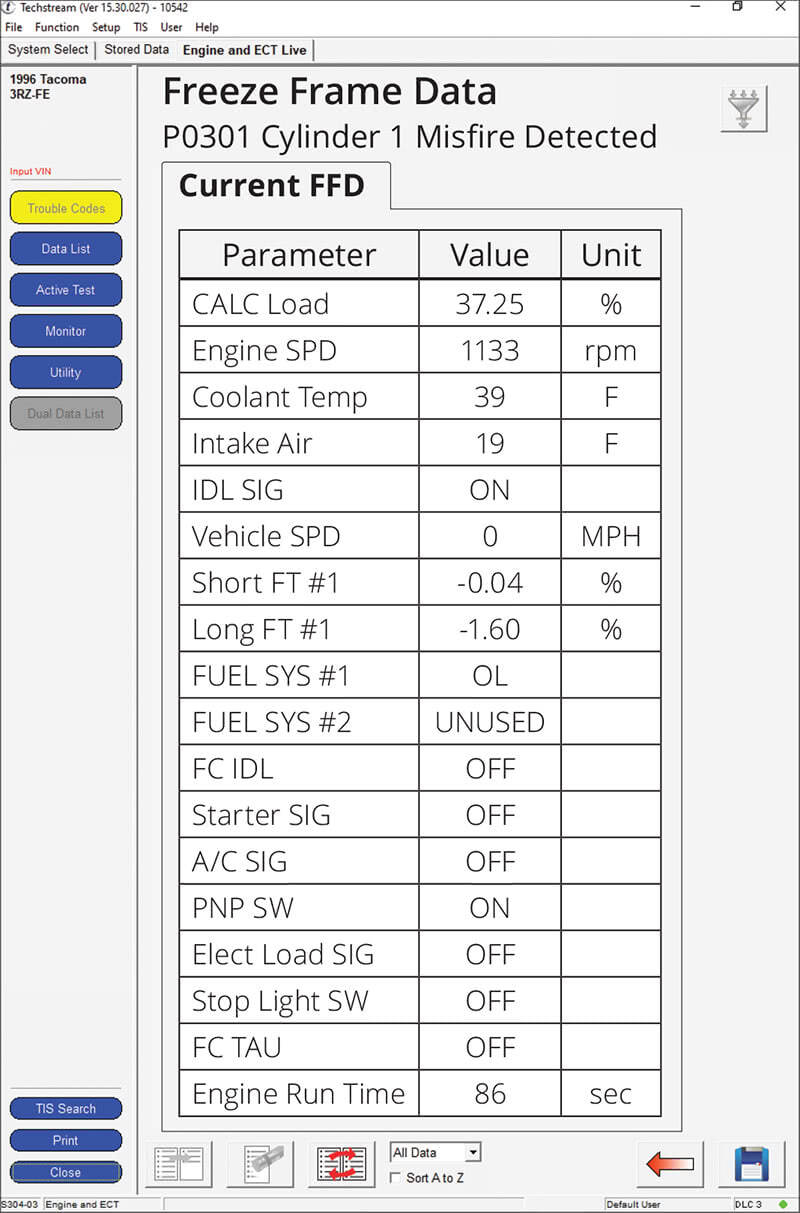
The engine coolant temperature showed 39°F and the intake air temperature read 19°F. The other notable PID was at the bottom of the list, an Engine Run Time of 86 seconds. After reviewing freeze frame information (next page), it was clear that the cylinder 1 misfire occurred quickly after start-up with a very cold engine. This was crucial information for diagnosing the engine misfire, and it showed that the misfire was related to the owner’s hard start concern.
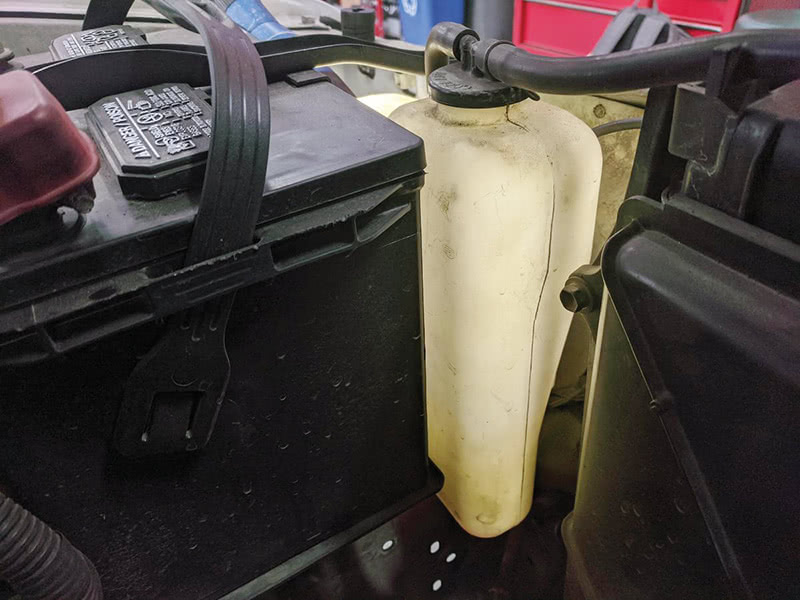
Another clue appeared when checking some of the basics on this Tacoma. The coolant overflow tank was completely empty, and the coolant was slightly low in the radiator also.
With a cold start misfire and low coolant level the first thing that came to mind was a cylinder head gasket leak. A quick and accurate way to check for a head gasket leak is to check cooling system pressure changes with a transducer and oscilloscope.
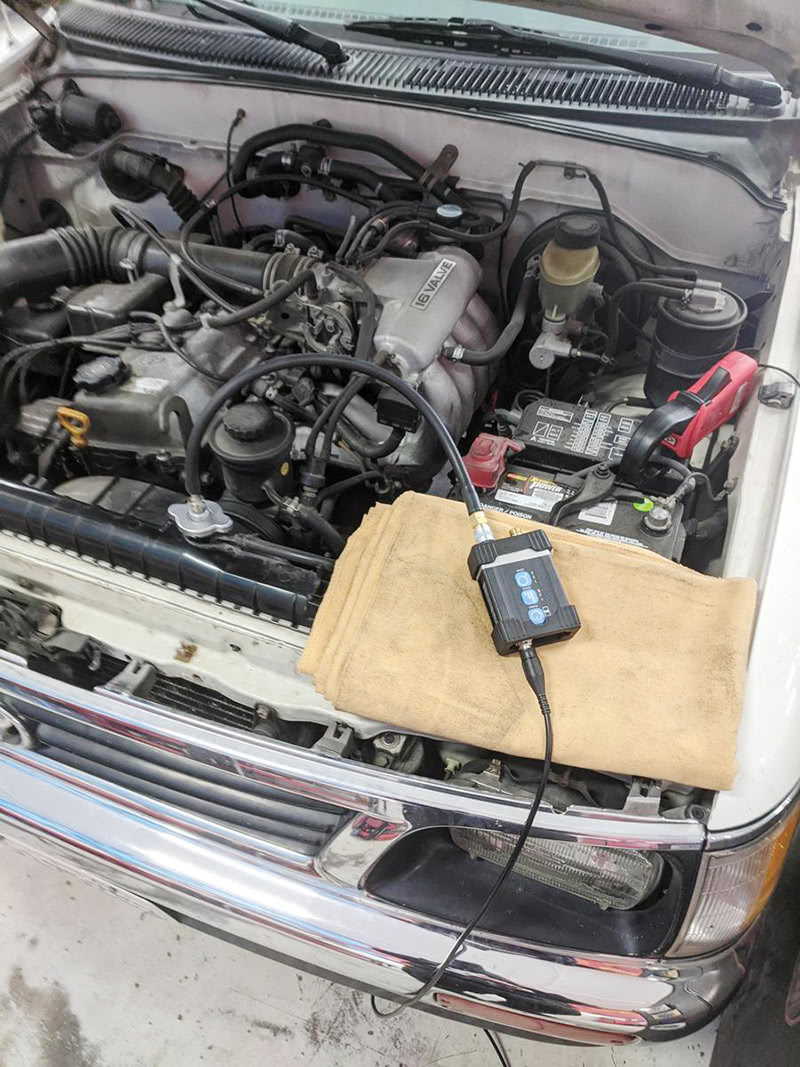
With PicoScope’s WPS500X pressure transducer attached to the radiator, and a high amp clamp placed around the negative battery cable, we’re ready for testing. To prevent the engine from starting up during the test, we’ll remove the fuel pump relay. The test is simple. Crank the engine while monitoring the pressure waveform from the cooling system and the current waveform from the starter.
This captured waveform shows the starter motor current and the cooling system pressure. The pressure transducer measured a definite rise in pressure at the radiator cap in just a few seconds of cranking the engine over. There was also a repetitive pulse in the pressure trace. By using the cylinder 1 ignition voltage as a reference point, and a waveform overlay tool the cause of the excessive pressure in the system was quickly identified. Every time cylinder 1 was on the power stroke the transducer read a pressure pulse.
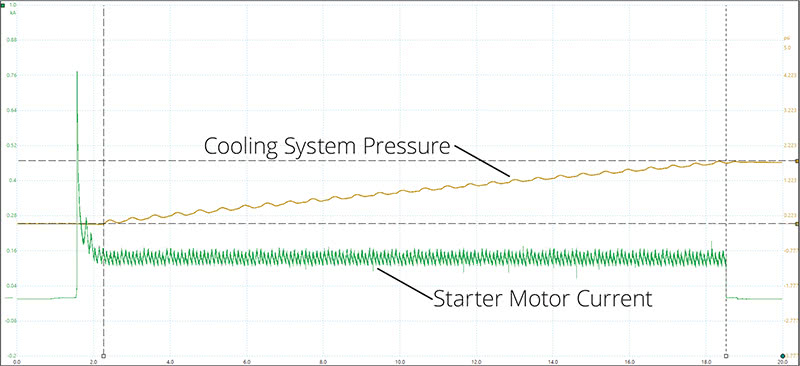
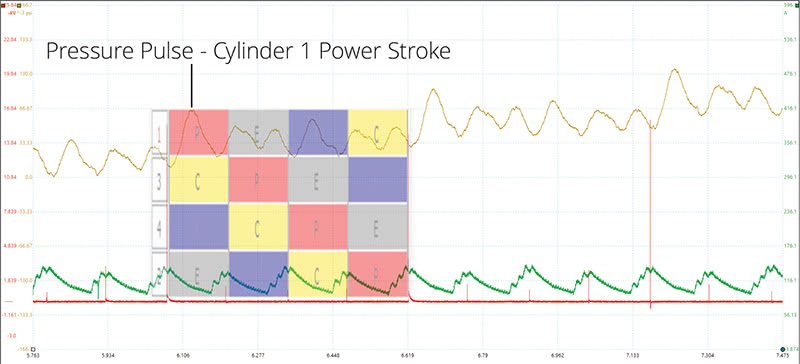
This quick and effective test confirmed a cylinder head sealing issue and pinpointed the leak to cylinder 1. This test also identified the hard starting issue, cylinder 1 misfire fault and the reason for the low coolant level.
There Can Be Only One
A 2016 Highlander came to the shop as a sublet from a local collision repair facility. The vehicle hit a deer and multiple airbags had deployed. The repair order stated that the Airbag Module, also called the Airbag Sensor Assembly had been replaced and was in need of programming.
In addition to the Airbag Module, both front airbags and the driver side air bag were also new. The SRS, ABS and Traction Control warning lights were shining while pulling the vehicle into the shop.
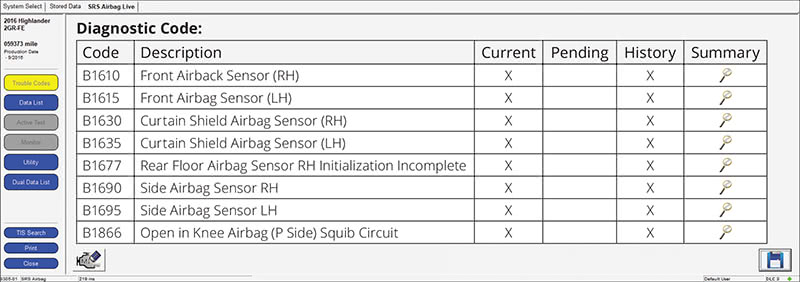
Performing a Health Check is an important first step to gain a full perspective. There were 8 faults stored in the SRS module, and no communication faults with the lateral acceleration sensor in several other modules. All the faults were hard codes, so they couldn’t be cleared.
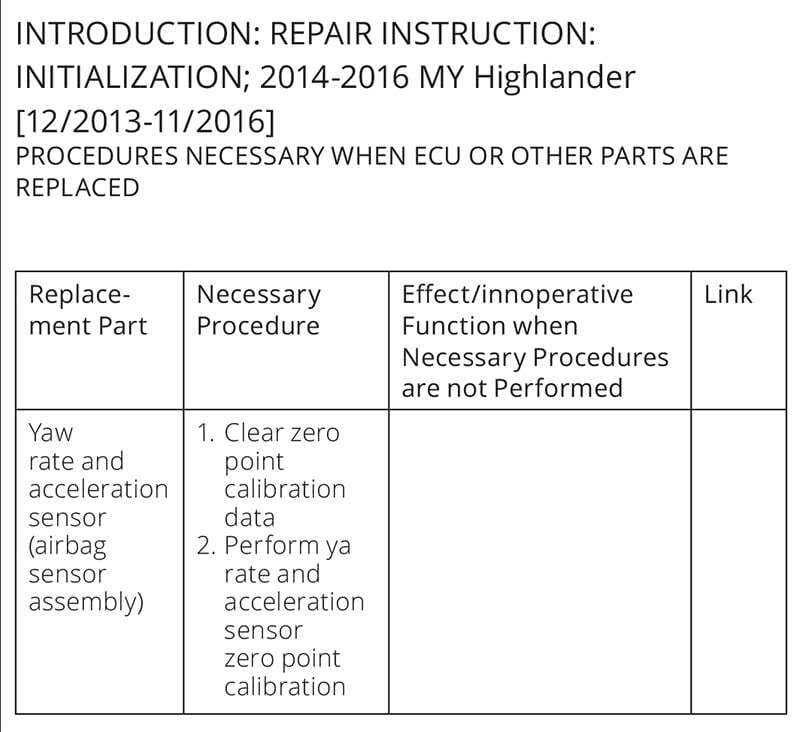
Toyota’s Technical Information Services or TIS clearly shows what procedures are necessary when a module is replaced under the heading, “REPAIR INSTRUCTION: INITIALIZATION.†On this Highlander, the initialization information for the Airbag Sensor Assembly didn’t state that programming was required, and it actually showed that the Airbag Sensor Assembly and the Yaw rate and acceleration sensors were all the same component. This explained why there was no communication with the acceleration sensor.
Based on service information the Airbag Senor Assembly was a ‘plug and play’ module, requiring only calibrations, but no programming. A visual inspection of the passenger compartment showed that the vehicle was not even equipped with a rear floor airbag sensor or a passenger knee airbag, both of which had fault codes stored.
At this point, it was clear that something wasn’t right. There’s no communication with the acceleration sensor, and there were fault codes for components that the vehicle wasn’t equipped with. These conditions would most likely be caused by an incorrect Airbag Sensor Assembly.
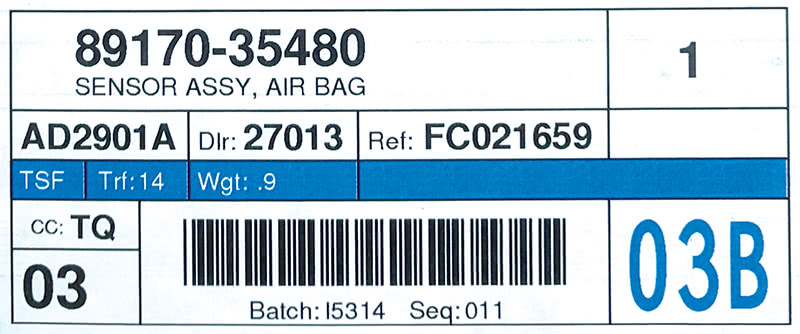
The body repair shop was called and asked to verify the part number for sensor assembly they installed. They sent over a photo of the Airbag Sensor Assembly box.
A phone call to the local dealer confirmed that the wrong Airbag Sensor had been installed on this vehicle. The correct part was ordered from Toyota and once in the vehicle the calibrations were performed successfully, and all the codes were cleared. A fault scan, a visual inspection and some deductive reasoning were all that was needed to get this SUV back on the road quickly and without any unnecessary testing or repairs.
Full Time Four Wheel Drive
How many mechanics does it take to screw in a light bulb? I don’t know, but I do know how many were required to figure out why a Sequoia was stuck in 4WD. The answer is three. Not because two lacked skill, but because they were trying to fix the hardest kind of fault there is — no fault. Well, sort of.
This 2013 Sequoia was originally brought into a local service station with a complaint that the vehicle would not come out of 4WD. After looking at the SUV briefly, the service center recommended the vehicle go to a transmission repair shop for further repairs.
Next, a transmission shop took a look. They scanned all the modules for faults and the powertrain was visually inspected. They found no faults and the visual inspection revealed nothing unusual. They decided that the problem must be related to faulty logic, and recommended reprogramming — something they were not equipped to do.
So, the Sequoia made its way to the third repair facility with a request to have all the modules programmed. The diagnostic technician at the third shop verified the owner’s complaint, which is always a good first move. The 4WD indicator light was always on when the engine was running, and moving the selector knob made no difference.
A Health Check using the Techstream confirmed there were no fault codes present, and showed there were no software updates available.
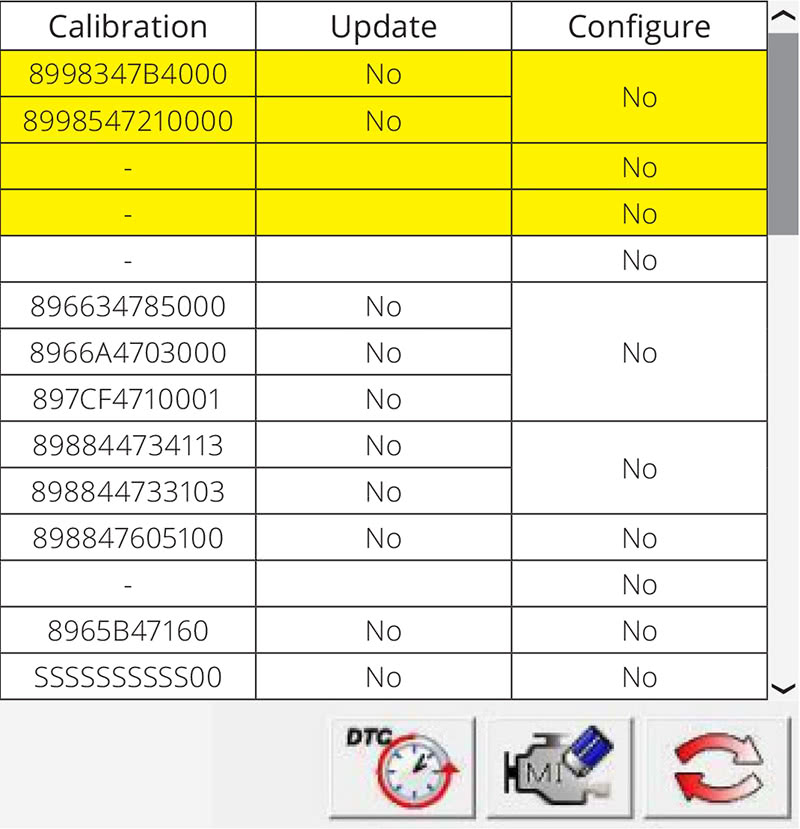
A great feature of the Techstream software is the Calibration ID. If there’s an internet connection available, the Techstream will check each module on a vehicle for software updates. In the Health Report Results the current Calibration ID will be displayed as well as a YES or NO depending on if there are any updates. If there are updates available, the YES will be a clickable link that will bring up the Technical Service Bulletin related to the software update.
A brief inspection of the transfer case, axles and driveshaft confirmed what the transmission repair shop had found: there were no obvious mechanical issues with the Sequoia either.
The technician took a moment to pause and reflect on what was known so far. There were no fault codes, no electrical or mechanical problems with the vehicle, yet the 4WD would not disengage. Such a strange problem. Maybe the events leading up to the appearance of the symptom would shed some light. Perhaps talking to the Sequoia’s owner might help.
After calling the owner of the SUV and asking questions about how and when the symptoms began the puzzle became clearer. The driver recalled that her young son had been in the front seat messing around with the buttons and knobs on the dashboard before the 4WD started acting up.
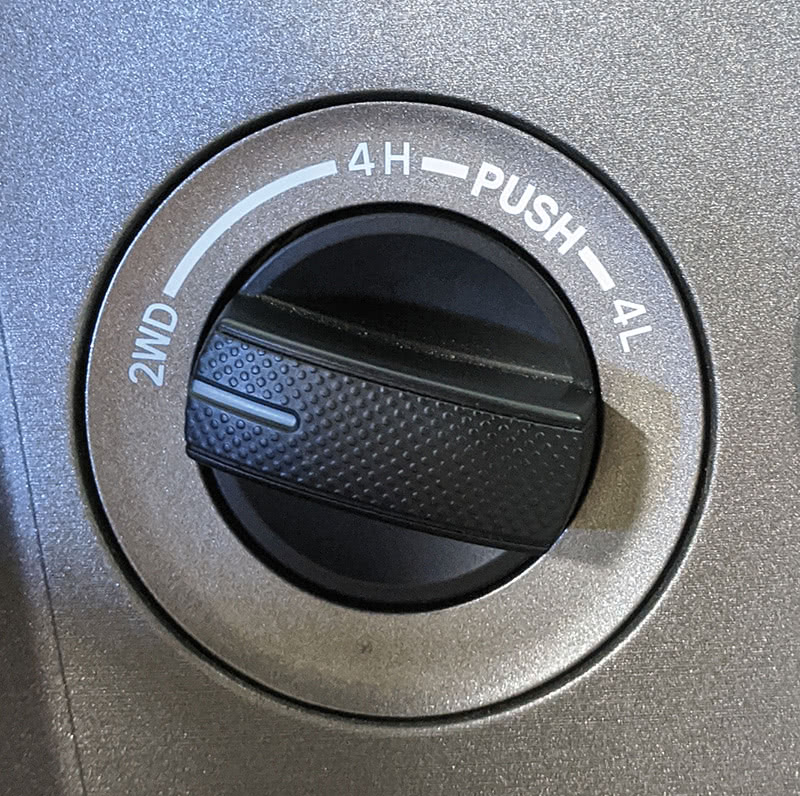
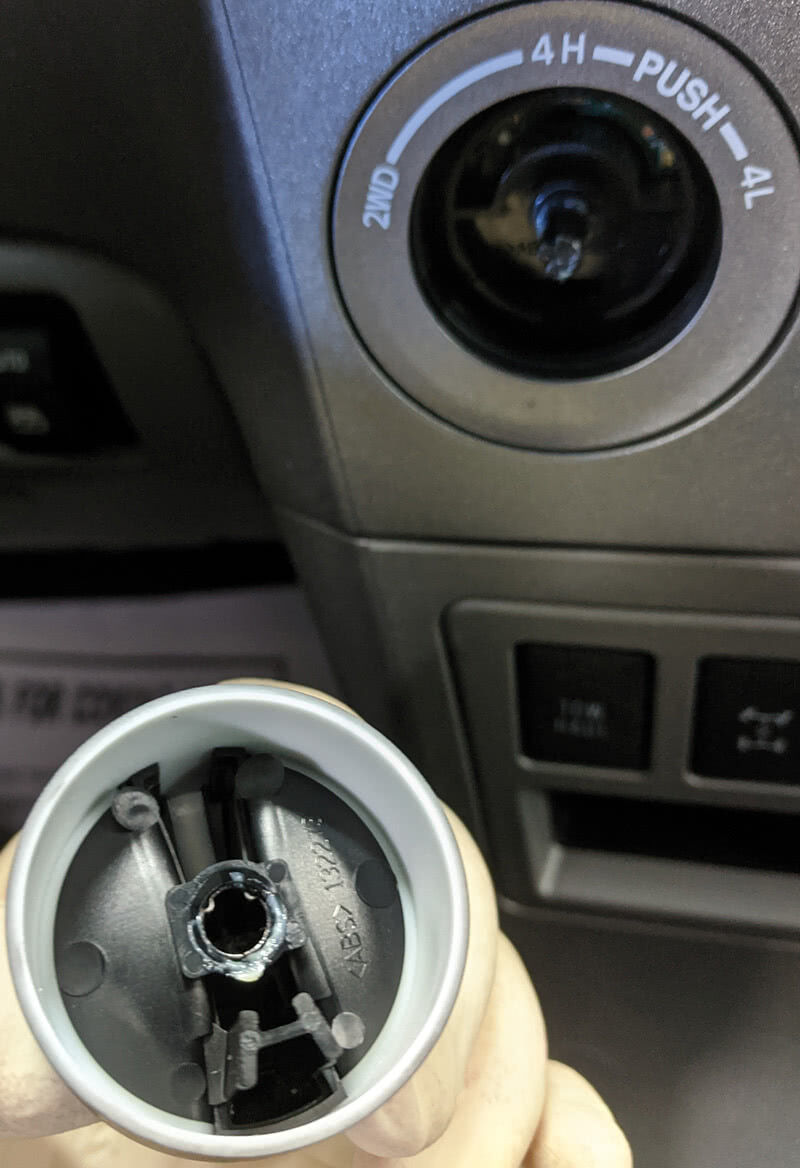
With this new information in hand, the technician took a closer look at the 4WD selector knob and discovered it was installed incorrectly. The knob was clocked out of position in such a way that it could turn, but it was not actually moving the switch to the correct positions. He reinstalled the selector knob in the correct position, and normal operation of the 4WD system was restored.
Of course there were no codes! As far as the Sequoia was concerned, the switch was in 4WD, and the SUV was in 4WD, and all was good with the world.
Remote Sold Separately
A husband and wife came into the office together when dropping their 2010 Toyota Tundra off for testing. They were a very nice couple and described the vehicle concern clearly. The truck had an intermittent no start concern. When the vehicle acted up, the engine did not crank over and there was no click sound at all. It seemed like there was battery power when the no start occurred though, as all the other electronics were working normally. One odd detail was that the no start condition would happen more often for the wife than the husband.
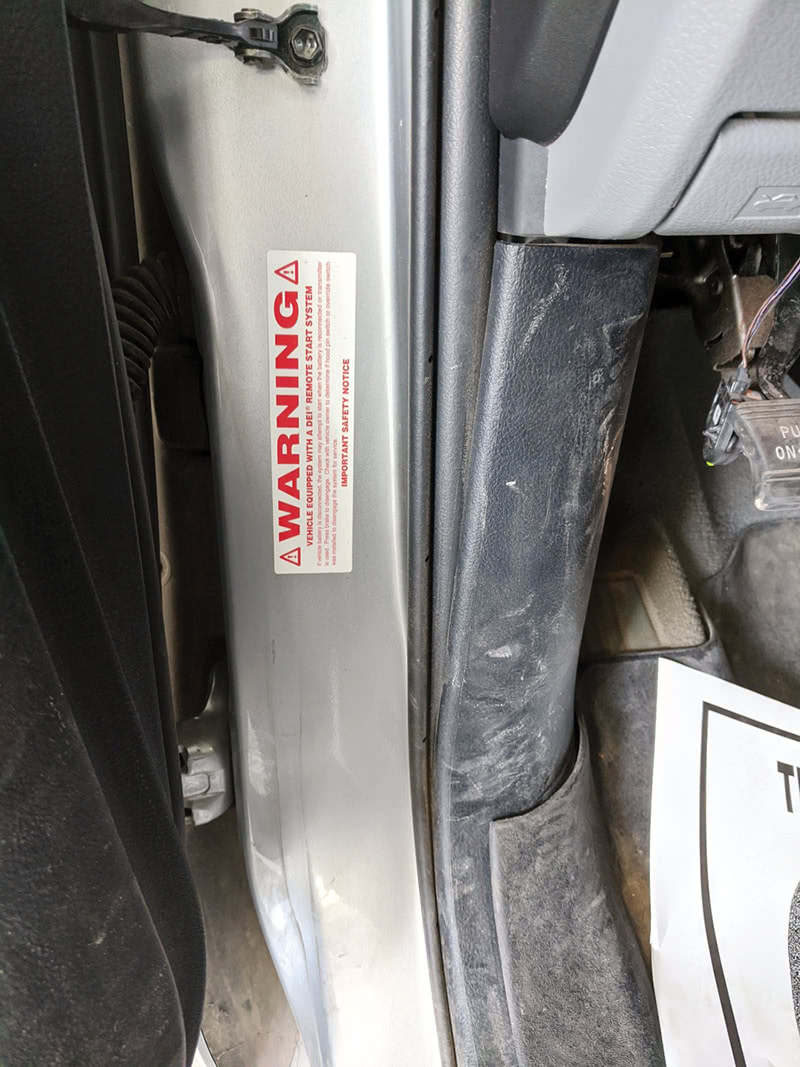
Initially, the no start concern was unable to be duplicated in the service bay, so the basic checks were carried out. The battery tested OK, and the starter motor current looked normal. A scan of all the modules on the vehicle showed there were not any faults related to the no start condition. One possible clue was noted in the driver’s door jamb: a Remote Start System sticker.
On the surface, there seemed to be nothing wrong with the truck. However, it seemed noteworthy that the no start happened more often for the wife than the husband. What would be different when the wife was driving the Tundra? The wife was significantly shorter than her husband. She would have to reposition the seat and the steering wheel.
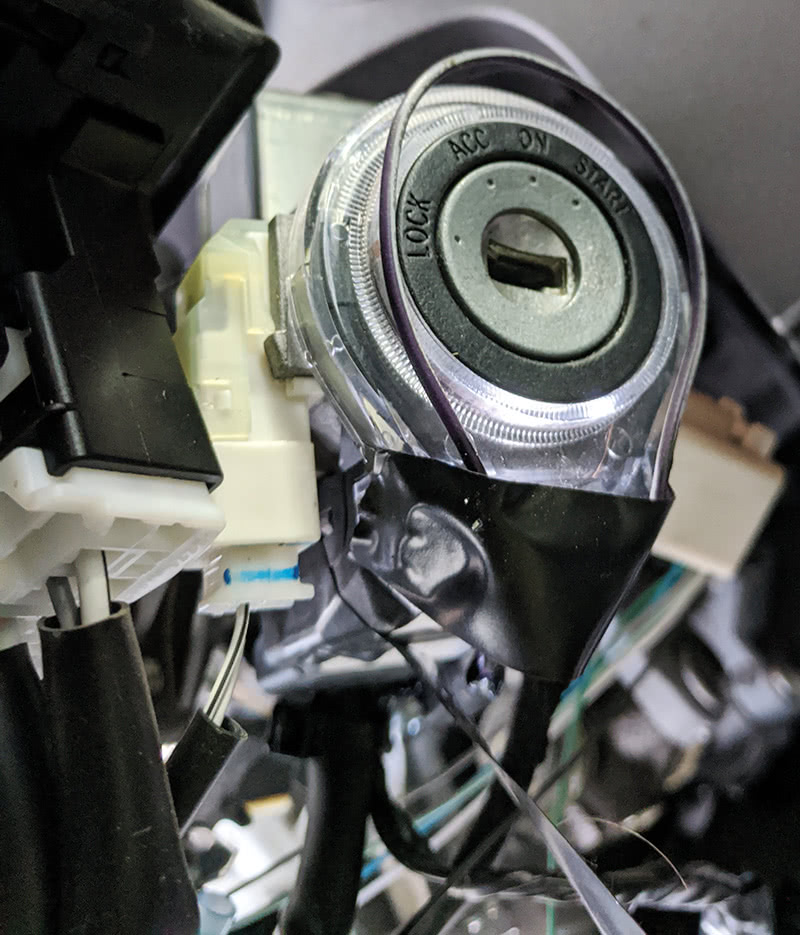
The steering wheel! That had to be it. The truck has a power telescoping steering column. With the power steering column fully extended the no crank no start was easily duplicated.
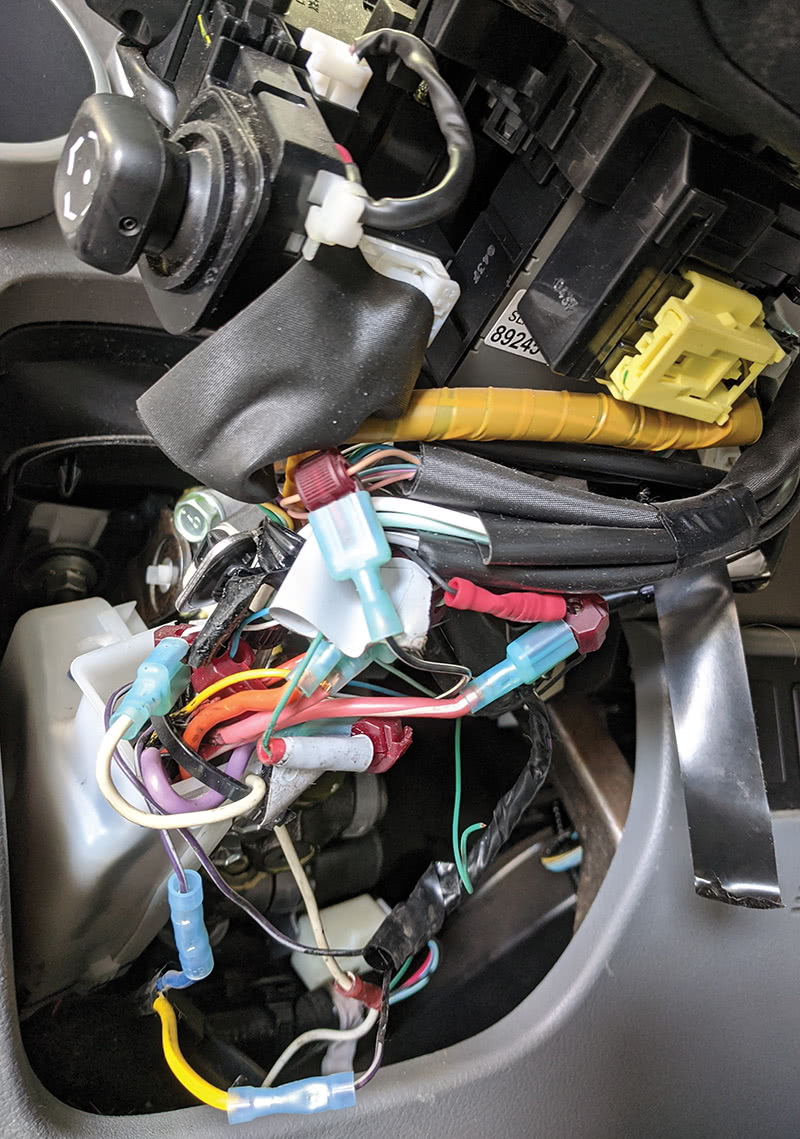
With the steering column covers removed, the problem was easily identified. The remote starter wiring was spliced into the immobilizer wires at the ignition switch. When the steering column was moved all the way out, the wires were being pulled tight causing an open connection.
With the remote start system removed, and the damaged wires repaired, the truck started every time, no matter what position the steering column was in.
While removing the remote starter we discovered an interesting solution to “bypass†the Immobilizer System. The valet key for the truck was stuck up in the dashboard with a length of wire wrapped around it several times. The wire then ran up and looped around the ignition switch. This setup provided the Immobilizer System with the correct key code and allowed the Remote Starter System to start the vehicle.
The Tundra was fixed with just a few connectors for wiring repair — and of course, spending the time to think about the information the owner provided and consider what might cause the car to fail more frequently for one driver than the other. What could have been a multi-visit issue was quickly resolved and the owners got an inexpensive repair and an extra key to boot.

Like these stories? Go out and make some of your own!
One Last Thought
Despite the title and topic of this article, the focus is not about time and speed. Speed shouldn’t be the goal, but rather the result. Speed is a natural byproduct of following a good process and paying close attention to small clues along the way. Slowing down and spending a few extra minutes to get a complete picture of the concern and fully analyze all the data will actually speed up the results. This may seem contradictory, but most mistakes and misdiagnoses are made in haste. Focus on quality and accuracy first and the speed will work itself out in the end.
By Jordan Hill

0 Comments