
An old saying is “there is nothing new under the sun,†from the book of Ecclesiastes. Wheel alignment has been around more or less since the invention of the wheel, in some fashion or another. What has changed or evolved by design are the components related to wheel alignment – suspension systems, steering components, axles, etc. Also added to this list is the incredible advances in machines to perform these alignments.
Why Alignment?
I know, silly question, but it’s important always to remember why you are performing an alignment in order to be sure the finished product is exactly as the engineers designed it to be.
Most alignment settings are calculated so that when traveling down the road at speed, your tires are getting the maximum and proper “touch†on the road, in addition to the ideal handling characteristics. Some vehicles may “squat†and push out the tires as you travel and some may “lift†a bit, so that is why these correction factors are specified on the alignment settings. All vehicles are different, and Mercedes-Benz vehicles are all different among all the various model types. Proper wheel alignment also maximizes fuel economy. According to the U.S. Environmental Protection Agency (EPA) vehicles with out-of-spec wheel alignment conditions can suffer a decrease in fuel efficiency by up to 7%. For a vehicle owner who drives 15,000 miles per year and gets an average of 25 miles per gallon at $3.50 per gallon, proper wheel alignment adds up to $150 annual fuel cost savings.
Terminology
The terminology of alignment correction factors has remained essentially the same for many decades. How we go about getting these various adjustments has, however, changed as modern Mercedes-Benz vehicles have evolved.
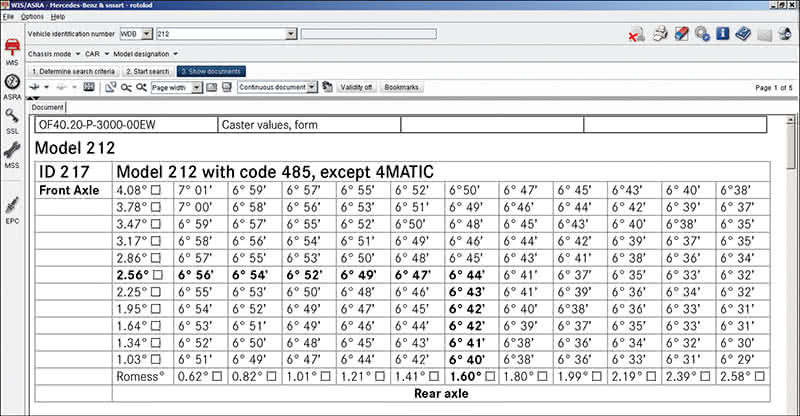
In any case, the specifications for a wheel alignment must be looked up for each and every vehicle, as even minor model changes can mean new specifications. The Mercedes-Benz Workshop Information System (WIS) has these adjustment values (Look in Group 40), as do all Mercedes-Benz Approved wheel alignment systems. Other, non-approved systems often have these specs as well.
Camber (the vertical tilt angle, inward or outward, of the tires when looking at the vehicle straight on) plays a major role in cornering and stability. While positive camber (top tilted outwards) is used to improve ride quality and vehicle stability, high performance vehicles may require better cornering performance gained with negative camber.
Caster (the forward or rearward tilt of the steering axis as viewed from the side of the car) has a significant impact on the vehicle’s straight-ahead steering. Engineers found that providing a caster angle (usually positive) helps the vehicle stay on a straight course and aids in the steering wheel returning to a straight position after a turn, in much the same way as an office chair’s caster wheels pivot when the chair is moved.
Toe (the angle at which the tires turn in or out when viewed from above the vehicle) has significant effects upon tire wear, and is the adjustment most often out-of-spec. Proper toe is crucial for even tire wear and extended life of your customer’s tires.
Thrust angle (the direction the rear wheels travel relative to the vehicle’s centerline) has an effect upon the straight-ahead tracking of the vehicle and can impact tire wear. The thrust angle is especially important in Mercedes-Benz vehicles equipped with DISTRONIC, where the thrust angle must always be set to 0°. Cases where the vehicle wheelbase is different from side to side also indicates a thrust angle issue, and the vehicle will pull to the side with the shorter wheelbase. A four-wheel alignment is used to measure and adjust thrust angle, and is the only Mercedes-Benz recommended alignment method.
Types of Alignment
- A front-end alignment makes adjustments only to the front axle. This is the most basic type of alignment and is not recommended for Mercedes-Benz vehicles, since thrust angle is neither measured nor adjusted.
- A thrust alignment combines a front-end alignment with a thrust alignment to ensure all four wheels are squared with one another. This type of alignment is usually recommended for vehicles with a solid rear axle. You won’t see any solid rear axles on modern Mercedes-Benz vehicles.
- A four-wheel alignment is a comprehensive alignment that combines elements of the front-end and thrust-angle alignments and also positions the rear axle angles. A four-wheel alignment is typically for all-wheel drive vehicles and front-wheel drive cars with adjustable/independent rear suspensions, and are what is recommended for virtually all Mercedes-Benz vehicles.
Different Alignment Machines
First of all, there are dozens of different brands of alignment machines out there, and if yours is fairly new, has been well maintained and has updated software, then you probably are in good shape. There are battery and cable operated sensors, camera systems, laser systems, and infrared to name a few. No need to run right out and purchase the latest state of the art machine — these babies are expensive! Unless you are doing several a day, it’s hard to justify the expense of new machine. (That said, you should never perform an alignment with shoddy or worn-out equipment.) However, if you are in the market for an upgrade, look for one that is Mercedes-Benz approved. Visit mbusassep.com for details on all approved workshop equipment, including wheel alignment systems.
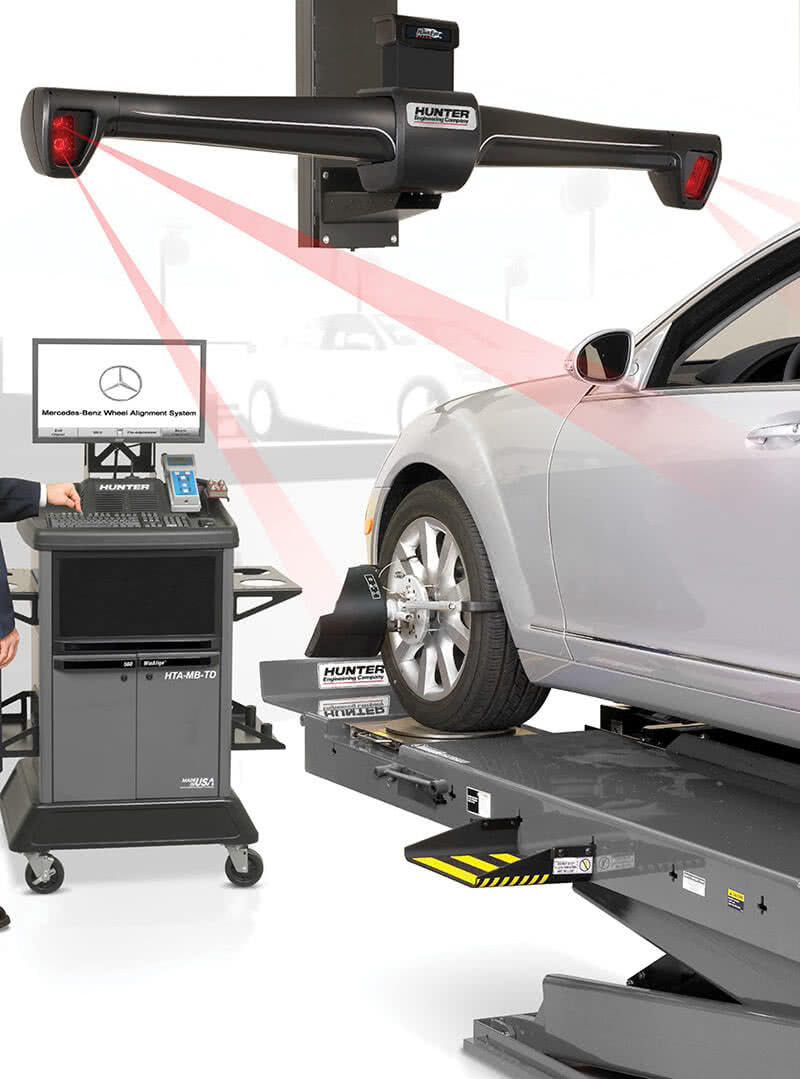
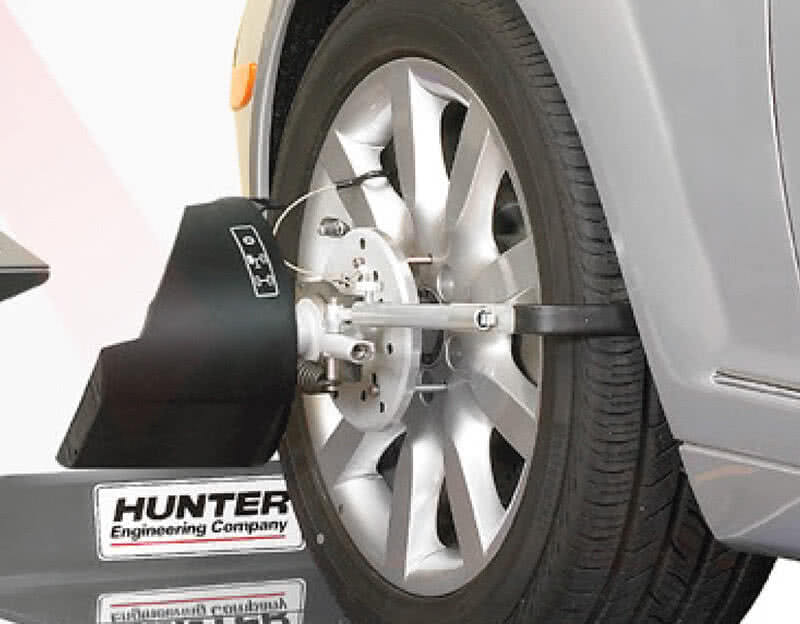
The Mercedes-Benz HTA-MB-TD alignment systems from Hunter Engineering Company® use HawkEye Elite® digital imaging sensors and an MKS (rack condition monitoring system) alignment rack, either full-height or scissors type. The sensors offer speed, durability, ease-of-use and are engineered to provide a low long-term cost of ownership, while the rack is designed so that verification of perfect level is easily performed using the sensors. The sensors have no electronics at the wheel (so no batteries, no moving parts, and no cables). They also provide the same high speed screen updates as conventional sensors. Four high-resolution digital video cameras continuously measure wheel position, and multi-dimensional modeling provides accurate, high speed alignment measurements.
Another handy tool to have in the alignment arsenal is the specialized Mercedes-Benz wheel adapters. These adapters have long tire hooks that easily attach to the tread blocks of Mercedes-Benz performance tires, and pins that go through the wheel and index to the wheel hub. The long hooks are also useful on models that have tight gaps between the tire and rim. The lower profile of the long hooks enables them to stay close to the tire. If you do a lot of Mercedes-Benz alignments this is a win-win. Your dealer can get them as special tool number W124 589 01 31 00, and Hunter sells them as well.
The Process
The beginning of all good alignment procedures starts with a conversation with the customer. Why have they requested an alignment in the first place? Perhaps they have just purchased new tires and want to get the most bang for their buck. Did the old tires wear evenly? Have they brought it in with a handling complaint? Does it pull left or right?
Perhaps your shop has noticed a problem and made the recommendation. Be sure you have addressed the problem accurately. You may have recently replaced some suspension or steering components. Any time you conduct repairs to the steering or suspension systems, you should recommend an alignment.
Inspections
Every wheel alignment begins with a test drive and a thorough vehicle inspection. Make a mental note of any handling characteristics on your test drive so you can look specifically for the causes upon your inspection. Use the same route for all your test drives so that you know how the vehicle should handle in a given situation.
Specifically:
- Does the vehicle pull to the left or right? Be sure to apply the brakes firmly to isolate whether the pull is in the braking system or the steering/suspension. Beware of road crown, which can easily be mistaken for a pull. Test on a flat road.
- Does the steering wheel return to center after turning?
- Check the feel of the suspension for softness or harshness.
- Listen for any ride related noises or vibrations, especially any tire related issues.
- Check that the steering wheel is centered when traveling down a straight road.
- Inspect the tire wear pattern for clues to alignment issues.
Check all tires for even wear and adequate tread depth, as there is no sense in trying to align a vehicle with worn out tires or (heaven forbid!) mismatched sets. Generally accepted tread depth is a minimum of 3 mm, but even at 5 mm replacements should be considered, particularly in areas where rain or snow are common.
Set the proper tire pressure according to the label on the fuel filler flap. Nothing like having a low tire to cause a pull.
A note on modifications: Mercedes-Benz specifically forbids the use of aftermarket wheel modifications, wheel spacers, etc. If you find anything of this sort on the vehicle, inform your customer and decline to perform the alignment. You’ll be saving yourself a lot of headaches.
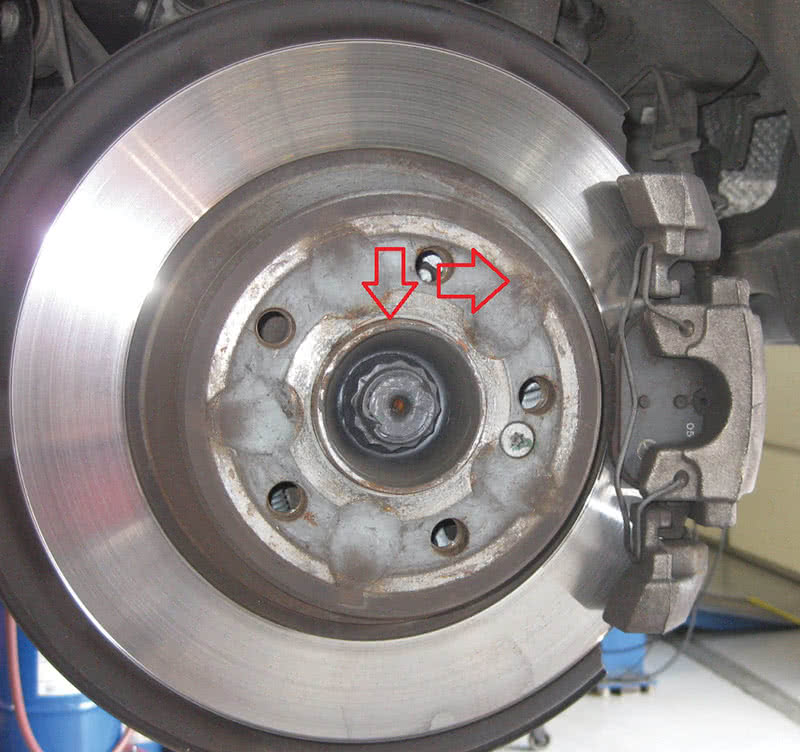
A good idea is to complete a brake inspection. Remove the wheels and verify there is nothing hindering proper contact at the mounting surface of the wheel to the hub. Be sure to clean the back of the wheel and the hub surface of any rust or corrosion. Just the slightest amount of rust or dirt can cause the specs to be out. Be careful not to remove any metal – use a mild abrasive pad and apply a small amount of high temp lubricating paste where the wheel mounts the hub. Do not get any of the paste in the lug bolt holes! Torque the wheels properly to specifications.
Suspension and Steering
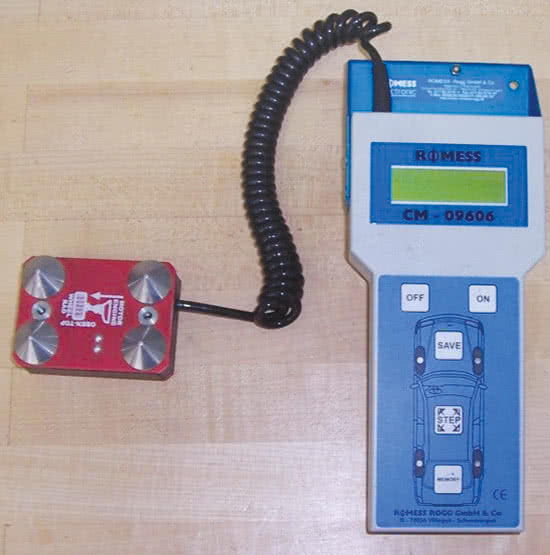
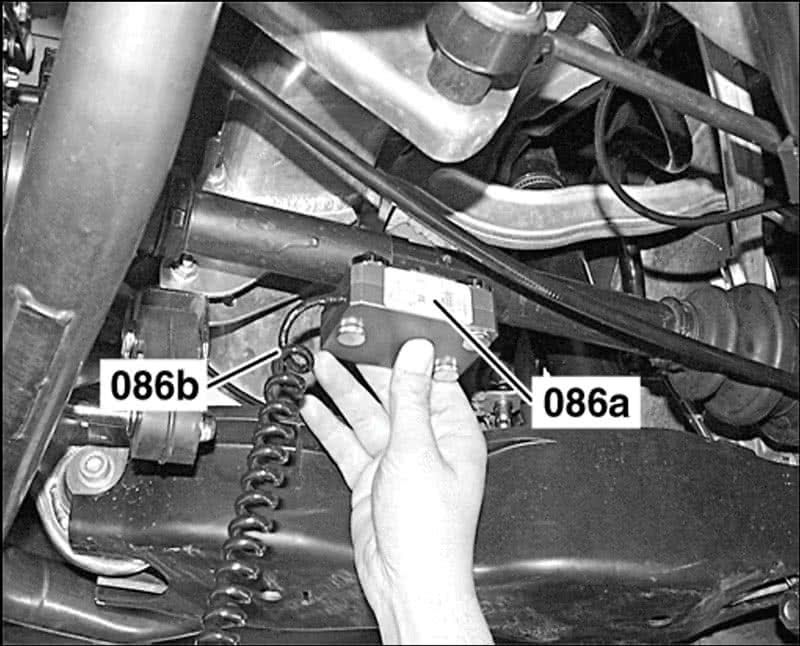
It is critical to perform a complete inspection of the steering and suspension components. Any play in these will cause your alignment specs to change continually while trying to dial it in. Look at tie rod ends, ball joints, control arm bushings, strut mounts, wheel bearing play, and anything you can think of that affects alignment. Check for proper ride height and level. This can be done at the alignment rack. Mercedes-Benz recommends the use of an inclinometer which is available as workshop equipment and, for some models, requires adapters. The Hunter machine listed above has the adapter for that.
Performing the Alignment
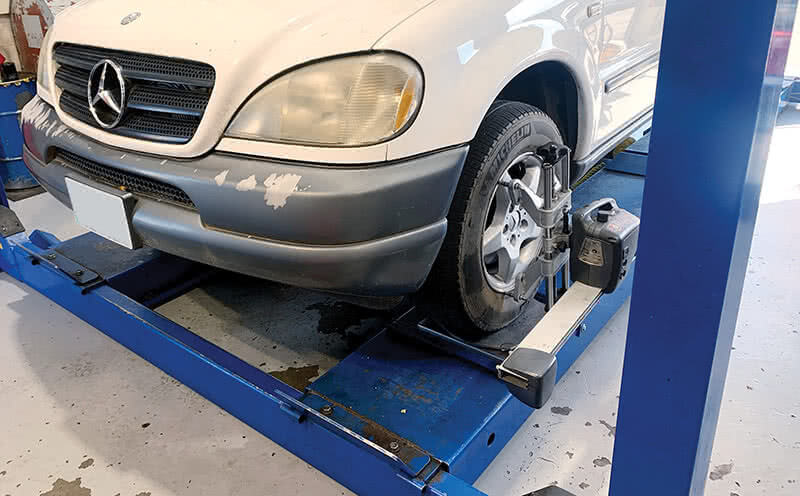
After you’ve conducted all the previous steps, you can drive onto the alignment rack, mount and calibrate your sensors, and begin the process.
Most modern alignment machines will have the proper specs built into the data base for the Mercedes-Benz model you are working on however it’s not a bad idea to compare with the actual values given in the WIS. Your machine will most likely also guide you through the actual alignment steps and procedures. In any case, detailed instructions for wheel alignments – both general and specific – are found in WIS. Tools like steering locks, brake pedal applicators and toe spreader bars are essential.
Ride Height and Level
Measuring ride height is a critical step in getting the camber and caster settings correct, because the specifications vary significantly depending on the actual ride height. Trying to do an alignment on a Mercedes-Benz without knowing ride height is just a shot in the dark, and is almost certainly going to end up incorrect.
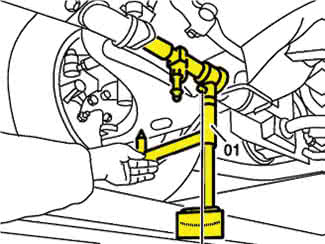
We’ve already mentioned the inclinometer tool. This tool measures the angles of the front lower control arms and the inclination of the rear axles. Any discrepancies can be usually corrected with proper spring or pad replacement. Note: Models with automatic leveling systems should have the level adjustment procedure performed according to WIS, which uses XENTRY. This will include fully raising and lowering the vehicle before measurement.
In some older models, the ride height is measured with manual measuring instruments (so-called “level gaugeâ€). The measurement value obtained must be entered into the alignment computer.
Caster Sweep
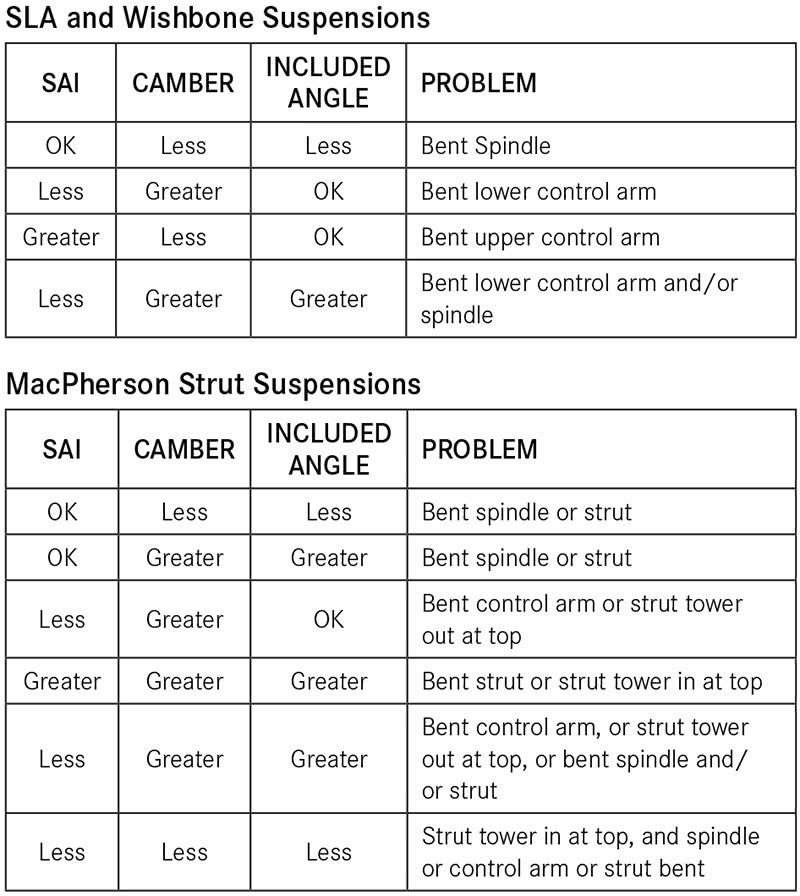
The “Measure Caster†display provides guidance through the procedure to measure Caster or Steering Axis Inclination (SAI) and Included Angle (IA). At times, measuring SAI, IA or turning angle may be useful “tools†to help determine front suspension or steering system problems with a vehicle.
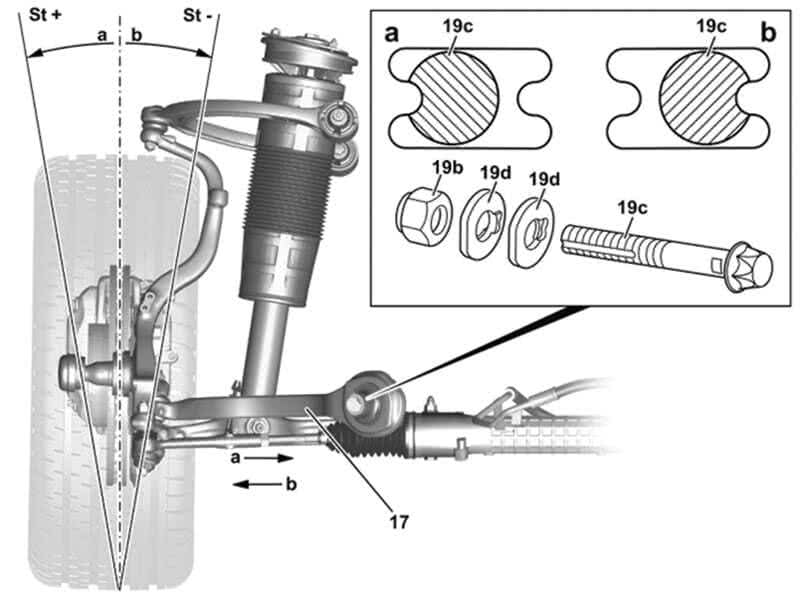
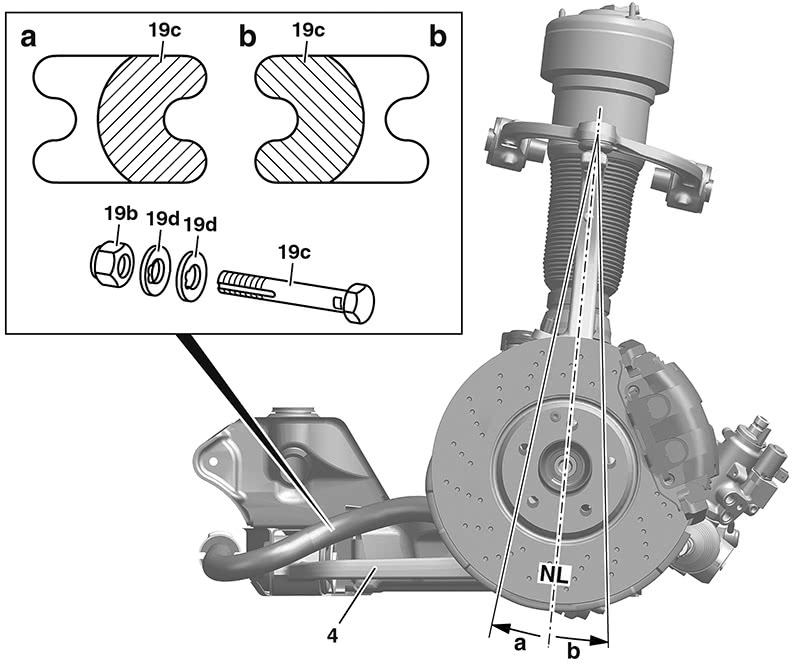
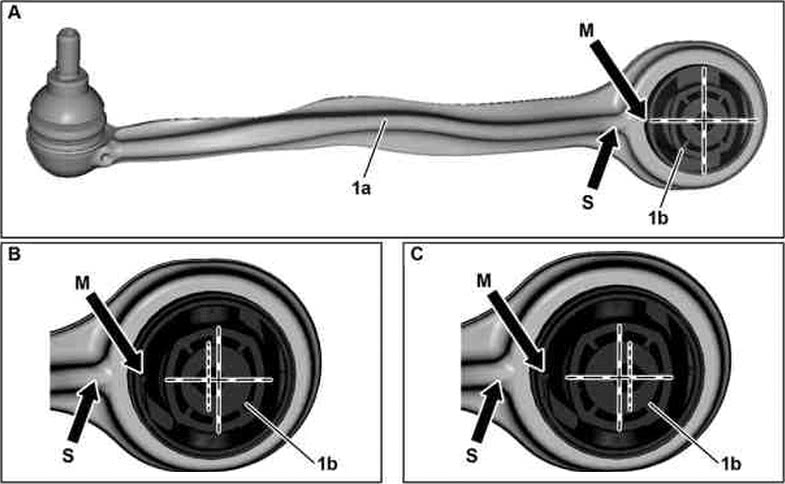
Caster readings that are out of spec usually indicate a worn or bent component. This is where your thorough inspection comes in. Some models will have a caster adjustment and some will not. In models where it is adjustable, your Mercedes-Benz parts department will have caster or camber bolt kits (see Figure 2, on page 5) or, in some newer models, adjustment bushings that are specifically designed for the model you are working on.
In smart vehicles, the camber and caster are adjusted by moving the front axle carrier.
Camber
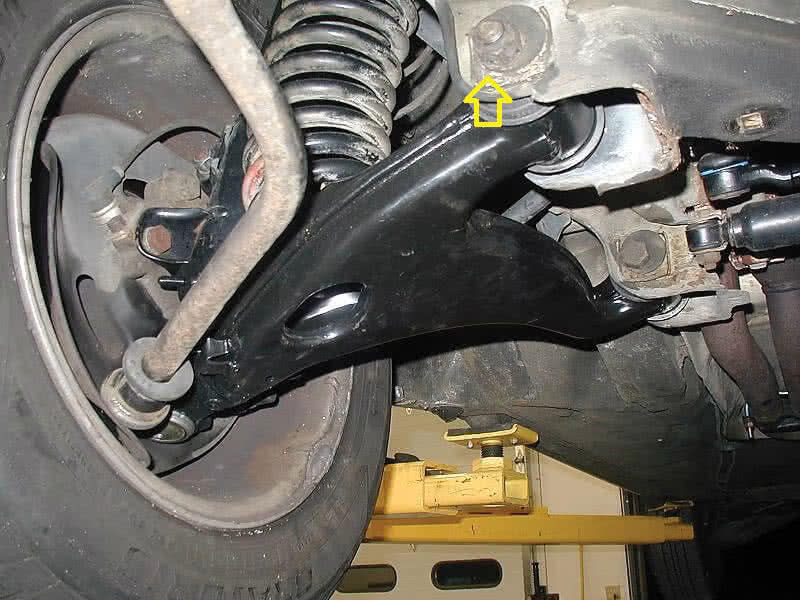
Your measurements here will be positive or negative. And inward tilt is negative and an outward tilt is positive (see Figure 1). Mercedes-Benz models will have a specification for both the front and rear wheels. If your camber specs here are out you may have one or more of the following conditions:
- Worn control arm bushings
- Bent or worn spindle
- Bent struts (look for accident damage)
- Worn strut tower mount, misaligned engine cradle or cross member issue.
Toe
Toe alignment refers to the parallelism between the wheels on the front and rear of the vehicle. Of all alignment angles, toe has the greatest effect on tire wear and is why adjustment is almost always provided. The Hunter machine will guide you through the WinToe function. A toed-out condition will result in a wear along the inside edge of the tire. Also, when running your hand over the tread you may feel a “feathered†condition. The opposite effect happens when the vehicle is toed in.
Take a measurement before and, if corrections are needed, insert a toe spreader bar. This is a spring-loaded bar that forces the front wheels apart with 90-110 nm (66-81 ft-lb) of force. The use of a spreader bar simulates driving conditions by preloading the rubber bushings in the suspension. The use of a spreader bar is the only way to get an accurate front end alignment on Mercedes-Benz vehicles.
Rear toe is generally adjusted using an eccentric washer.
Toe Out Angle
The steering geometry is checked by measuring the toe out angle. This is the difference in the steering angle between the outside wheel and the inside wheel when the wheel is turned roughly 20 degrees. Engineers have built-in adjustments for this as the outside wheel has to travel more distance than the inside wheel on turns. This is also called Ackerman angle. To reduce tire scrub, the inside wheel is turned in slightly more to correct. If this angle is out, the normal toe may not be adjusted properly (assuming the camber and caster readings are in spec.). You may have bent components or the vehicle may have been involved in an accident.
If you find any adjustment or corrections are needed on the wheel alignment the following is the generally accepted order:
- Ride height
- Rear camber
- Rear toe
- Camber and caster front
- Front toe
Adjustments
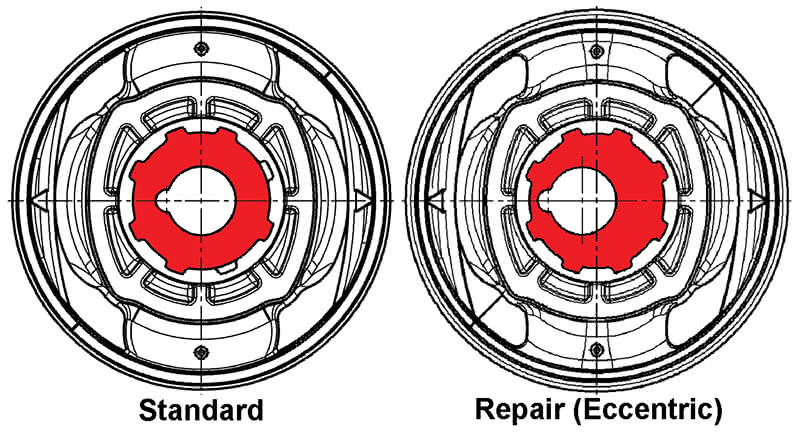
Older models use the cam-type adjusters to move the suspension and adjust the geometry in very small increments. Most models use an available bolt kit, allowing for two new positions (one positive and one negative) for the adjustment, the idea being you try to get in-spec as best you can (and if you can’t, something might be bent). Some modern models use adjustment bushings, which also provide two adjustment points. Note that, in some models, the ‘neutral’ bushings are only available with the control arm assembly. For the bolt kits, and especially the bushings, be sure to determine the correct installation position before assembling it. There is nothing worse than pressing in a control arm bushing to find that you installed it in the wrong position. With the bolts, once installed they must never be turned, or the control arm will get chewed up.
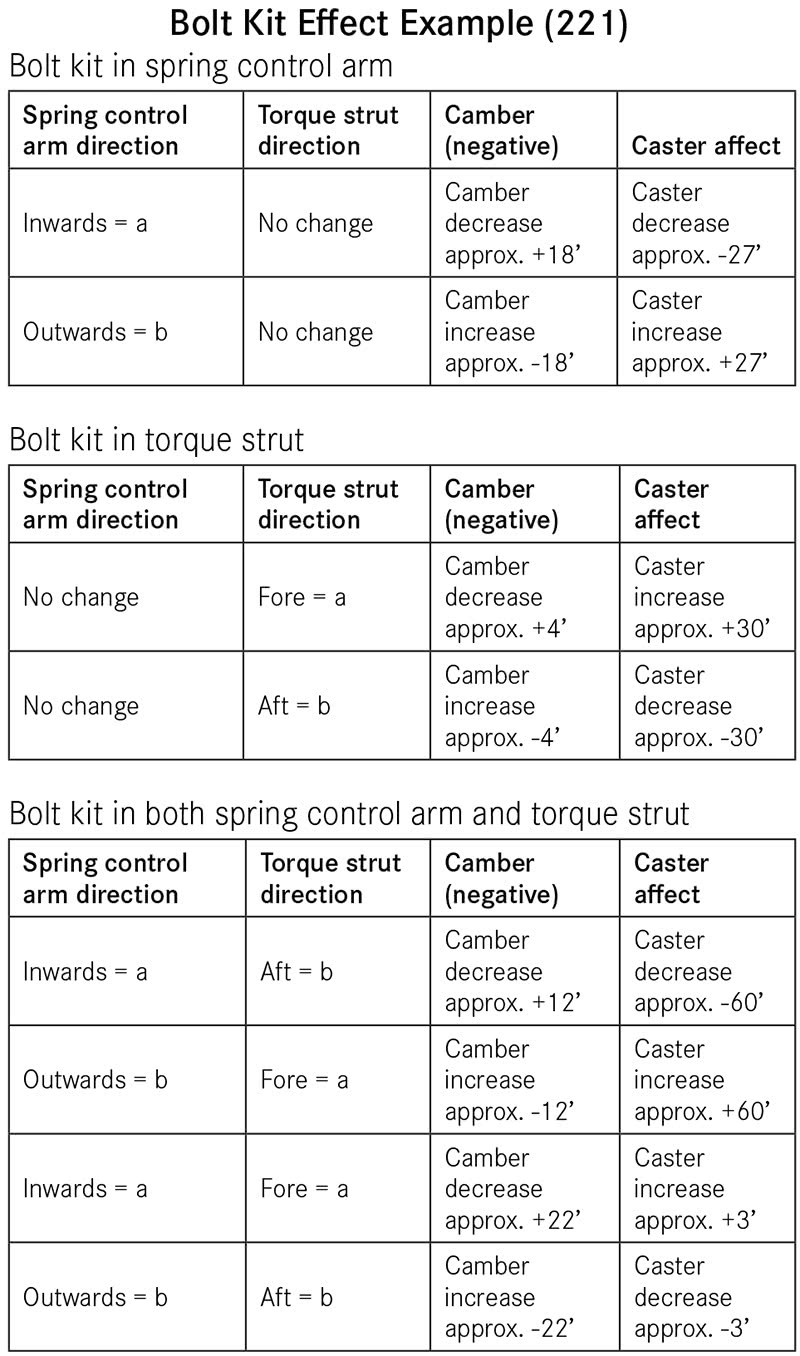
The Bolt Kit Effect chart, below, shows an example of the effects of a bolt kit for a model 221 S-Class. A similar effect can be calculated for eccentric control arm bushings. Figuring out the installation position requires a good understanding of the effects of each adjustment option, the details of which can be found in WIS.
After any alignment is performed, a calibration or reset of the steering angle sensor (if equipped) must be carried out. All vehicles produced for USA consumption from 2012 on have been equipped with ESC, and many earlier ones as well. The procedure resets the steering angle to match the vehicle’s new thrust line after the alignment has been completed. Newer alignment software will remind you of this function.
Having the right equipment in addition to the information resources will assure you of a positive outcome on all your alignments. Make sure your machine is up to date with the latest software and has been calibrated recently. Invest in the proper tools for Mercedes-Benz specific vehicles and you’ll be good to go!


0 Comments