Some of the mistakes and omissions I’ve run across, as well as detailing the trickier dance steps to help you turn out quality Honda brake work.
When it comes to doing a quality brake service on Hondas, some folks are tripping over their tap shoes. How much difficulty is there in hanging a new set of pads or shoes? Turning rotors? There aren’t too many fancy dance steps involved in either, are there? In spite of that, some techs are still ‘dancing’ around their customers and ‘underfixing’ a lot of what they are calling ‘brake jobs.’
I’ll cover some of the mistakes and omissions I’ve run across, as well as detailing the trickier dance steps to help you turn out quality Honda brake work. We’ll consider the meaning behind customer complaints, then run through the techniques to use to make sure the cars you turn out, stay out.
Low Brake Pedal
Back in 1988, brand-new Honda Accords were rolling off the transport with a low and mushy brake pedal. This problem was uncovered during new-car prep, also known as the Pre-Delivery Inspection (PDI). This really surprised me, because at that time a PDI on a Honda was mostly ceremonial. It was usually unnecessary to actually sort out a new car, because we found so few serious problems.
The brake systems had no air in them, and all the hardware was installed properly. But there was one step in putting the car together where the cart had been placed ahead of the horse. The relation-ship between the rear shoe adjustment and the emergency brake adjustment had been flip-flopped. They adjusted the E-brake at the factory before they did the service brake adjustment. This meant the E-brake cable was stretched to the limit before you could apply sufficient pressure between the shoes and the drums.
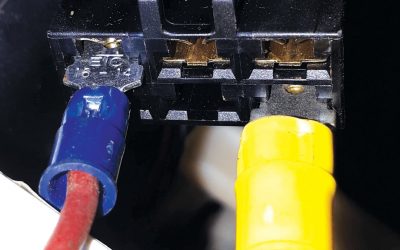
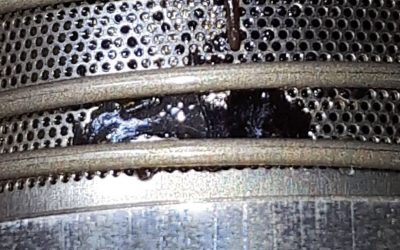
To fix this, I backed off the E-brake cable adjusting nut (Photo 1) until there were no threads exposed, then adjusted the star wheel with the rear drum removed (Photo 2). After reinstalling the drum, I found pedal travel and firmness restored to their normal feel. Usually adjusting the E-brake cable nut after this procedure requires a fraction of the initial turns made by the factory to achieve the ideal 6-8 clicks pulling up the E-brake lever to hold the car firmly.
The most common mistake techs make, when a customer complains that the E-brake doesn’t hold like it used to, is to adjust the E-brake cable nut first. Hold off on that; first remove the drums and adjust the shoes. Maybe you’ll find it needs new shoes too, while you’re in there. Braking performance and pedal feel will remain as designed if you do the job in this sequence.
Cars with rear disc brakes may also exhibit a similar low pedal. The problems I see are caused by seized E-brake levers on the caliper or by seized E-brake cables.
Pry back the E-brake lever on one side until it bot-toms against the stop on the caliper, then pry back the lever on the other side. Go back to the first side. If the lever is no longer against the stop, the E-brake cable is too tight. Keep in mind if the E-brake lever does not return to its stop because the lever is rusted or the cable is too tight, the rear brakes can’t self-adjust, so the pedal will keep getting lower and lower with pad wear.
Remove the cable at the E-brake lever on the caliper and apply the lever in the direction the cable will pull it. If the lever returns under its own spring pressure, the cable needs further evaluation. If the lever does not return, the parking brake mechanism is rusted inside the caliper, and the caliper must be replaced.
I recently worked on a Honda with four-wheel disc brakes and a seriously low pedal. I could not make the E-brake levers return to the stop on either rear caliper, and the rear shoes were worn out. The E-brake cables, however, moved freely. I started by selling the rear brake pieces I felt necessary to make the car ‘whoa!’ The front pads were in good shape, so we agreed to just fix up the rears and see what that netted us.
About 1000 miles later, the customer was back. This time the pedal was just as bad as it was before, and he’d had another shop replace the front pads. The other shop had bled the brakes – I could tell because our brand new bleeder screw caps on the rear calipers were missing. I did get some air out of the system, but the pedal still was not like it should be.
I asked an assistant to apply and release the brakes as I checked each wheel for anything unusual. I had a trainload of pedal travel, but couldn’t see why. I noticed a very strange wear pattern on the front rotors. They had been turned on an off-the-car lathe (I’ll talk more about that later), but the wear on the outboard side of each rotor was along the outer edge with a faint coating of rust close to and around the hub.
As my assistant applied and released the brake pedal, I could see the rotors on each side as they pushed outward and actually flexed. There was my low pedal! I pulled the calipers off and found both lower caliper slides were locked solid, which explained why the calipers were no longer floating and taking up for pad wear as they should. The other shop had turned the rotors and replaced the front pads, then installed them into frozen calipers.
Pedal Pulsation/Rotor Resurfacing
Check for a pedal pulsation by braking on straight, smooth pavement from about 60 mph. If you get a quiver in the steering wheel or the pedal pulsates, it usually means the front rotors are warped. If you’re going to service brakes on Hondas, but don’t have an on-the-car lathe to turn the front rotors, just leave the rotors alone. You might get both wear surfaces parallel with an off-the-car lathe, but that won’t mean much if they’re bolted onto a hub with even 0.001-inches of runout.
It will take 2000-7000 miles to see your next come-back if you turn the rotors off the car. And then you’ll end up replacing the rotors, because there won’t be anything left to cut. After that, the new rotors will be back in another 2000-7000 miles because they were mounted on the same warped hubs.
To avoid comebacks, the only effective way to resurface Honda front rotors is with an on-the-car brake lathe. Use open-end lug nuts (not acorn-style nuts), flat side inward and flat washers installed on the wheel studs. Torque the nuts to 80 ft.-lbs. to stress the hub/rotor assembly, just as though the wheel were normally installed on the car (Photo 3). Do this before removing the caliper so you can prop a screwdriver in a vent slot and against the caliper to keep the hub from turning when you torque the lug nuts.
When I was a machinist at Cottrell Racing Engines in Chaska, Minnesota, I observed first-hand the difference between boring and honing an engine block with deck plates torqued in place, versus doing the job without them, with no loaded stress on the casting. On a small-block Chevy, if you positioned the right-sized ring down the cylinder after honing the block, then torqued the head plates on, you could actually see shadows on the cylinder wall in five places corresponding to the locations of the head bolts.
The brake pedal pulsates because the two rotor surfaces vary – because they’re not parallel. The Honda spec for parallelism is 0.0006-in. maxi-mum. You can have all kinds of runout without detectable pedal pulsation, but that runout will soon lead to a parallelism variation as the pads wear opposite sides of the rotor ‘clock.’ When measured with the rotor stationary, you may have more wear on the inside of the rotor at 6 o’clock and more wear on the outside of the rotor at 12 o’clock. This is where the rotor surface parallelism problem comes from.
When measuring the rotors, use eight reference points, about 10mm in from the outside edge of the rotor. Measure at and between each wheel stud (Photo 4). Record each measurement, then subtract the thinnest measurement from the thickest. A good place to document this is the back of the repair order. If you get 0.0006-inch or more variation, that rotor needs resurfacing; and if you do one, you should do the other on that axle. If you don’t have an on-the-car lathe, send the car to a shop that does.
When turning the rotors, start with an unused bit surface for each job. Make a rough pass at high speed with the self-feeding feature, but with the engine fully warmed up and idling in low gear to keep the rotor speed as slow as possible (Photo 5). Too fast, and you’ll dull your tool bit. A lot of rust will dull your tool bit early as well. You may need to switch to a new bit surface to do the other rotor.
Install a set of old brake pads in the caliper frame, then clamp them to the rotor with a large C-clamp. This will hold the opposite rotor you’re not cutting stationary. If you’re doing the job on a car with an auto trans, turn the ignition key ON, and nudge the brake pedal just enough to unlock the interlock solenoid, then shift to Neutral and start the engine. Finally shift to Low.
Make your passes at no more than the lathe manufacturer’s recommended cutting increments. When both sides are smooth, finish your last pass on the lathe’s slowest speed. In my experience, if you have resurfaced the rotors properly, quality brake pads don’t require a perfect non-directional finish on the resurfaced rotors to properly bed in the new pads.
Noises
After a few thousand miles of service, even OE pads can start making high-pitched squealing noises when coming to a stop, but not necessarily because they are worn out. If the pads are fine as far as the wear surface goes, make sure they aren’t binding in the calipers and apply an approved noise reduction product to the ears of the pads and where the pads contact the calipers. This should diminish the noise (notice I didn’t say eliminate). Just follow the directions on the can. If the pads are actually worn out, the wear indicators on the inner pads will make the ‘fingernails-over-the-blackboard’ sound we’re already familiar with.
The Pads, the Calipers and Other Things
The most common problem is rusted brake pad ears. The rust increases the overall length of the pad, so the pads bind in the caliper. When you inspect the brakes, inspect all surfaces of all the pads! On most brake jobs, I find one pad that has worn more than the other in the same caliper. This is usually caused by rusted brake pad ears, which keep the pads from moving freely within the caliper frame.
New pads don’t always come with new spring steel pad guides, so clean them up with a wire wheel, then clean all the rust off the caliper where the guides reside. Apply a small wipe of antiseize to the caliper before putting the guides back on, then apply a coat of Moly supplied with the pads to the edge of the ears and between the shims and the pad, and between the shim and the caliper (Photo 6).
Always open the bleeder screw before pushing the piston back in (Photo 7), and drain the fluid into a container. Don’t force the piston back into the caliper with the bleeder closed! This is a sure way to force debris past the master cylinder piston seal, which can damage the seal. If the caliper piston won’t return with moderate force, such as light pressure with a large self-locking pliers, rebuild or replace the caliper.
Defective master cylinders on Hondas are usually easy to diagnose. When they fail, the most com-mon symptom is a brake pedal that slowly fades to the floor. This usually happens when the vehicle is already stopped, and the driver is applying a very light pressure on the brake pedal. Hitting the pedal hard will flare the cup seals enough to get a temporary good seal and a temporary good pedal. If you suspect the master is bad, depress the pedal very gingerly. If it oozes all the way down to the floor with that pressure but holds the car firm with a brisk pedal application, that master cylinder is bad.
Remove the slides to clean and lubricate them. Also, check the rubber boots. Dealers stock replacement slides, boots and bolts if you need them. If one’s corroded or rusted, you can usually get it out with a little persuasion.
Clean the rust out of the slide hole with a wire bottlebrush. Take your pick of caliper slide lubricants. I like Dow Corning 111 silicone grease (Photo 8), but I’ve had success with ordinary wheel bearing grease and some other materials as well. Just be sure there’s no rust on the slide where the seal fits and the seal has no holes in it.
Time For Bleeding
A pressure bleeder does a great job of cleansing the brake system. Before you start bleeding, remove the old crud directly from the master cylinder reservoir so it can’t damage any other parts of the brake system as you hydraulically force it through. Ulp! If my wife sees this article, she’ll find out what happened to her turkey baster, so button your lip! (Photo 9). Empty as much fluid as you can from the master cylinder reservoir, then fill it with new clean fluid from a sealed container. Attach the bleeder to the reservoir with one of those cool blue anodized aluminum adapters, then crank about 15 psi into the bleeder and have at it (Photo 10). Let the brake fluid run from each bleeder until it runs clear. That should about do it.
A vacuum bleeder works well too. We’re dealing with pressure differential to let the fluid run through the system; it doesn’t much matter how you achieve it. With a vacuum bleeder, close the bleeder screw before you release the vacuum from the bleeder. Otherwise, you’ll suck air into the caliper.
When a vacuum bleeder is used, air can be sucked past the threads of the bleeder screw. This causes a stream of bubbles in the fluid going into your catch jar. It’s hard to tell which bubbles are coming from where. You can make yourself crazy wondering where all that ‘air’ is coming from. Some techs temporarily wrap the bleeder screw threads with Teflon tape to cure the false-air problem.
Bleeder Screws
Manufacturers don’t put many parts on cars with-out a good reason. Those little rubber caps on the bleeder screws keep the bleeders from rusting in place. If you want to eliminate the need to deal with a frozen or broken-off bleeder screw the next time the vehicle comes in, reinstall the bleeder caps. I’ve seen very few frozen bleeder screws that still had the caps on them.
Torquing the Wheels
Don’t go near Honda lug nuts without a torque wrench (Photo 11). It’s okay to use a small impact to spin the lugs down, but make sure they move when you use a torque wrench to achieve the 80 ft-lb. final value. If you zap lugs with your big impact before you torque them, the torque wrench won’t move them at all before the wrench goes ‘click.’ The rotors are now overtorqued, and maybe warped.


0 Comments