


If you work on Volvos, you really, really need this.
VIDA is not just another four-letter word. VIDA stands for Vehicle Information and Diagnostics for Aftersales. If you work on Volvos, you’re already using it, or you are going to need to use it. Yes, your scan tool can speak Swedish, but only VIDA can truly speak Volvo. Some independent shops have been hesitant to invest in this Volvo factory information system for several reasons. They think it costs too much, it’s too hard to use, or maybe they believe they don’t need it to fix Volvos.
Well, it’s time to wake up and smell the meatballs. To effectively diagnose and service Volvos built from 1999 to the present, you’re going to have to get to know VIDA. As for cost, VIDA can be purchased in three-day subscriptions as needed. With the introduction of the web-based VIDA 2015, the subscription costs have gone down. The previous cost was about $130 for three days, but now that’s about $70, which can more easily be expensed to the customer. Also, it is more efficient to do multiple software downloads and diagnostics while the subscription is live to get the most value out of it.
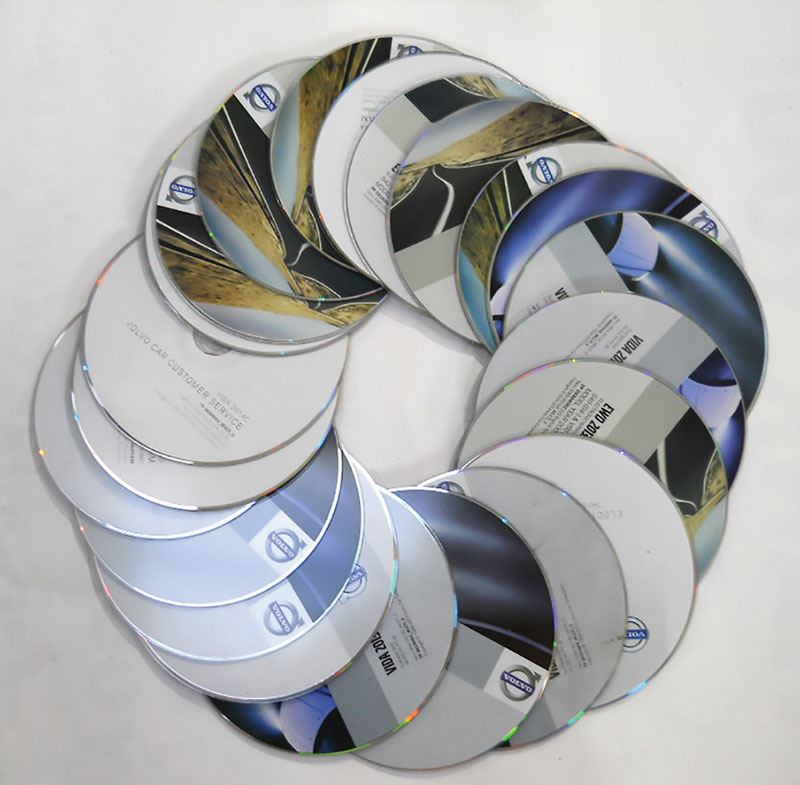
Volvo has been improving Vida every year since its creation. If you have been around Volvos for a while, you may remember VIDA’s predecessor VADIS. It worked fairly well for its time, but it was a CD ROM-based system with limited capabilities.
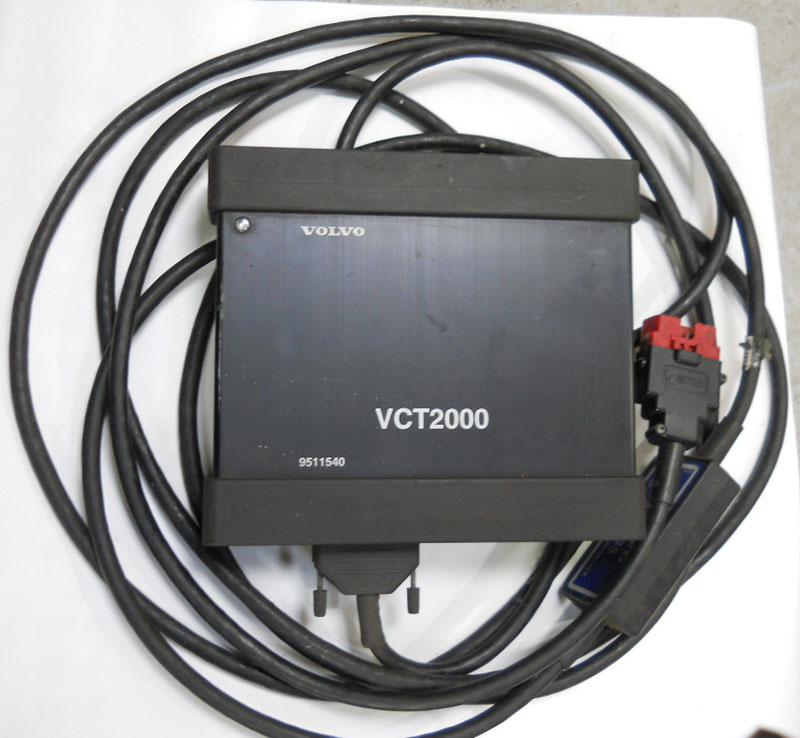
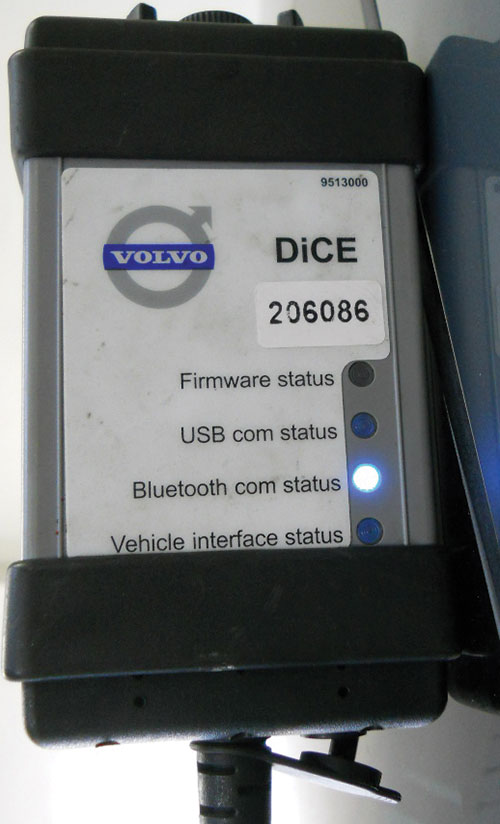
When VIDA came out in 2007, it used the same communication tool that VADIS did, the VCT 2000. It was a box hooked up to your PC or laptop with a six-foot cable, so your computer had to be pretty close to the car to plug the cable into the DLC. This was an awkward setup, and more than one tech has driven out of the shop dragging a computer. Volvo recognized the problem and came out with a new Bluetooth-based communication tool, the VIDA DiCE unit.
The DiCE works well and you can communicate with a car all the way across the shop. Volvo says that the Bluetooth has a maximum range of 100 meters if unobstructed.
VIDA 2015 is the first version to be online only, so there’s no more waiting to get a new disc in the mail!
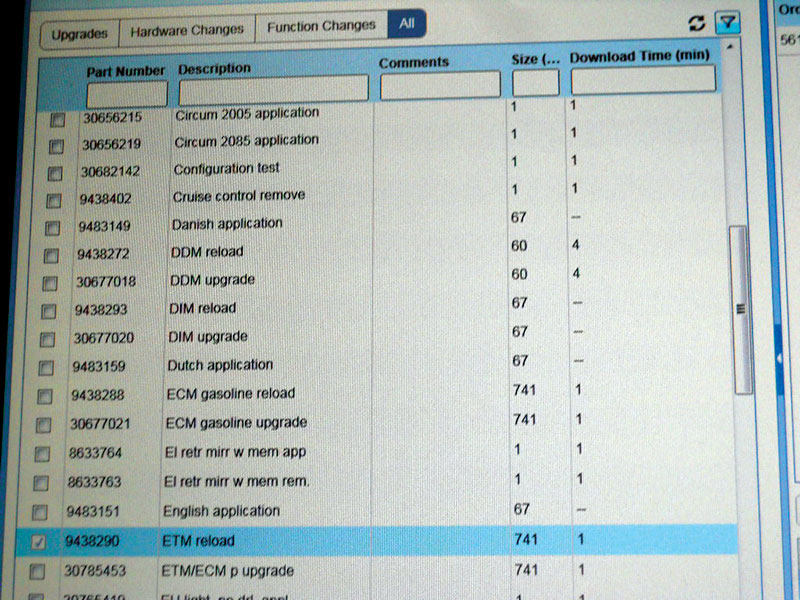
It has some new features, such as fault tracing in ranked order, integrated wiring diagrams, and the Volvo Standard Time Guide (VSTG) built in. As with older versions of VIDA, you have tons of information available to you: parts images and numbers, two-way communication and component activation with all modules, and live data that can be recorded and graphed for precise diagnostics. It’s also the only safe way to download needed software updates and new software to CAN modules and replacement parts that require software to begin to work.
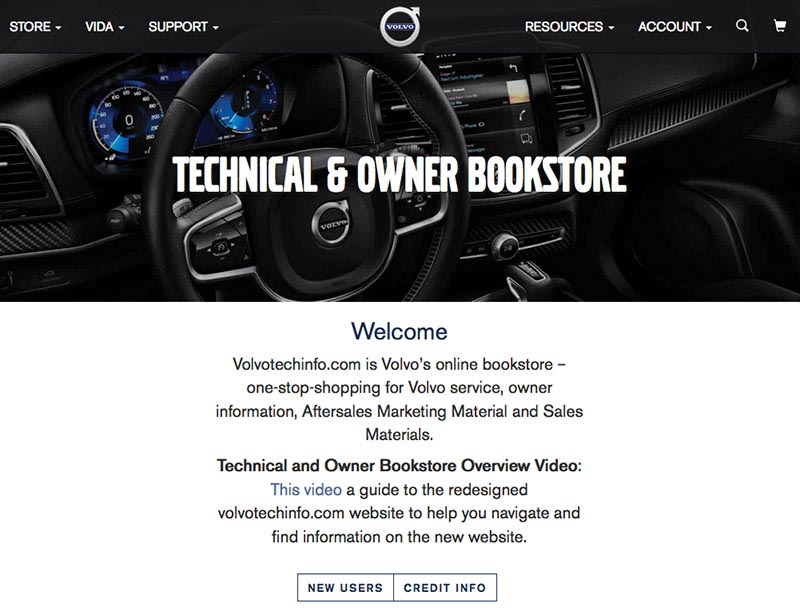
Some of you are probably saying, “I just send the customer to the dealer.†We’re sure your local dealer loves the referrals, but what if you don’t have a local dealer? The closest one might be 100 miles away. What if the car is towed in with a no-start or poor running condition, say from a malfunctioning throttle module? You replace that part and it’s going to need software before you can drive out of the shop. This is where VIDA goes beyond handy to indispensable. You might be asking, “How do I get my hands on this awesome tool?†The short answer is volvotechinfo.com, which has all the information and links you’ll need to get started. Take some time to explore this site as it will be your main link to up-to-date Volvo information and support.
Initial setup
VIDA is a relatively easy tool to learn and use. The only hard part is the initial setup, so here we will try to make it a bit easier to understand. To get started, you will need a laptop or PC with at least the following:
- Core i3 or better processor
- 4 Gigs of RAM
- 10 Gigs of local free disc space
- 2 x USB 2.0 or higher
- A good internet connection
- Microsoft Internet Explorer 10 or higher
- Adobe Acrobat 8 or higher
- Windows 7 Professional/Enterprise (64 bit) or Windows 8.1 Professional (64 bit) operating system
- NTFS file system
- Display resolution:
| Aspect Ratio | Minimum Resolution |
| 16:95 | 1280 x 720 |
| 16:10 | 1280 x 800 |
It can be installed on a PC work station, but most techs prefer to use a laptop because you can test drive with it connected to the car.* If you use a laptop or mobile device, make sure you plug it into a power source while you’re downloading software. You don’t want to lose battery power during the process as it can possibly corrupt the software package or damage the new part you just installed.
Whatever you use should have room to expand because Volvo often adds new features to the system. You should get a machine that you can add more RAM or hard drives to if needed (more memory will give you better performance).
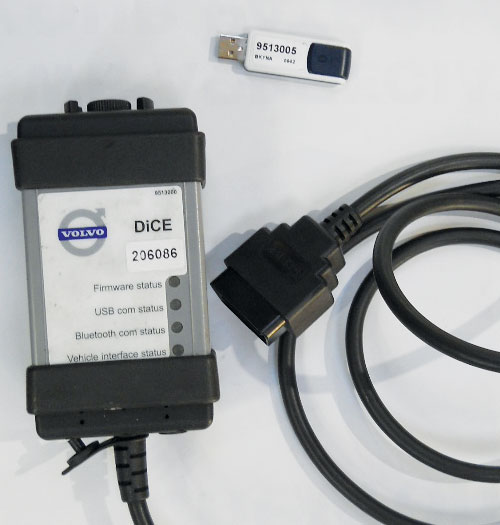
You will also need to purchase the Volvo DiCE communication tool and Volvo Bluetooth adapter to connect to the vehicle.
We mentioned software downloads above, and we should make an important point about that operation: You should have the car hooked up to a stable power source to maintain the proper voltage in the car’s network. Volvo recommends using the Midtronics battery charger/maintainer. This unit keeps the voltage at a steady 13.5. Do not use your shop’s old-school battery charger because of the risk of voltage and amperage spikes that could cause damage to the vehicle’s network.
You can purchase the DiCE tool and other Volvo special tools at volvodealersolutions.com [Edit: volvotechinfo.com].
Pirates!
Some of you are probably saying, “Why should I buy it from Volvo? I’ve seen a bunch of pirate Vida and DiCE units on eBay® and Amazon® for a lot less.†Well, you get what you pay for. Suppose you get one of those knockoff discs to actually work and you plug the dollar store tool into your customer’s car. It’s possible that it’ll give you the info you’re looking for. Or, maybe it was a long day at the knockoff factory and the guy didn’t have enough solder to cobble those recycled TV parts into a working unit, and you just plugged a short or 12V DC into the CAN bus! Oops! Also, do you think that disc of unknown origin that has a sticker on it that looks like a nice photo copy of a VIDA disc is okay? That’s a big risk. The moral of this story is if you want it to work right the first time, to have the most accurate up-to-date information, and not risk your customer’s safety or your sanity, only buy VIDA and DiCE from Volvo at volvotechinfo.com, or volvodealersolutions.com.
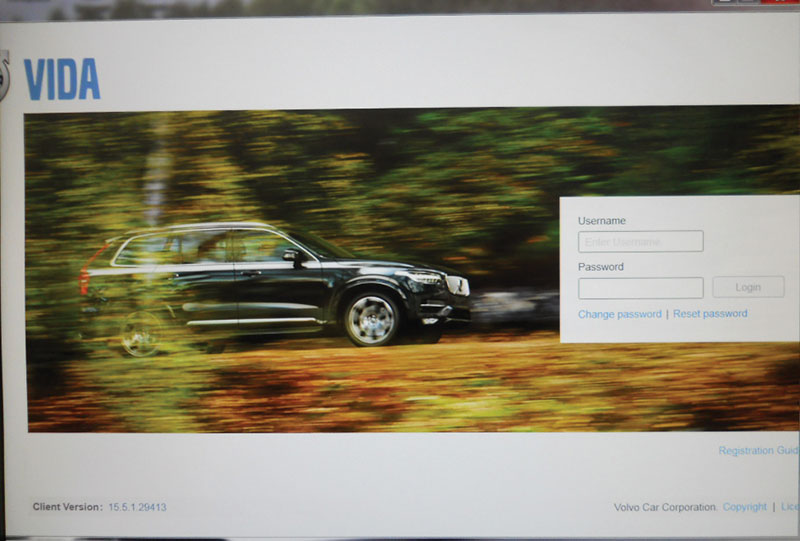
VIDA 2015
If you’re a regular VIDA user, but have not installed or used VIDA 2015 yet, here are some things you should know.
- Your old machine may not work for the online version. So make sure that your “old faithful†is up to the challenge.Â
- Even if you’re a VIDA vet, but have not used the new version, you should start by going to volvotechinfo.com and reviewing the installation instructions under the VIDA tab.
- If you already have a user name and password, it will still work with VIDA 2015.
- You will need to have administrative rights on your PC to install VIDA 2015.Â
- Purchasing the VIDA subscription is the same as before, but when you get to the part where you used to select VIDA AIO (all in one) or VIDA, make sure you select VIDA, the online version.Â
- When you activate VIDA 2015 for the first time in VIDA admin, there is one additional step: Your computer (or “device,†as they call it) needs to be approved. So, after you save all the usual tabs (Computer, Subscription, and User), click on the Device tab and follow the device-approval instructions. You only have to do this the first time you use VIDA 2015.

For new users
If this is going to be your first time installing and using VIDA 2015, congratulations! You came in at the right time. VIDA is better and less expensive than it has ever been before.
Here are 12 tips on getting started:
- After you’ve purchased the required equipment as listed earlier, start by registering for a user name and password for the volvotechinfo.com website. Under the Support tab, there’s a link for New Users. Click here to create a user name and password.
- Next, log onto volvotechinfo.com and under the VIDA tab click on installation instructions. Make sure you take the time to read and understand all the steps. You may want to print out the .pdf so you can highlight each step before doing the install.
- There’s a short video that covers some of the new features of the volvotechinfo.com website on the first page.
- The first time you install VIDA it can seem complicated, so if you’re not a computer person, you may want to get some help from someone who is.
- You should set up and install VIDA when you can focus on it and have no distractions — after hours, at home, or on a weekend.
- Make sure you are logged on to your PC with administration rights, and that you are using Internet Explorer, not Firefox or another browser.
- After you’re sure your computer meets all the requirements, you should download the pre-installation package. There’s a link in Section 2.1, line 4 of the installation instructions labeled (vidainstaller.volvocars.biz/client-installer/VIDASetup.exe.). When you click the link, the installation wizard window will pop up, so follow the screen prompts.
- After you install the prerequisite package, a desktop shortcut to VIDA 2015 should be created. Double click the desktop shortcut (V) to install the VIDA 2015 client. After it verifies the application requirements, a window will pop up asking if you want to install the application. Click “install,†which will download and install VIDA. Now check to see if the installation was successful. There should be three new VIDA icons on your desktop: VIDA, VIDA Admin, and VIDA Support.
- Also make sure that the Volvo Car Corp. program group has been set up under the Windows start menu. At this point, if the installation went well you will need to log onto volvotechinfo.com and purchase at least one three-day subscription. Click on the Store tab, then Subscriptions. Follow the instructions on how to buy, if it’s your first time. You can chose from three-day, 30-day, or 365-day subscriptions. You should probably buy a three-day to start with, even if you don’t have a download to do right then. It will give you time to learn and play with VIDA 2015. Think of it as a really affordable three-day automotive training class.
- After purchasing a VIDA subscription for the first time, a new user will be set up with a dealer code (Partner ID), a VIDA user name (different than the one for the website) and a temporary password.
- The user will be sent an email from Volvo with instructions on resetting the temporary password and adding a security question. It is highly recommended the user sets the security question and answer at this time. Also, your VIDA password will have to be changed every 90 days.
- Now select a subscription by clicking one of the radio buttons, Continue, and Confirm. This should complete registration.
- But wait, there’s more. After initial registration, you will have to go to the VIDA Admin page from the link on your desktop and approve your device. You only have to do this the first time you register. Every time you purchase a new subscription, however, you will have to log into admin to activate it.
- Confused yet? We know this sounds like the instructions for starting the space shuttle, but a lot of it is only for the first time you install VIDA. Once you use it a few times, it becomes second nature and if you get stuck or have a problem, Volvo has great technical information, which you can access on the volvotechinfo.com site. You can get assistance by opening a Help Request under Support.
Cool capabilities
Vida can do some pretty cool things. Here are just a few examples:
Diagnostics
On one screen you can view the high- and low-speed networks and immediately see all the car’s modules and the network map. You will see all the nodes and their status, and be able to quickly diagnose whether you have a problem with the node or the network. If you have a ECM code stored, you can not only read the code, but you can get specific information such as if the fault is intermittent or permanent, and if the fault data is high, low, faulty, or a missing signal. You can go right to fault tracing and live data on the same tool. This extra data will save you lots of time, money, and sanity.
Calibration
There are multiple calibrations you can do without software. The most common one is window calibration. If you have a late-model Volvo with windows that go to the fully closed position, then go back down or up a little on their own, this can be fixed with calibration. In Communication, select the DDM (Driver’s Door Module) or PDM (Passenger’s Door Module) and click on “Advanced.†Follow the screen instructions and — BAM! — you’ve just fixed the customer’s window problem in under five minutes. This is just one example of the usefulness of Calibration.
Parts catalog
Do you ever find yourself doing a repair and you’re looking at a part that you have never changed before, such as a cracked bracket on the back of the engine or a coolant hose that you can’t quiet describe to the parts person? VIDA has the answer. When you click on Parts Catalog, it opens the factory catalog that you can search by system, and get a parts image so you can quickly identify that mystery bracket or hose by part number. You’ll get the right part the first time.
Software Fixes
There are many repairs on Volvos that can be done just by updating the software in a specific module. We’ll cover some of the most common ones in future Volvo TechTips articles.


0 Comments