

Today’s Volvo ABS (Antilock Braking System) works in concert with Traction Control to make driving safer than ever before.
The antilock braking system on a vehicle is a safety feature found on most modern vehicles. The ABS system is designed to help prevent wheels from locking during heavy braking situations, preventing the vehicle from skidding or hydroplaning. The ABS system is made up of the ABS sensors and reluctors that are located on each wheel and the ABS control unit. The sensors detect wheel speed, and will send a message to the ABS module to rapidly pump the brakes when it is detected that the vehicle is skidding or has lost traction.
When the ABS system is not functioning properly, then loss of traction, skidding and hydroplaning are far more likely to occur under heavy braking conditions. The ABS system on most vehicles is usually designed to give plenty of warning signs when there is any trouble with the system. Being aware of these warning signs, and addressing the problem as soon as they arise will help ensure that the ABS system and vehicle remains functioning for maximum safety.
1. Unresponsive brake pedal
In certain cases, depending on the model of vehicle, when the ABS module fails, the brake pedal may become unresponsive. This is an obvious problem as an unresponsive brake pedal will not stop a vehicle, or will not be able to do so in an adequately safe manner. In most cases, this will happen slowly, over time. Usually the brake pedal will become increasingly hard to press until it is no longer responsive.
2. Brake pads require more push effort
When all components of the braking system are working properly, the pedal should require very little effort. It should be very easy to press down on and, once pressed, should have an immediately noticeable effect in slowing the vehicle. If you start to notice that over time the pedal requires increased effort in order to achieve the same amount of braking force, then that may be a sign of a possible issue with the ABS module.
3. The ABS light is on
The most common sign of an issue with the ABS system is the ABS light will illuminate. The ABS light will show an amber color, and is the equivalent of a Check Engine light except it is only to diagnose problems with the ABS system. Older vehicles equipped with earlier ABS systems may not have an ABS light, and may use a Check Engine light instead. If the ABS light comes on, then that is a sure sign there is a problem with the ABS system.
4. The brakes are locking up
When it is functioning correctly, the ABS system is designed specifically to prevent the wheels from locking up during heavy braking, preventing loss of traction. However there can be certain instances where a faulty ABS module can behave erratically, causing brakes to lock up even under normal driving conditions. If you are experiencing sporadic behavior from the brakes, such as random clicking noises, and/or pumping of the brakes, then the ABS control unit will likely need to be replaced.
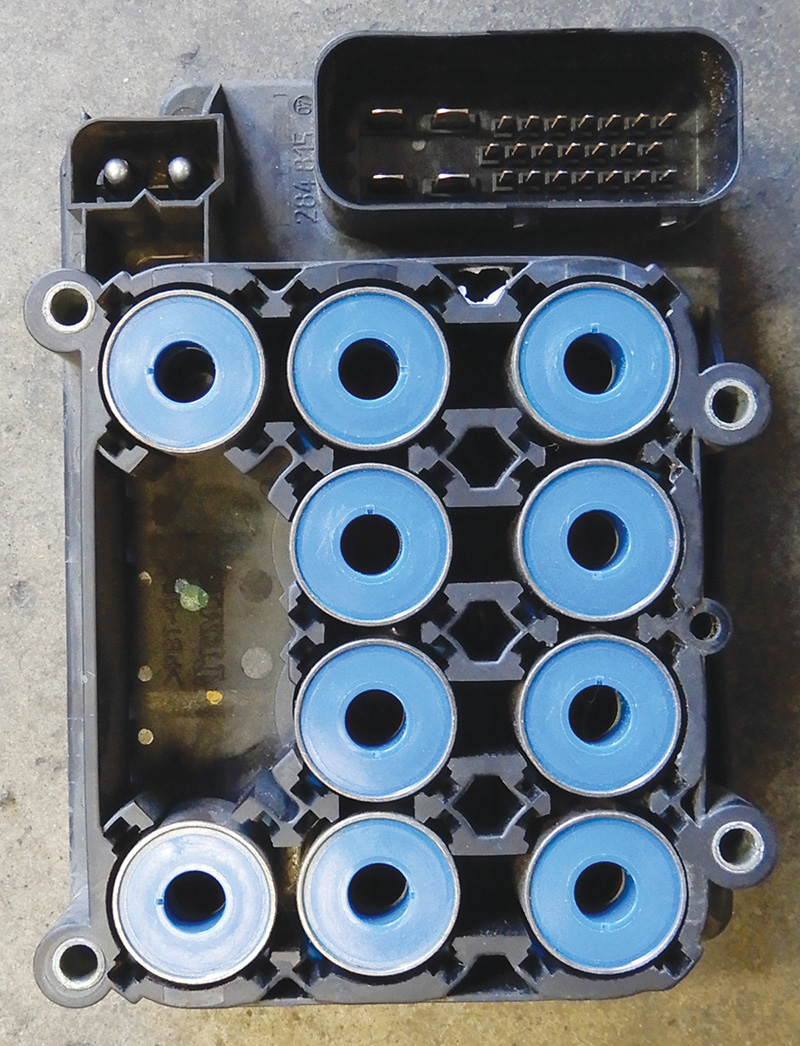
The ABS control unit is attached to the ABS pump, which will need to be unbolted when the control unit is replaced.
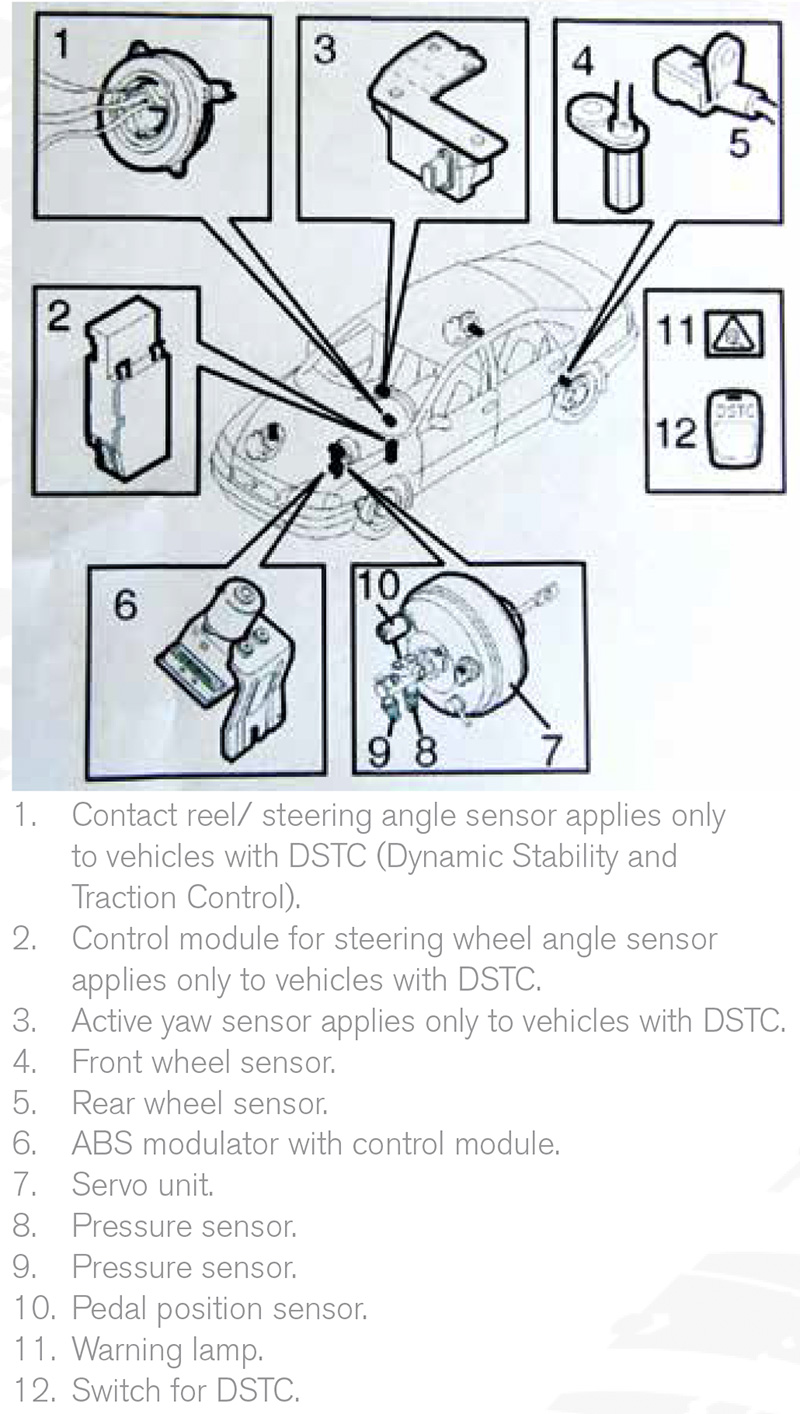
Components and what they do, ABS braking system
TRACS
This was Volvo’s original traction control system which used the ABS sensors to monitor and brake the wheels that were slipping. As many 850 owners experienced, the ABS control module could eventually fail and disable both ABS and TRACS. Often a failing module could falsely trigger and attempt to brake one of the wheels. Now TRACS can be turned off at the push of a button.
STC, Stability Traction Control
During the turn of the century, most Volvos came equipped with traction control as a standard feature. STC is composed of multiple sensors and traction control components which apply the brakes or cut engine power to the wheels that are slipping. This system was often a frustration to drivers because it could dramatically slow down the car’s acceleration under certain conditions. Thankfully, holding the STC button for three seconds would partially disable traction control and provide drivers with the ability to select a different driving mode if needed.
DSTC, Dynamic Stability and Traction Control
Just like STC, the purpose of this system is to prevent the car from skidding or sliding by slightly applying the brakes or cutting engine power to the wheels experiencing a loss of traction. Being dynamic, it consists of even more components than STC but can still be partially disabled at the push of a button.
Traction Control
A component of both DSTC and STC, Volvo’s modern traction control detects a wheel slipping and immediately cuts power to that wheel while applying more power to the other wheels. The purpose of this system is to prevent the car from sliding.
Spin Control
Another modern component of DSTC and STC, this system limits power to the wheels so that they do not spin. Spin control is the main reason why Volvo owners have such a hard time performing burnouts or achieving rapid acceleration from a standstill. When disabling either STC or DSTC, this is the main traction control component which gets turned off.
Active Yaw Sensor
A bit more advanced than the standard traction control system, the yaw rate sensor monitors for any wheel slipping and determines how to distribute the engine’s power to keep the car under control.
EDC, Engine Drag Control
When using lower gears for engine braking, EDC prevents the wheels from locking up. A wheel locking up while driving down a wet or icy hill could have serious consequences.
CTC, Corner Traction Control
Because all modern Volvos are either front wheel or all wheel drive, it’s likely that a driver might experience understeer if they enter a turn too quickly. Understeer occurs when the wheels are turned, but the car’s excessive forward momentum prevents it from making the turn as expected. CTC applies the brakes and distributes power as necessary to keep the nose of the car pointed in the direction you want it to go.
Trailer Stability Assist
The trailer stability assist function is to stabilize the vehicle and the trailer combination, particularly if the trailer begins to sway back and forth. The function applies brakes to one side or the other to slow down and correct the swaying motion of the trailer. Trailer swaying is a common problem when a trailer is loaded with insufficient, or negative, tongue weight. Industry standard is to have at least ten percent of the total loaded trailer weight as tongue weight.
Replacing components in the ABS system and reading ABS codes in the system requires the capability to read the data within the control module. Using Volvo’s VIDA system can help read and diagnose problems with the ABS system. A qualified technician will have little to no problem replacing components in the ABS system.
Troubleshooting
Let’s talk about the 1996 to 2000 850, S/V70, and the S80. That annoying ABS or Traction Control light can come on and go off and then on again, and is a good sign that the control unit is bad.
ABS control modules are a known problem and sometimes can be replaced more than once in a vehicle’s lifetime. Make sure to troubleshoot all codes that are present before just replacing a control unit.
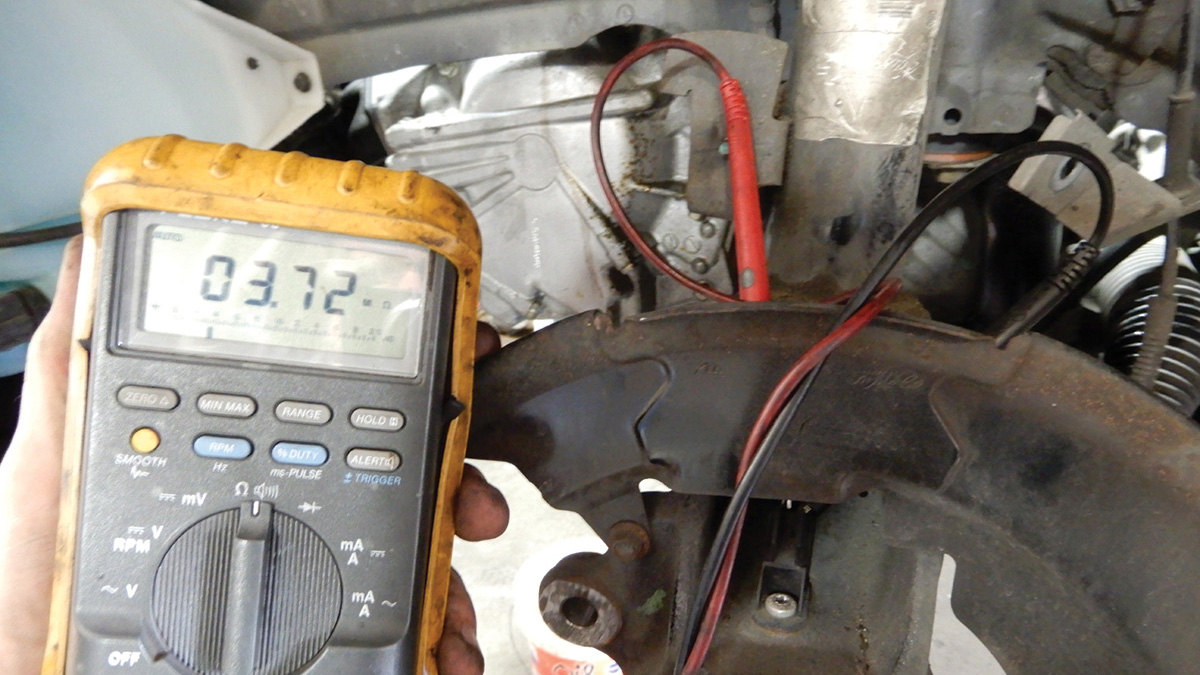
Speed sensors rarely fail but are easy to check with a ohmmeter. Connect a meter to the sensor and spin the wheel. Testing senor resistance should be 900-1,380 ohms. Usually if there is open sensor reading, most of the time there will be a wiring problem, possibly wire worn through from chafing on something. In such cases it’s not a bad idea to clean sensors while troubleshooting. (See image on page 16.)
Sometimes pump codes will be present. Be sure to check the wires at the pump-to-control unit connection. The outside insulation on the wire can start to fall apart, leaving wires exposed that could short out. Rarely will the pump motor fail, but that is possible. Excessive resistance or an OL (Over Limit) reading from a meter means the pump motor is bad and will need to be replaced. Always check the connection at the control module and clean it with electrical cleaner and dry it, making sure no corrosion remains.
Always check fuses first before troubleshooting further. A loose axle nut, or a torn axle boot that’s spilling grease everywhere could cause a wheel sensor code.
Make sure that the charging system in the vehicle is up to snuff, at least 13.4 volts. Overcharging or undercharging can set off ABS codes.
Control Module Part Numbers
ABS control modules for all 1996 – 1998 front wheel drive 850, V70, S70, and C70 models with Tracs may carry part numbers 9162675, 9140774, or 8602266. These numbers are all compatible.
For 1996 – 1998 front wheel drive Volvos without Tracs, the part numbers are 9140773 and 8602265.
For 1998 all wheel drive vehicles, including the XC70, V70R, V70AWD, and S70 AWD, the control modules are part number 9162675, 9140774, and 8602266.
The newer model Volvos become more sophisticated with more components and of course safer for the
driver and passengers.
The Volvo XC90 AWD model had a more modern system with new components in the ABS system. When an anti-skid or a brake warning light comes on, many new codes are introduced into the system, making diagnosing somewhat more challenging. Although these control modules were a bit more reliable than those in the 850 models, other components in the system could malfunction.
Using Volvo’s VIDA to read and diagnose problems will make this process a lot less challenging.
Making sure the system is updated with the most recent software is a good place to start when diagnosing problems in the system. Making sure the alternator is putting out sufficient voltage for battery is key.
One problem with the system is water entering into the cabin. Sunroof drains that leak and fill up the floor board of the vehicle can cause electrical issues with many things, one being the yaw sensor. This sensor is located under the passenger seat, so when water enters the cabin of the vehicle this sensor can become water contaminated.
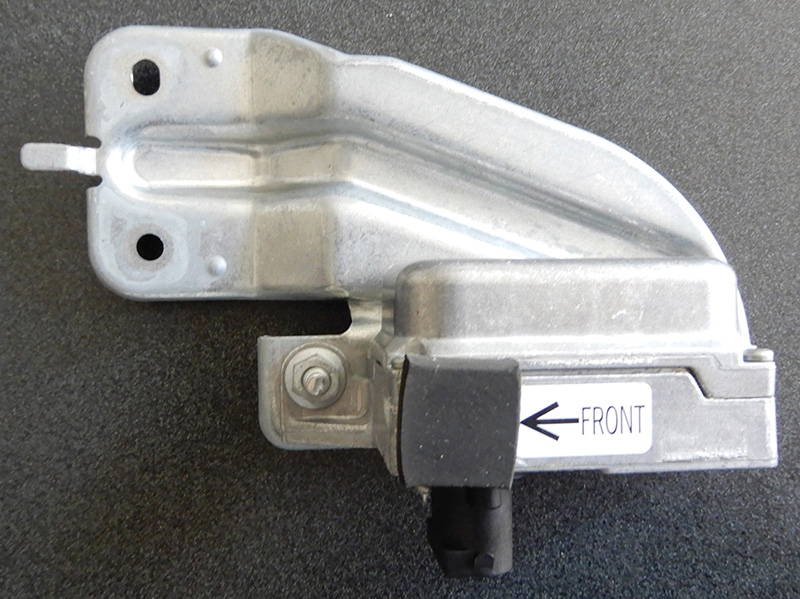
Move the passenger seat towards the back to make room to expose the yaw sensor. Remove the 10 mm bolts and remove the amplifier. Look to see if the compartment is filled with water. If water is present, vacuum it out, remove the seats and carpet and dry out.
Two 10 mm bolts hold down the sensor. Remove them and pull the sensor out. Now that the yaw sensor is exposed, remove the connector and check for water corrosion. If the connector and sensor are corroded, replace both parts using genuine Volvo parts along with a new electrical connector.
After the new unit and connector are replaced and installed under passenger seat, make sure there are no codes in system and test drive vehicle.
Driveshaft Service and R&RÂ
Volvo vehicles equipped with all wheel drive starting with the 1998 Volvo S70 and V70 will have a driveshaft from the angle gear to the differential. The angle gear could also be called the transfer case. These drive shafts are a two piece shaft with center support and bearing. The ends are not your regular u-joints like in the past but rather are a new style propeller shaft universal joint. There is one on each end and one in the middle near the center support bearing.
The driveshaft or propeller shaft can sometimes make a clunking sound, rattling or even a scraping noise when driving, or when moving from Park to Reverse or forward gears. This is a sure sign of wear and deterioration on the universal joints and/or center support bearing. Excessive vibration while driving can also be a driveshaft problem. Driveshafts are finely balanced before installation to make sure there is no vibration. A vibration in the driveshaft can also cause other parts on a Volvo to fail, so it’s very important to check the vehicle carefully when vibration is present.
Replacing the Driveshaft
Before lifting the vehicle up, make sure to leave the gear selector in Neutral so the driveshaft will spin. This will make it easier to remove connecting bolts. Disconnect the battery just to make sure of no problems.
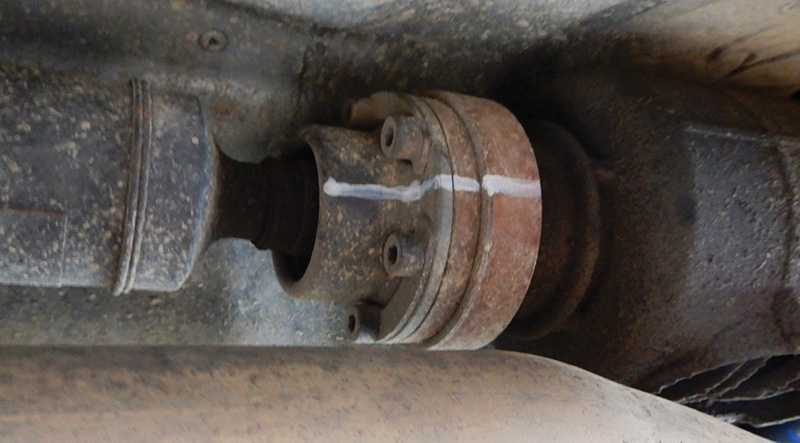
Once the vehicle is lifted up, mark both ends of the driveshaft if you’ll be installing the same driveshaft after repair. If you’ll be installing a new driveshaft, this procedure is not necessary.
Remove the exhaust system and heat shields. The exhaust can be unbolted in front and removed at the hanger in the rear, so you can remove the system all at once. After the exhaust and heat shields are removed, the driveshaft will be exposed. Remove all bolts at the angle gear and differential, or in some models, from the Haldex. Remove bolts from the center support. Remove the driveshaft from the vehicle. Replacing the front universal joint is possible. But check all three universal joints for play. If there are any other problems with the driveshaft, a new shaft will have to be installed.
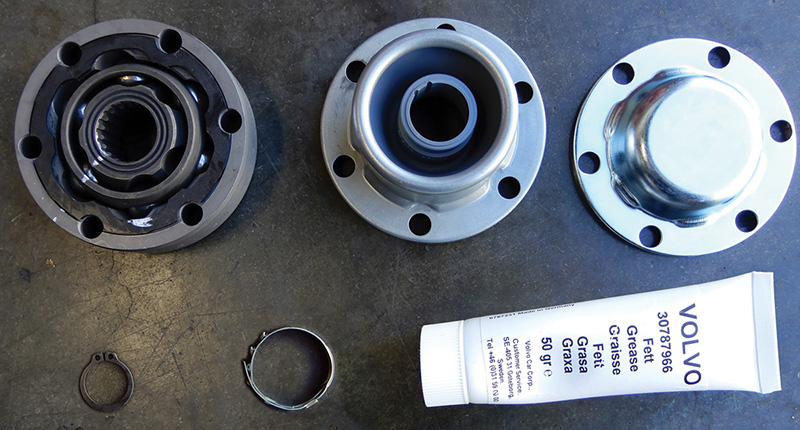
To replace the front universal joint, secure the driveshaft into a vise to hold it in place. Remove the front cover by tapping the edge with a small drift or punch and remove the snap ring. Remove clamps on both sides of the universal joint. The universal joint should now be able to be removed; just slide it off the shaft. In some cases the universal joint will be stuck on the shaft. Removing the rubber boot and using a drift punch and tapping with a hammer may be necessary. Clean the end of the shaft from all grease and debris. Install a new joint and be sure to grease properly. Install a new e-clip after the joint is on the shaft. Secure the clamps on the boot to protect the universal joint. Using Volvo Genuine parts will make the job easier and durable.
Install the driveshaft back into the vehicle. Tighten the bolts at both ends of the shaft and at the center support. Install all heat shields and the exhaust system. Test drive the vehicle to make sure no vibration or noises remain.
Download PDF


0 Comments