

This job is not a common repair, and it is somewhat complex. Only in a few cases will the fuel tank be replaced in order to fix an evaporative system issue.
The need for fuel tank replacement can be caused by a variety of problems. This job is not a very common repair, and it is a somewhat complex task.
Most shops will perform this repair because the tank was damaged by an accident or cracks caused by overenthusiastic off-road driving.
Only in a few cases will the fuel tank be replaced in order to fix an evaporative system issue.
Case study
In this article, we will cover a 2005 XC90 2.5 L Turbo that had to have its fuel tank replaced because of a leak in the evaporative emission system.
The Volvo in this case study came into the shop with an illuminated Check Engine light.
After interviewing the customer, the service advisor found out that the Check Engine light had been on for a couple of weeks, and the car did not exhibit any other symptoms, such as poor engine performance .
The customer also stated that in the last few months, three other shops had tried to fix this problem. These shops had already replaced multiple parts including the gas cap and Diagnosis Module Tank Leak pump (DMTL pump). This pump is more commonly call a Leak Detection pump (LDC pump).
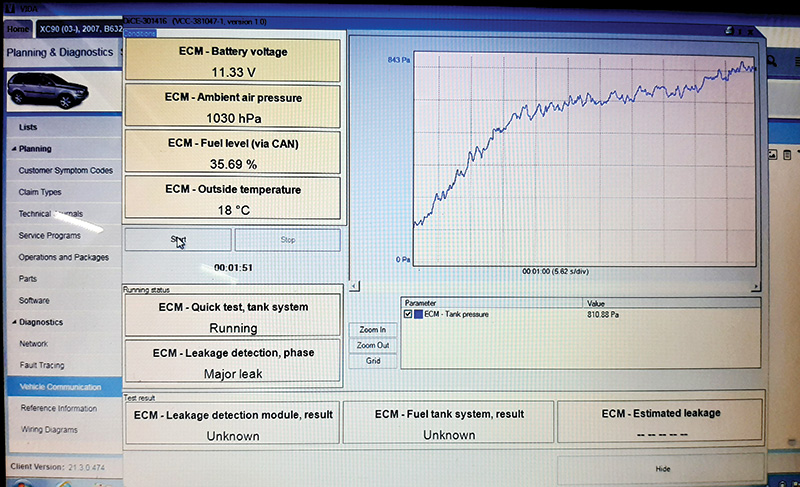
Our technician hooked up the car to Volvo’s VIDA scan tool program and ran a scan for codes and stored freeze frame data.
The ECM had stored codes ECM 439C (PO442), ECM 421C (PO444), and ECM 421D (PO445).
The codes were active at the time the car came into the shop so the technician knew that the car had an active issue.
These codes can be caused by:
- A loose gas cap
- Sticking, clogged or inoperative canister purge valve
- A leak in the hoses or lines anywhere in the EVAP system
- A leaking or clogged EVAP canister
- A cracked or damaged EVAP canister
- A malfunctioning DMTL pump (one of the more common problems on higher mileage Volvos)
- A damaged or leaking fuel tank
- An electrical problem, such as contact resistance, open or short of the electrical connectors or wiring to the EVAP system components
- Or any combination of the above.
NOTE: Replacement of the vehicle’s fuel tank for an evaporative emissions system problem is the exception to the rule. You should only consider it if you have performed all the appropriate testing for the codes and symptoms that your customer’s car is exhibiting, unless you see a hole or crack in the tank. It is critical that you make sure that all the EVAP system components and hoses are intact and functioning properly.
Bottom line is that fuel tank replacement should never be one of the first steps in fixing an EVAP leak. You can use Volvo’s VIDA software system to run an evaporative system (tank system) test on most of their models. You can use this valuable test data to help you pinpoint the problem and, once you have figured it out, you can use the test again to verify the repairs.
But this article is about fuel tank replacement, not EVAP system diagnosis.
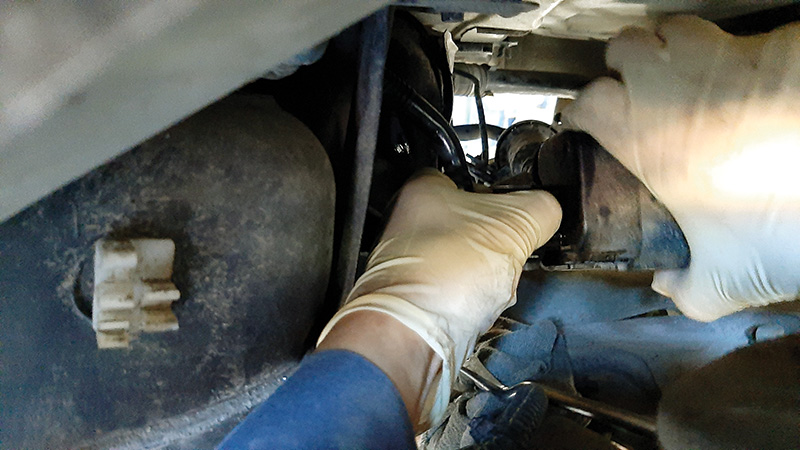
The technician ran the proper testing and, after confirming that all the EVAP components were operating properly, the technician used a smoke machine to test the sealing integrity of the fuel tank system.
Using the smoke testing machine with an adapter, the technician hooked up to the fuel filler neck and saw smoke coming out from under the car in the space between the body and the top of the tank.
Since the space between the body and the fuel tank is so tight, further disassembly was needed to ascertain the source of the leak.
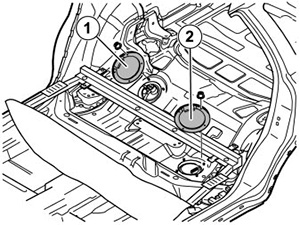
There are two access plates in the floor above the fuel tank used to access the fuel pump assembly on the right rear, and the secondary fuel level sender on the left rear.
To access these covers you will need to remove the rear seats and, in the case of cars with a third row of seats, you will have to remove the tracks and seats from the third row.
Removing the rear seats is the same procedure you will have to do to replace the fuel pump assembly or fuel level sensor.
Once the rear seats had been removed, the two access plates were removed and the technician was able to see that the smoke was not leaking out of the fuel pump or sender seals.
Using a mirror and a flashlight the tech saw that the smoke was coming from the top of the fuel tank on the right side. The technician concluded that the tank was cracked and recommended that the fuel tank be removed to confirm the crack and replace the tank as needed.
This is a big job on one of these all-wheel drive cars, so make sure that you have eliminated everything else before you start taking the entire rear end apart.
You will more than likely want to drain the fuel in the tank before you begin. There are several ways to do this. If you’re lucky, the tank will be below a quarter full and you can lower the tank and use a hand pump and hose to pull out fuel into a suitable container.
If you want to do it by the book (Volvo’s book), the following is what Volvo recommends.
Fuel tank draining (the Volvo factory way)
Preparation: Disconnect the battery negative terminal. See Battery, Disconnecting.
| Warning! RISK OF EXPLOSION!!! THE USE OF A FRESH AIR MASK IS RECOMMENDED. |
Remove the outer rear seats (second row).
Remove the center rear seat.
Fold the carpet back.
Remove:
- Ventilation pipe (1). This only applies to 7-seat vehicles.
- The insulation block (2).
- The insulation block (3).
Removing the cap over the level sensor: Remove the covers (1 and 2) over the fuel pump and level sensor assemblies.
Remove the hoses from the right-hand level sensor. Cover the area around the combined tank unit and between the doors with absorbent material.
Caution! Make sure dirt does not enter the fuel tank.
Draining the fuel tank
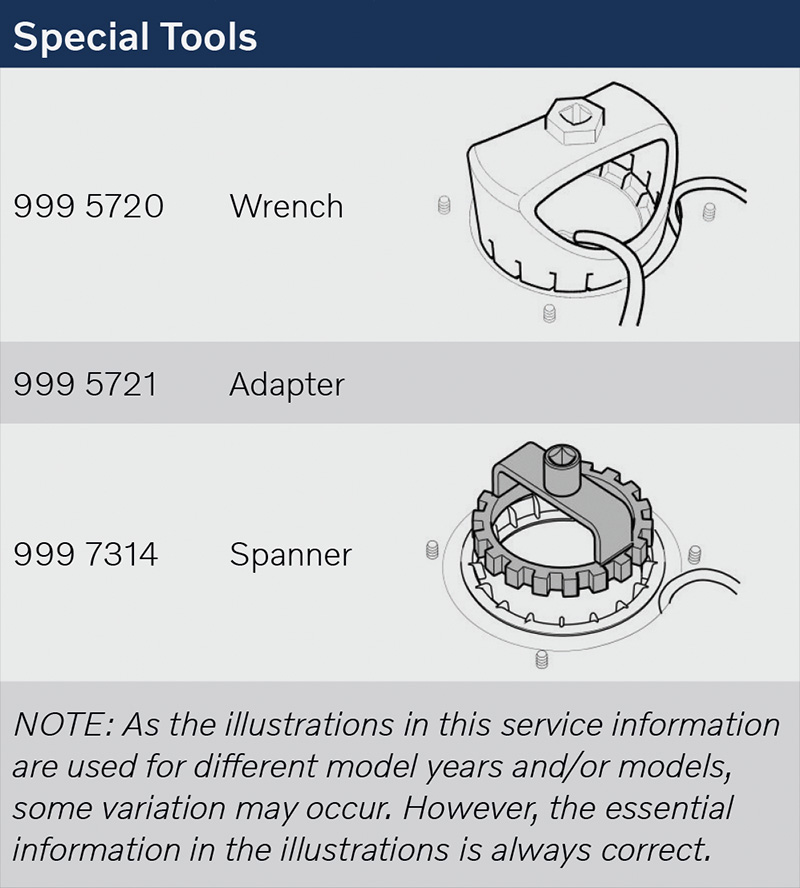
Special tools: Use wrench tool number 999 5720.
Clean and remove all dirt from the right and left-hand combined tank units.
Remove the screw on the fuel pump assembly. Insert the heavy-duty hose and suck out the remains from the bottom of the right-hand side of the fuel tank.
Connect hose adapter 999 5721 to the heavy-duty hose. Suck out the remains from the bottom of the level sensor reservoir.
Carefully remove the overflow pipe from the reservoir.
Remove the thin hose 999 5721 adapter from the heavy-duty hose. Connect the thin hose to the overflow pipe. Use a hose clamp.
Pump until a lot of air comes out.
Open the left-hand level sensor; use wrench 999 7314 Spanner. Insert the heavy-duty hose and suck out the remains from the bottom of the left-hand side of the fuel tank.
Removing the fuel tank

After removing the seats and access covers from the rear floor area, remove or disconnect the electrical connectors from the fuel pump assembly on the right, and from the secondary fuel level sensor on the left.
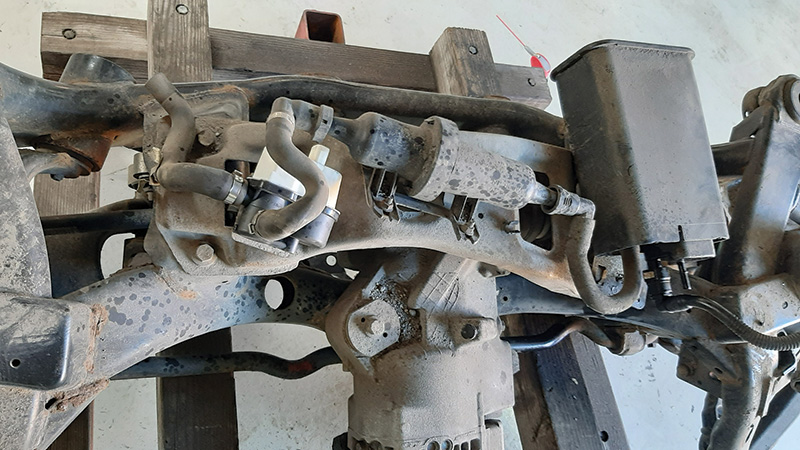
You are going to have to lower the entire rear end suspension assembly out the car to get the gas tank out, so there are a few things to disconnect first.
Start with the brakes.
Remove the rear wheels.
You can take out the whole rear end member with the rear brakes assembled, but you will have to remove the parking brake cables. This is easier if you disconnect the cables at the rear backing plates.
Unbolt the calipers and temporarily hang them from the rear suspension. Next, remove the brake rotors and then disassemble and remove the parking brake shoes.
It makes it easier if you remove the brake calipers and clamp the lines to keep the fluid from leaking.
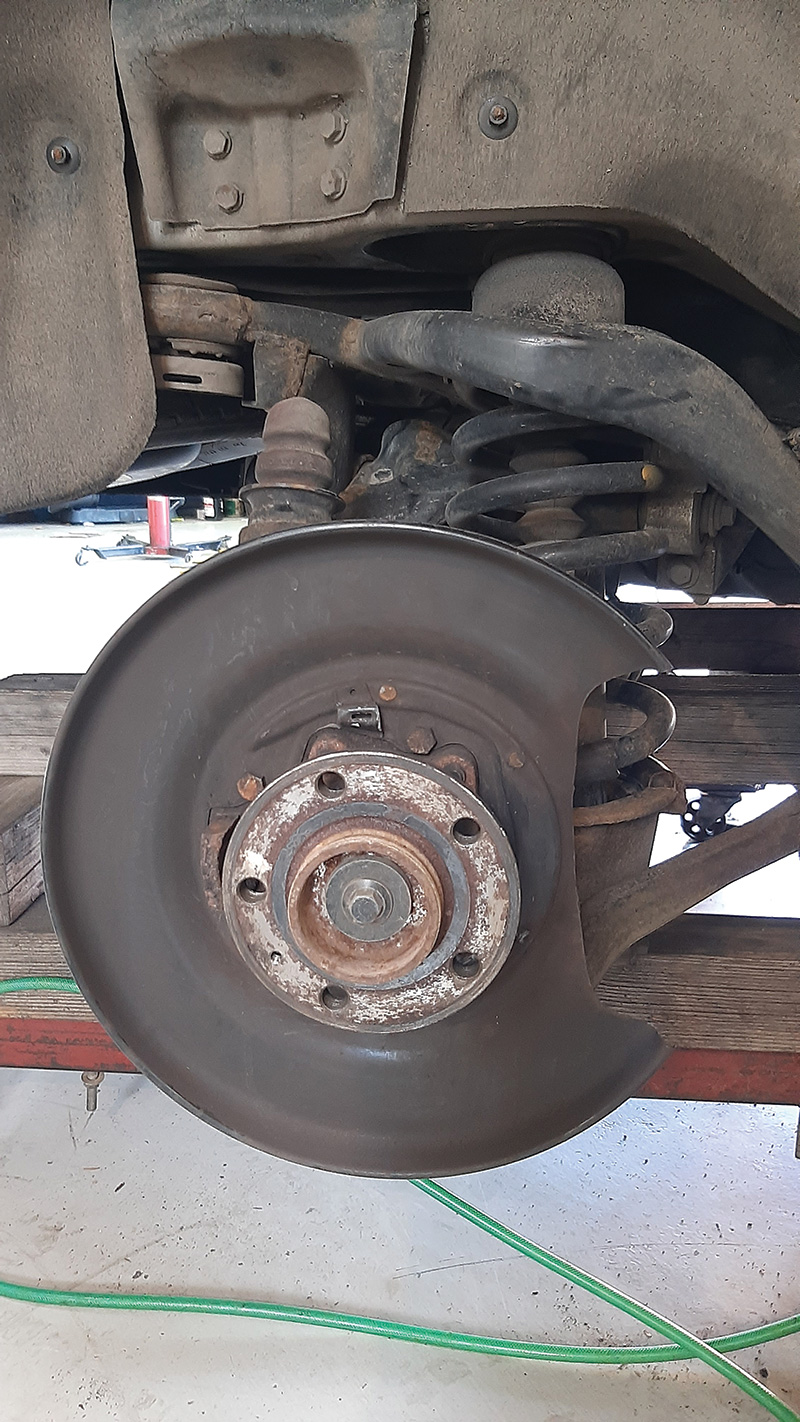
Disconnect the parking brake cables from the rear brake backing plates and let them hang down..
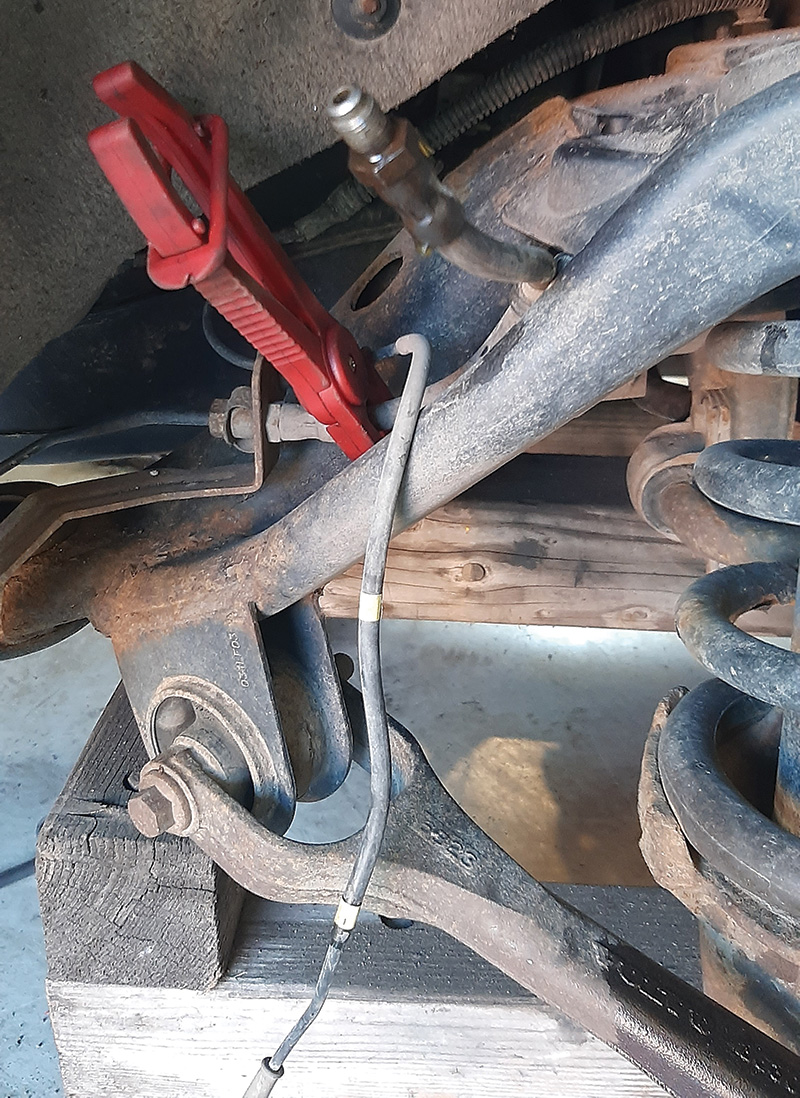
Remove the six hex bolts at the rear drive shaft flange, and let the drive shaft hang down using a bungee cord to support it.


Disconnect the Differential Electronic Module (DEM) connectors.
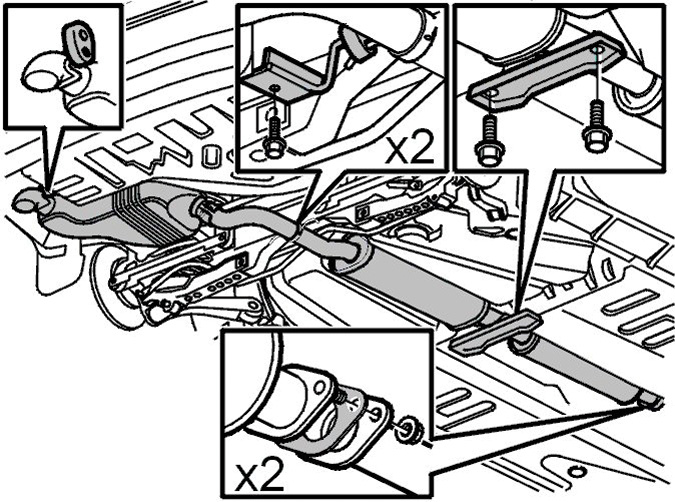
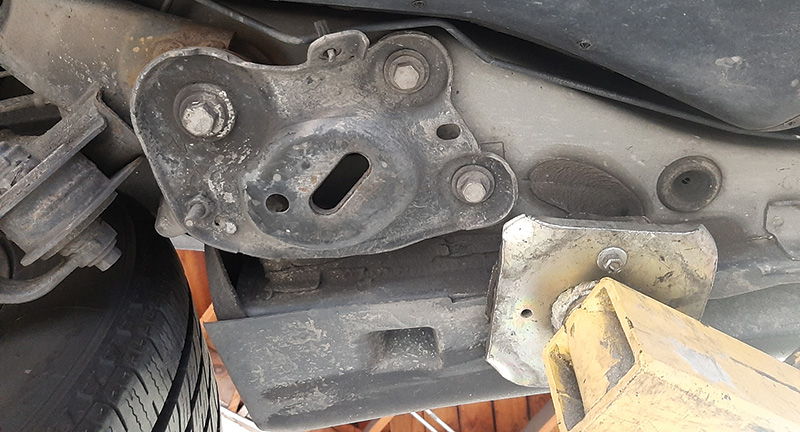
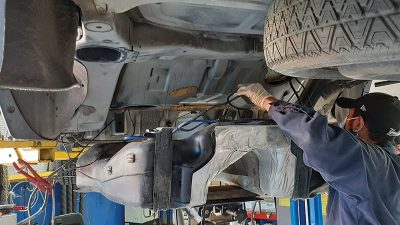
You will next have to remove the exhaust and rear muffler assembly by unbolting the assembly at the catalytic converter flange. Replace the gasket when you reassemble.
NOTE: Hang up the three-way catalytic converter to prevent damaging the flex boot.
Remove the ABS cable harness from the clips on both sides of the fuel tank.
Support the rear member with a transmission jack, or lower it down on a support cart and unbolt the four main bolts holding it to the body. Lower the rear subframe a little to be able to disconnect the pipes and connectors from the EVAP canister and leak detection pump.
Now lower down the rear member or lift the car off to remove the rear end assembly from the car.
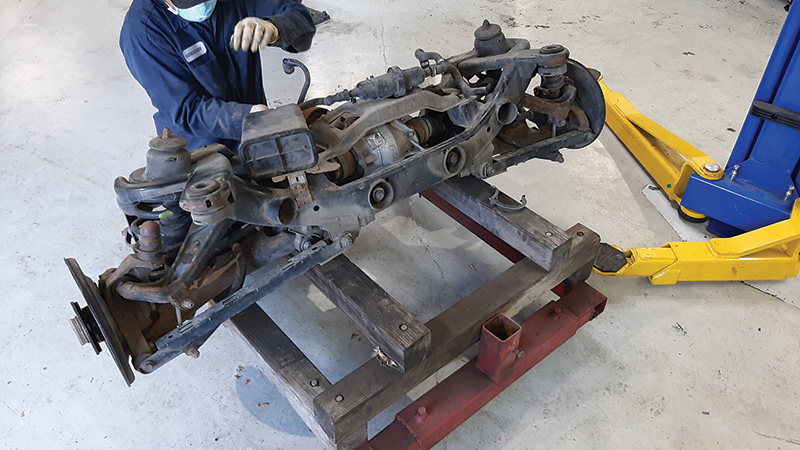
Removing the fuel tank
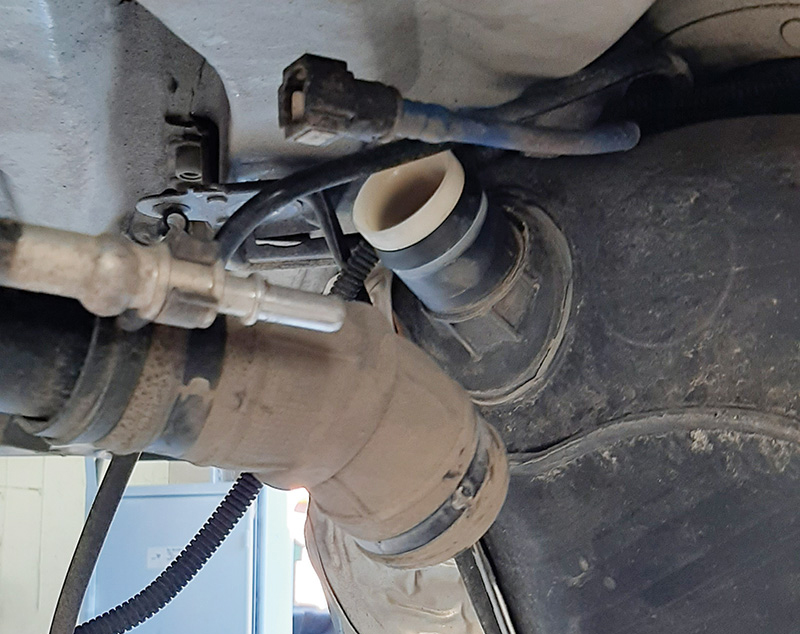
Next, with the rear end removed, support the fuel tank and remove the hose clamp from the filler neck hose and disconnect the vapor bleed pipe.
When you are sure that the fuel tank is totally disconnected from all the pipes, hoses, and electrical connections, you are ready to lower it out of the car.
Remove four bolts for the fuel tank supporting straps.
With the tank balanced and supported on a transmission jack or lifting table, slowly lower the tank out of the car, checking for hoses or wires that may still be attached.
When the technician got the tank out of the car, the EVAP problem was obvious. A rodent decided that the top of the fuel tank was a great place to get a snack.
The vapor lines on top of the tank are not replaceable separately, so the whole fuel tank had to be replaced as a unit.
Reassembly
Start by installing the new fuel tank and securing it with the four bolts and tank supporting straps.
Installing the right-hand level sensor
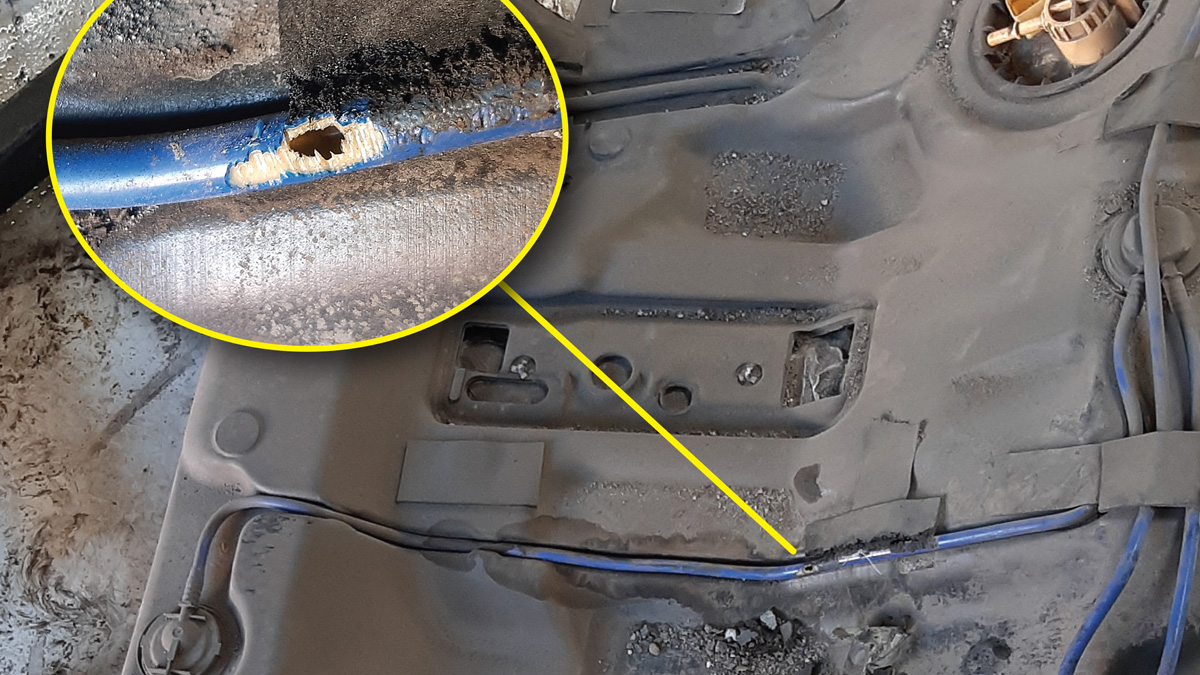
- Place the overflow pipe approximately half a centimeter to the left-hand side.
- Grip around the right level sensor reservoir. Pinch the level sensor reservoir so that the float is held in its lowest position.
- Lower the reservoir carefully while rotating it backwards around the front-rear shaft on the float.
- Install the overflow pipe on the reservoir.
Installing the left-hand level sensor
- Install a new o-ring, lubricated with lubricant, P/N 1161580.
- Push down the left-hand level sensor so that the raised rectangular section on the level sensor runs along the car.
- Check that the o-ring is not trapped.
- Tighten the screw to 60 Nm. Use wrench 999 7314 Spanner. Wipe up any fuel spillage.
- Position the wiring in the cutout in the rubber ring.
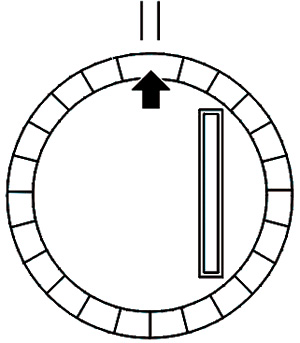
NOTE: Check that the arrow on the cover is between the markings on the tank. If the arrow is outside the markings the fuel level sender will give an incorrect value and the float may catch against the inner wall of the tank. If not: slacken off the screw and adjust the position of the sensor. Tighten as above.
Right-hand level sensor, continued
- Install a new o-ring, lubricated with lubricant, P/N 1161580.
- Press the right-hand level sensor down so that the fuel line connections are pointing forward and to the right.
- Check that the o-ring is not trapped.
- Tighten the screw to 60 Nm. Use wrench 999 5720. Install the hoses on the level sensor. Wipe up any fuel spillage.
- Position the wiring in the cutout in the rubber ring.
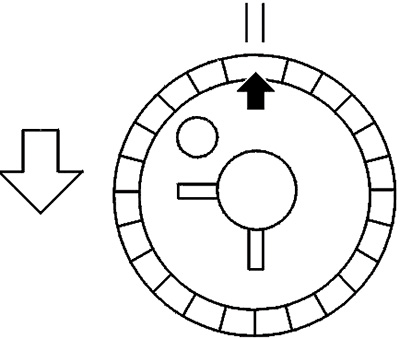
Fuel pump align 
Install fuel pump
Install on both sides
- The wiring in the sockets on the rubber seal.
- The cover over the level sensors and tighten the nuts to 6 Nm.
Connect the wiring and the connectors. Fold the carpet down and reinstall seats.
Well that’s the long version, but note that there are more than a few ways to drain the fuel from the tank.
In the case of the XC90 in this article, the tank was almost empty so the technician decided to just drop the fuel tank out of the car with the fuel in it.
NOTE: Some of you may be thinking, “Why don’t you just repair that rat-chewed fuel tank vapor line with a piece of hose and a couple of hose clamps?†Well, there are a few reasons why that is a bad idea. One thing is that this is a fuel vapor line that is under pressure at times and filled with flammable fuel vapors.
Another good reason to replace the whole fuel tank with a new unit from your Volvo parts dealer is liability and safety.
Let’s say that your shop “fixed†that vapor hose instead of replacing the fuel tank with a new part, and let’s say that, down the road from the day your shop “fixed†this car, the customer gets into a bad rear-end wreck, or maybe rolls the car over, and that “fix” is compromised. You can see the possibilities.
So don’t take any chances, only use a new OE fuel tank from Volvo for a repair like this.
You will have to swap over the old pump and level sending units; follow instructions in the “draining fuel tank” section of this article.
Reinstall all parts in reverse order, fill the new tank with fuel and check for leaks.
Finally, use VIDA to run a quick test of the fuel tank leak detection system.


0 Comments