


Approaching automotive diagnostics from an agnostic viewpoint allows a technician to gather evidence without bias toward a specific answer.
The word agnostic is usually reserved for discussions of religion and the hereafter, but it has a broader meaning of not knowing the answer to a question. This, of course, is an oversimplification of the concept, but it is a starting point from which to build a discussion.
Approaching automotive diagnostics from an agnostic viewpoint allows a technician to gather evidence without bias toward a specific answer. Albert Einstein said it best with his quote, “It is the theory which decides what we can observe.” A technician can more fully observe a problem’s symptoms and causes by remaining open to multiple theories and possibilities.
On the contrary, a dogmatic approach is when a technician has already decided the cause of a problem and sets out to prove his theory is correct. This is problematic, because clues can be overlooked or dismissed to confirm what is already thought to be true. As a result, the dogmatic approach often leads to misdiagnosis and unnecessary part replacements.
It is easy for technicians to develop this dogmatic mindset, as we are always expected to have the answer. Friends, family, co-workers, and bosses expect us to know what is wrong with any given vehicle at the drop of a hat. We also tend to put ourselves in this mindset because no one wants to admit they don’t know something or were wrong about a diagnosis.
This Volvo TechTips article will focus on using a di-AGNOSTIC approach on a pair of 2015 Volvos: an S60 and an XC60.
Wednesday’s Child: 2015 Volvo S60
“Wednesday’s child is full of woe,” reads the old children’s rhyme. So it was fitting that this problem child S60 was dropped off at the shop mid-week, on a Wednesday. Both the owner of the Volvo and the vehicle were undoubtedly in a state of woe.
The Volvo was brought in for an intermittent loss of power steering. A red steering light and a warning message for the Power Steering Assist Temporarily Reduced were displayed.

Kendra, the vehicle’s owner, stated that she looked for the power steering fluid reservoir but could not locate it. She also discovered, by chance, that shutting the car off for a few moments and restarting would bring the power steering back to life. At best, though, this technique only worked 50 percent of the time, and that percentage was dropping. Kendra also stated that the Check Engine light was on and wanted to know if that was related to the steering problems or a separate issue needing service.
Volvo uses an electric steering assist system on this S60 (so there was no way Kendra would find a power steering fluid reservoir). A large electric motor is mounted to the steering rack and pinion. Two heavy gauge wires feed the motor, with the power supplied by a 100 amp fuse in the engine compartment distribution box. The rack assembly also serves as the Electrical Power Steering Module (EPS), communicating on the high-speed CAN network.
As with most diagnostic procedures, the starting point was to verify the symptoms, followed by a complete vehicle pre-scan to get a big picture of what may be happening.
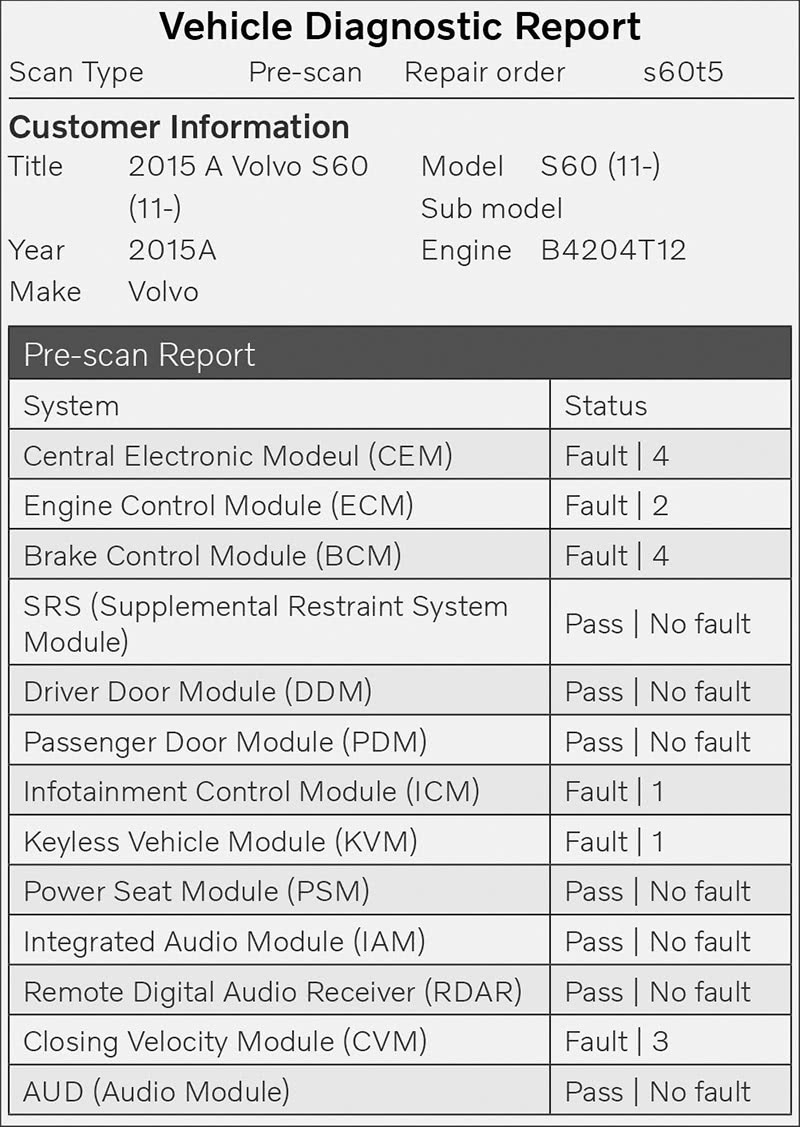
There was no power steering when the S60 sedan was driven into the service bay, and multiple warning lights were displayed. Steering assist returned, however, after cycling the key, just as the owner had described. The pre-scan showed communication faults in most of the high-speed CAN bus modules. The faults were mainly for a loss of communication with the Electrical Power Steering Module (EPS). Notably, the EPS was absent from the pre-scan results. It is important to remember that many scan tools will leave non-communicating modules out of the full scan report details. This can be misleading, as modules present on the vehicle can be overlooked.
Subsequent attempts to individually communicate with the power steering module failed, confirming the loss of communication faults. The engine control module also had a P0301 misfire fault, which was the likely cause of the Check Engine light the customer was wondering about. However, the engine was not misfiring, and the power steering problem remained the primary concern.
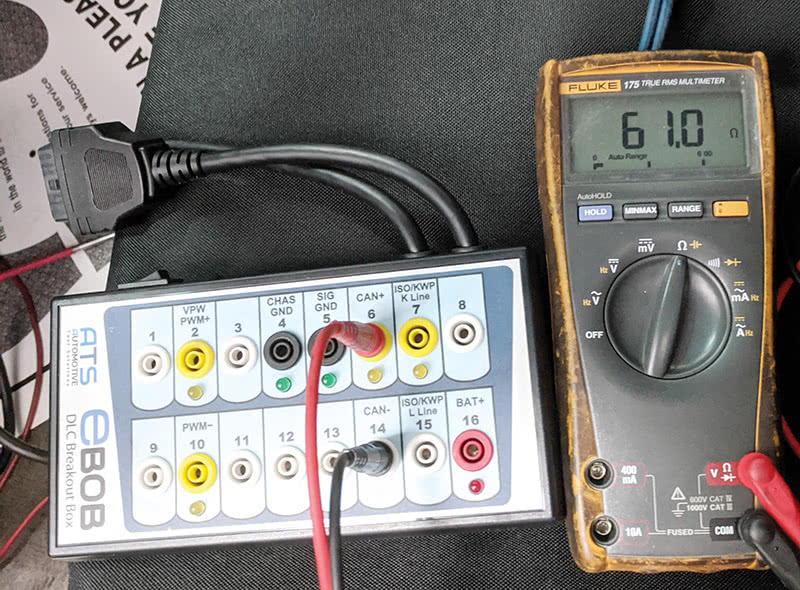
Checks of the powers and ground to the rack motor and control module proved good. Next, the technician used a DLC break-out box to measure the CAN network resistance across terminals 6 and 14; resistance was as expected at 61 ohms. Ideally, the negative battery cable would be disconnected before checking the network resistance, but waiting five minutes after shutting the ignition off is usually adequate to get an accurate reading.
At this point, some technicians would have all the data they needed to make the call on a faulty EPS module and order the new steering rack and pinion. However, the agnostic approach does not make assumptions or leave any stone unturned in the search for the truth. Therefore, there were still tests to run on this Volvo—namely, taking a closer look at the CAN bus.
Volvo recommends using an Error Frame Finder for intermittent communication bus issues. Error Frame Finder (EFF) software is available for the DICE interface and VIDA diagnostic program. This technique is covered in Technical Journal Reference Number TJ 20402.
According to Volvo, “The EFF function can aid in fault tracing intermittent CAN network problems by providing a visible indication of error frames on the network when a fault becomes active. Error frames will be transmitted when there is a critical fault in the network or network wiring, such as open circuits, broken wiring, short circuits, and defective nodes.”
The advantage of using the EFF function is that error frames are often transmitted on the network before a vehicle symptom occurs. Hence, if the fault is very intermittent in nature, it may be possible, for example, to induce a wiring fault for a short duration by manipulating the vehicle harnesses and connectors. If an electrical fault occurs, it will be detected by the EFF software without even having a vehicle symptom occur.
Purchasing the Volvo OE diagnostic equipment may be cost-prohibitive for many independent shops. There is an alternative method, however. An oscilloscope with a high sample rate can act as an Error Frame Finder. Using two lab scope channels connected to CAN High and CAN Low, the harnesses and connectors can be manually flexed as previously described. A glitch may be visible in the waveform depending on the severity of the problem, or the serial decoding function can be used to identify individual faulty frames.
This technique was used on the Volvo sedan and yielded surprising results. With the ignition on and Picoscope hooked up to the high-speed CAN bus, the harnesses and connectors were flexed while monitoring the computer screen. It made sense to start under the hood, specifically in the area of the rack-mounted power steering module. When the harness on top of the transmission was moved, there were visible glitches in the CAN waveform. This was easily repeated every time the harness was repositioned.
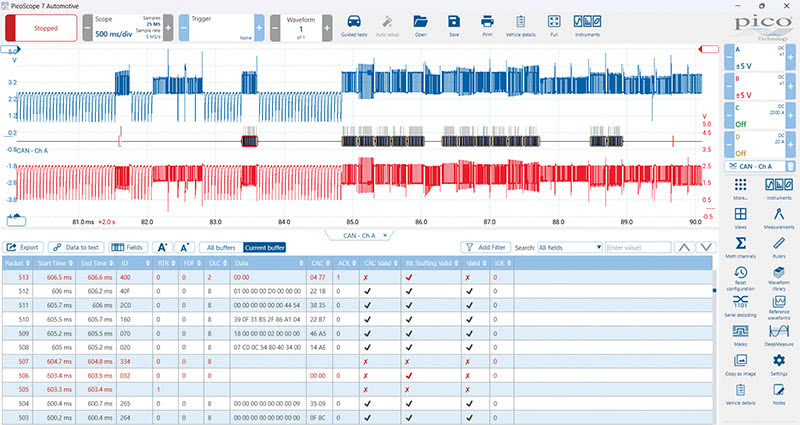
Further analyzing the waveform showed that the high and low CAN voltages were being pulled toward ground in a repetitive sawtooth-type pattern between message frames. Using the serial decoding feature built into the oscilloscope software confirmed that there were invalid messages being transmitted on the CAN network. The invalid messages are shown in red in the table below the voltage waveform (see CAN bus waveform image on page 20).
After a close inspection of the wiring harness, the issue was discovered. A smaller harness broke out of the main under-hood harness on top of the transmission bell housing and snaked down to the electric steering rack. The twisted pair of CAN wires was almost completely severed at the harness junction, save for a few copper strands. This explained the intermittent nature of the power steering issue. As the vehicle moved and the harness flexed, the connection would be partially lost on the twisted pair of CAN bus wires leading down to the EPS module.
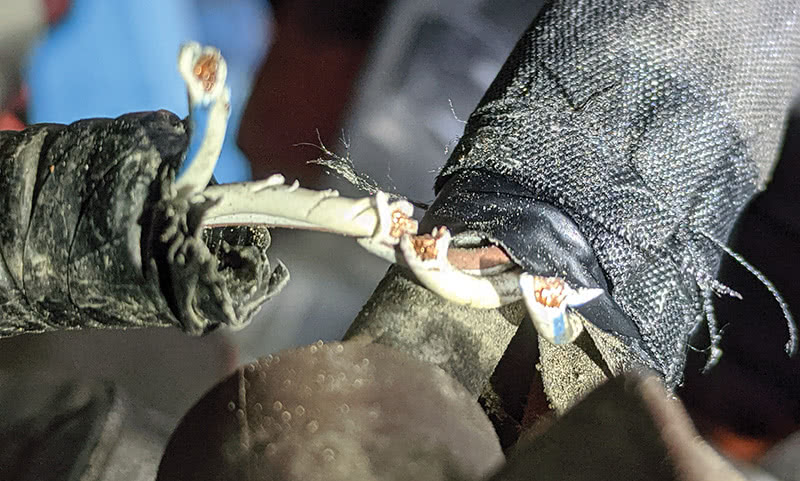
The cause of the wiring damage was unclear. It was possibly from a rodent looking for a snack, but it was in an unusual location, with no other damage nearby. It may also have been from an errant pry bar placement during a previous repair.
The wiring harness was repaired, and all the fault codes were cleared. The power steering worked perfectly during the road test, with no warning lights. All that was left was the engine misfire, but that would have to be dealt with at a future date. In the case of this S60 Volvo, a di-AGNOSTIC approach paid dividends for the customer—a simple wiring repair instead of a high-dollar rack and pinion replacement.
Thursday’s Child: 2015 Volvo XC60
“Thursday’s child has far to go,” reads another line in the familiar children’s poem. This aptly described a 2015 Volvo XC60 brought in for repairs on a Thursday morning. The owner of the crossover SUV was from out of town. He was traveling for business and still had a 500 mile drive to be home for the weekend. This XC60 had 90,000 miles on its 2.0 liter turbocharged engine.
According to the customer, the Check Engine light had illuminated several days prior, shortly after starting the vehicle one morning. The engine ran rough at first, but after driving for a few minutes, it smoothed out. He wanted to keep driving home but did not want to risk further damage to his Volvo, so he found a local shop with good online reviews.
There was a sense of urgency about diagnosing and repairing this Volvo so the owner could get back on the road and head home. It is important to remain empathetic to a customer’s plight, but this pressure can lead to problems. Pressure to meet a customer’s demands should not outweigh the diagnostic process. This limits a technician’s ability to remain impartial and not rush to conclusions.
The engine controller was scanned for faults, and two active faults were found, a cylinder 2 misfire and a lean system on Bank 1. The freeze frame data and readiness monitor status were recorded. The freeze frame data for the P0302 fault showed an engine coolant temperature of 90 degrees and an engine run time of 20 seconds, indicating initial start-up. Service information was searched for code criteria, bulletins, and relevant case studies. Several applicable bulletins were found related to spark plug misfires, an intake hose causing a lean fault, and a campaign for the fuel pressure sensor.
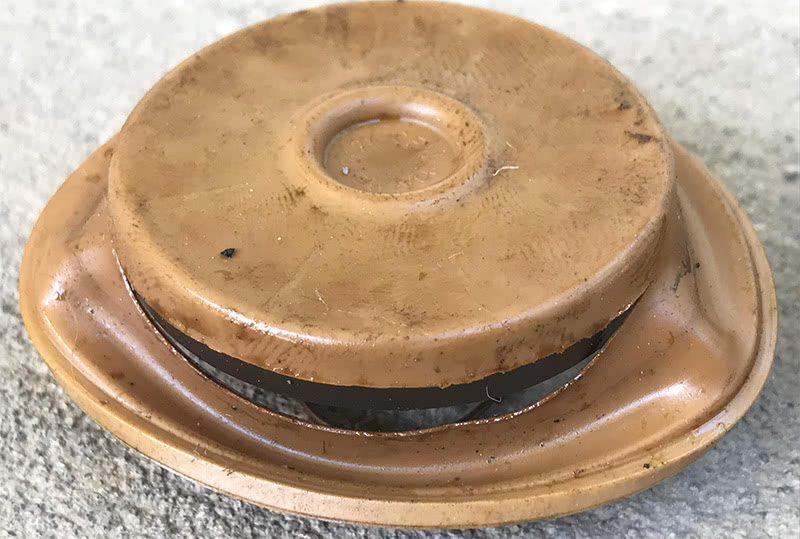
With the data collection and research completed, attention was turned to the Volvo. A few symptoms were noted with the hood open and the engine running. First, a high-pitched whistling sound could be heard from the engine compartment. This whistling was louder with the engine cover removed. Second, while the engine had a shaky, unsteady idle, it was not misfiring. Suspicions about the plastic oil separator or crankcase vent valve mounted to the camshaft cover were high, so testing began there.
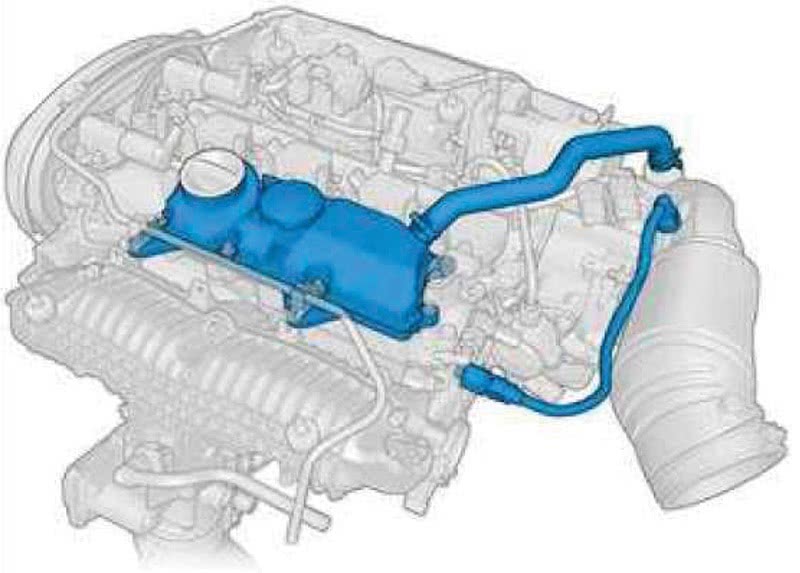
Fuel trims were checked with a handheld scanner, which allowed easy viewing of global OBD II data. In some diagnostic situations, it is more practical to view generic data PIDs instead of using enhanced vehicle-specific scan data. The long-term trim was elevated at almost 15%. By covering the air reference hole on the oil separator, the short-term trim immediately reacted with negative numbers, showing that the engine computer was self-correcting and removing fuel. This simple test proved that the oil separator’s internal diaphragm was torn.

Other ways to test the oil separator include smoke testing or checking the crankcase pressure with a manometer. Unfortunately, Volvo has not published acceptable crankcase pressure numbers for their engines, so it would behoove a technician to create a database of known good readings as vehicles come through the shop. It is also important to note that the engine adaptations must be reset after replacing the oil separator. This reset can be performed with a capable scan tool, or the ECM fuse(s) can be removed for at least 15 minutes.
It was clear that replacing the oil separator would correct the lean condition, but the diagnosis was not finished. The oil separator did not explain a single-cylinder misfire fault, nor did it fit the freeze-frame data. There was more going on with this XC60. A spark plug was removed to inspect the condition and verify if the updated parts were installed. The plugs were worn with buildup on the electrodes, and the part number did not match the improved design, according to Service Action Parts Bulletin S29842.
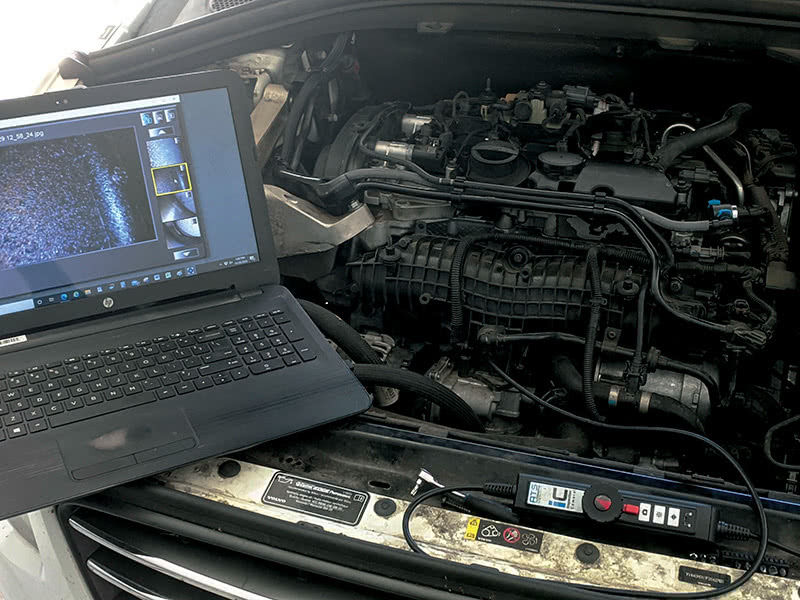
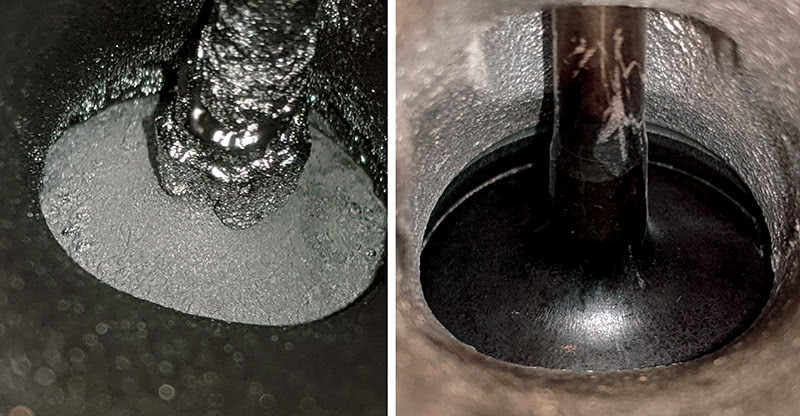
Based on previous experience with Volvo GDI engines, a borescope was used to inspect the intake valves. This is quickly done through a central vacuum port on the intake manifold. The intake valves showed heavy carbon buildup, typical of gasoline direct-injected engines. Carbon deposits like this can cause misfires on cold and warm start-ups, fuel mixture faults, and performance issues.
Now the diagnosis was complete. The oil separator was leaking internally, the spark plugs were worn and due for replacement anyway, and the intake valves had significant carbon deposits. Waiting down the street at a local diner, the owner was called and authorized the repairs. Thankfully, the Volvo dealership had an oil separator and updated spark plugs in stock.
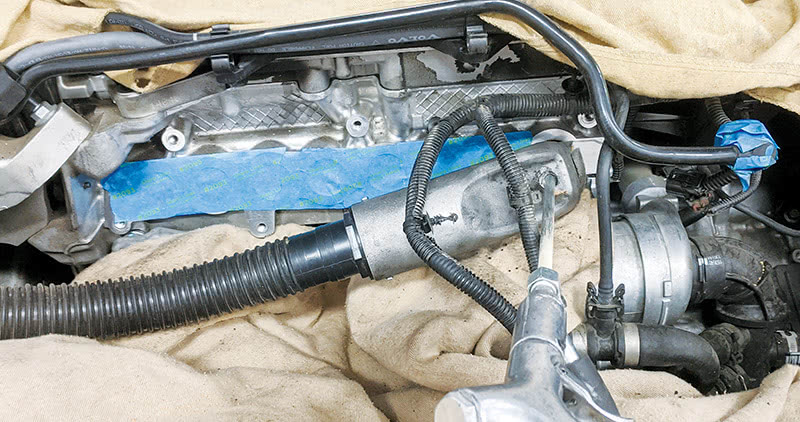
While waiting for the parts to be delivered, the walnut blasting got underway. Removing the intake manifold on the B4204T11 engine is a straightforward procedure, and it was quickly out of the way, exposing the intake valves. The valves had a lot of carbon buildup, with cylinder 2 looking worse than the others. All eight intake valves were cleaned with the air-powered walnut blaster, and the vacuum attachment made for easy cleanup. The valves cleaned up well, and the intake manifold was reinstalled with new gaskets.
When the parts arrived, the new oil separator and spark plugs were installed. Next, the oil was changed, which is a good idea after a walnut cleaning procedure and when the fuel trims have been elevated. The final step was to clear the faults, reset the engine adaptations, and road test the vehicle.
Due to the client’s time constraints, the vehicle could not be kept overnight for a cold start and a final road test, but this limitation was communicated to the owner, and he understood. With the invoice paid, the XC60 was back on the road for the final leg of the business road trip.
These two Volvos are examples of using an agnostic approach to diagnostics. Remaining open to the process and resisting outside influences are the best ways to get the correct answer when troubleshooting an automotive problem. However, these techniques take time and practice, so stay focused on pursuing the truth.


0 Comments