


PCV was mandated in the U.S. 53 years ago(!), and the systems have naturally evolved. On Volvos, ALWAYS check them during any engine service oR the consequences may be far-reaching.

A long time ago in a galaxy not so far away (Sweden), Volvo engineers used a standard PCV system — a one-way vacuum valve and a hose or two to recycle engine blow-by (through 1975). It was a simpler time when men were men, cars were heavy, and gas cost less than a dollar a gallon. But in 1976, Volvo introduced the B21 engine, the 2.1L naturally-aspirated follow-up to the legendary B20 and B18. At that time, Volvo, like all auto makers, was trying to keep up with the latest U.S. and California emissions regulations. The year before, Volvo engineers in conjunction with Robert Bosch, came up with the first oxygen sensor-regulated fuel injection system (electronic K-Jetronic). Volvo called it Lambda Sond.
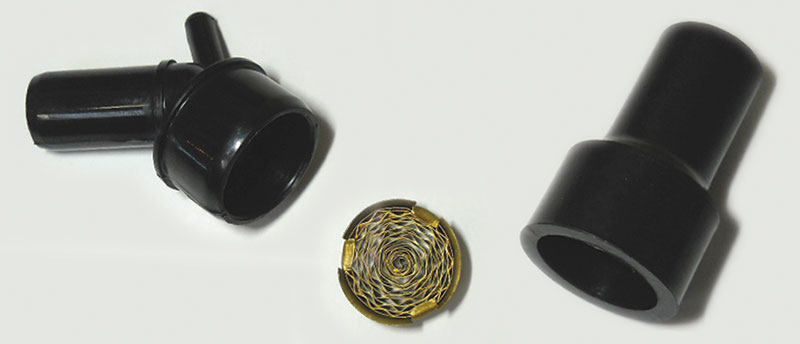
Screen scene
Along with this groundbreaking feedback fuel injection, Volvo did a redesign of the positive crankcase ventilation system. Instead of a standard PCV valve, the Swedish engineers came up with a free-flowing blow-by recirculation system with no check valve. Instead, an oil separator box on the side of the block with an in-line brass screen was used to prevent ignition of the vapors returning to the intake manifold. These systems worked well — as long as the cars were serviced regularly and properly. The weak point was the brass-screen flame trap. The screen would get clogged with carbon and restrict or completely stop crankcase ventilation.
On ’76 through ’79 models, the flame trap was right on top connected to the valve cover, which made it easy to check and change. In 1980, the flame trap holder was relocated under the intake manifold on top of the oil separator box, which made it much more difficult to check or service. If the shop did not specialize in Volvos, the technicians most likely did not even know it existed.
When the Volvo engineers created the B23 and B230, they moved the flame trap fitting to a more serviceable location. That was a good thing because when these systems clogged up, they would naturally cause high crankcase pressure. That would slightly affect emissions, but the real problem was seal failure. More than one rear main seal has popped out because of this. So, if you happen to see one of these early Volvos in your shop for service, make sure you don’t forget to check that flame trap.
In 1994, Volvo introduced the 850 series to the U.S. market. The new five-cylinder all-aluminum engine, which came in either N/A (Naturally Aspirated) or turbo versions, used a new type of PCV system. Non-turbo models still had a plastic flame-trap screen, but turbos added a heater element to the vacuum fitting in the air intake tube from the MAF (Mass Air Flow) sensor to the turbo inlet. This system worked well, but as the cars got older they were likely to develop some of the same clogging problems.
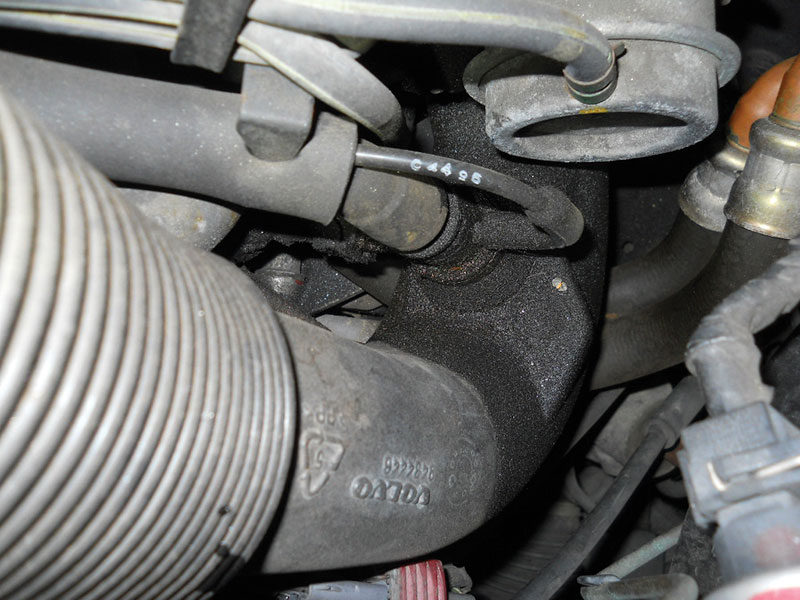
Bad elbow
On the 850 and early S70 and V70 series (1994 through 2000), another possible PCV failure was deterioration of the vacuum elbow on the right side of the intake manifold.
When this hose failed, it would cause a number of troubles, such as oil burning, seal failure, and an unmetered air leak that would adversely affect fuel trim and mileage.
It is wise to visually check the PCV vacuum hoses, and also perform a crankcase pressure test during an inspection. There are several ways to do this. The old-school guys will tell you to take off the oil filler cap while the car is idling and hold a piece of toilet paper over the opening to see if there is pressure or vacuum. Another method is to fasten a rubber glove over the oil filler neck with a rubber band and see if it is sucked against the opening, or inflates. Or, you can remove the dipstick and look for escaping smoke. If you happen to have your smoke machine out, see if smoke is drawn into the oil filler at idle (cooling fan off). None of these is very high tech, but they give a fast indication. For more accuracy, you can use the Volvo PCV tester, which you can order from your Volvo dealer’s parts department.
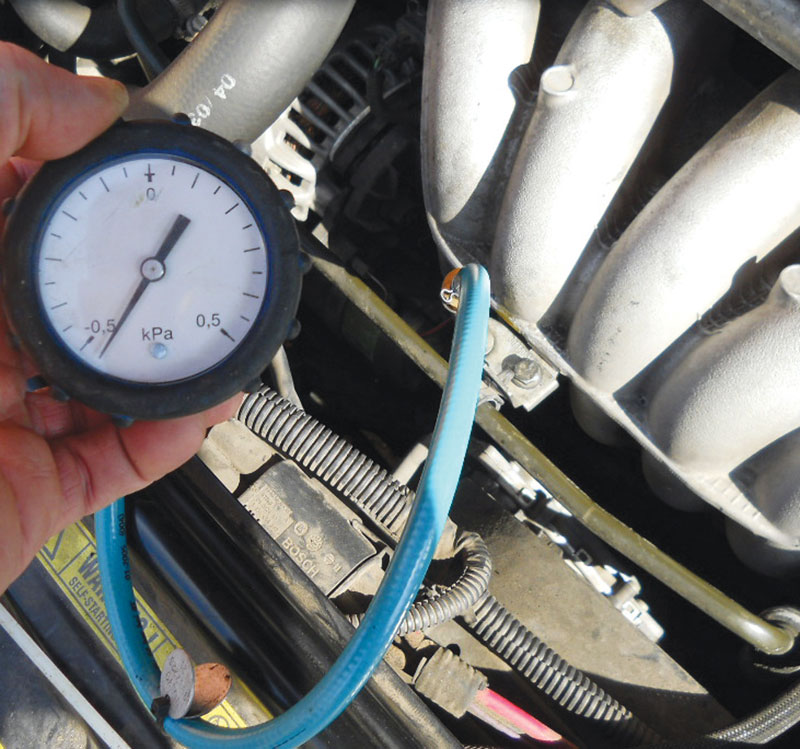
So to test the PCV system have the car at operating temperature and idling, then remove the oil dipstick and insert the nipple of the test gauge into the tube. You should see negative pressure (vacuum), the amount of which depends on the model. After you’ve done this frequently, you’ll know what normal looks like on different engines.
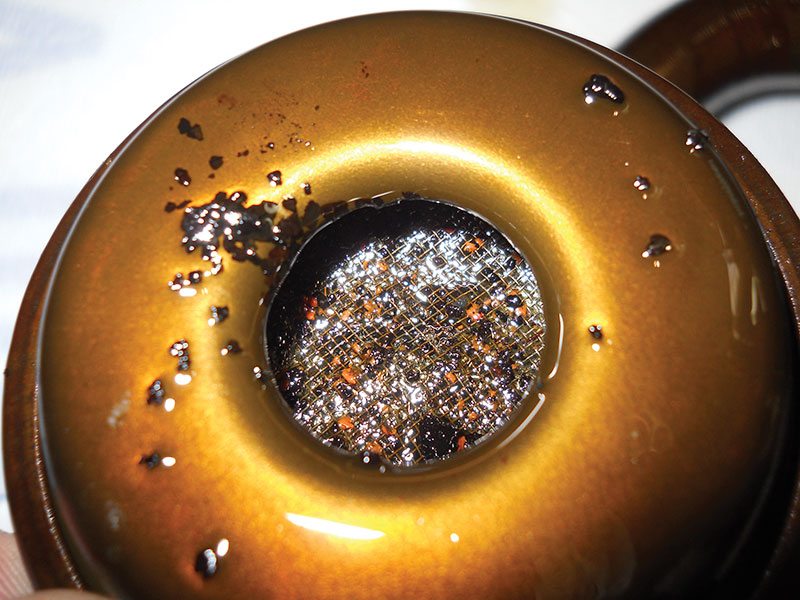
If you see positive pressure, it’s time to do some further investigation. On later Volvos, looking at the inside of the oil filler cap is a good indicator of how much carbon is probably clogging the breather system. If the oil cap looks like a barbeque grill at the local public park, you can bet this car has not been serviced regularly. Other factors that can contribute to breather system carbon build-up are poor fuel quality, lack of service, and a cooling system thermostat that’s stuck open. Of course higher-mileage cars will eventually clog up even if they are well serviced.
These days, we see clogged breather systems causing more far-reaching damage on the networked fly-by-wire cars, such as the PCV heater on the intake hose leaking oil into the connector and causing a short. This won’t turn on the MIL (Malfunction Indicator Lamp) for the heater, but it will sometimes set a code for an oxygen sensor because they share a ground.
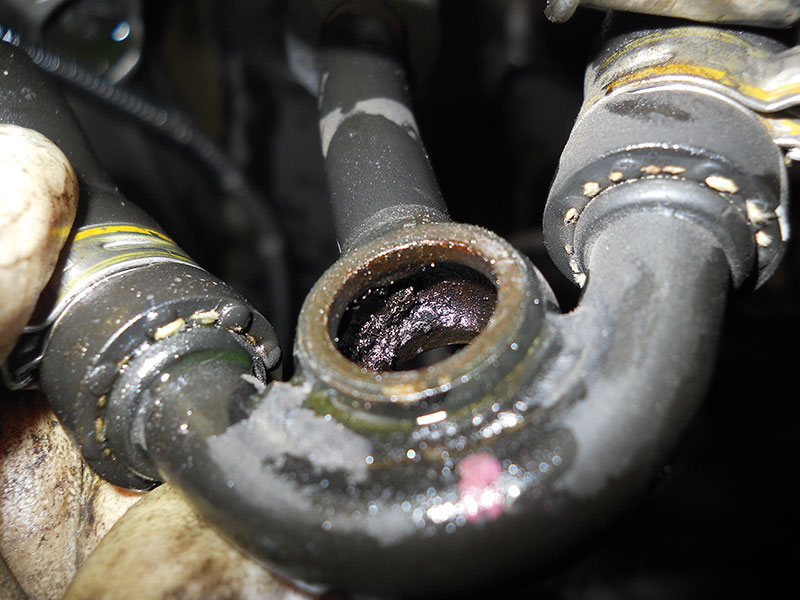
Plugged orifice
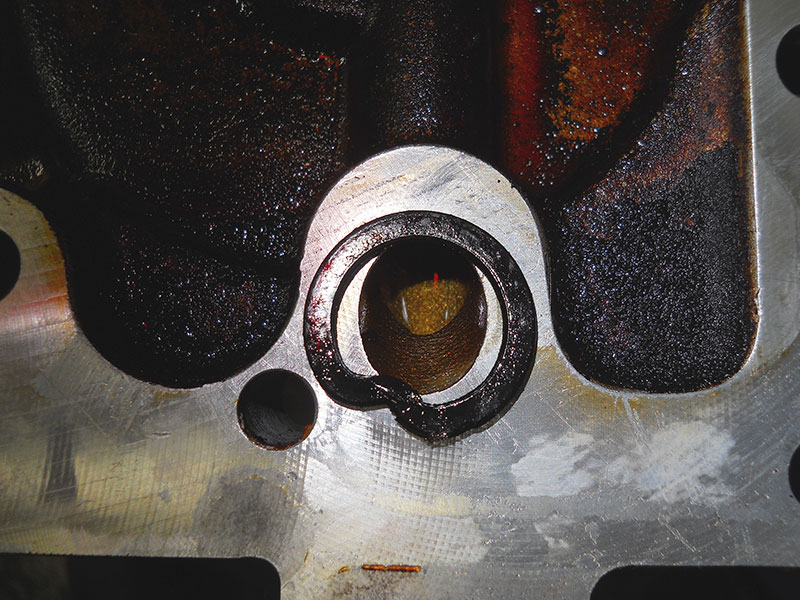
One thing we can see on 1999 and up cars is carbon clogging of the orifice under the intake manifold that supplies vacuum to the breather system. If you catch this in the early stages of the blockage, you can sometimes get away with just cleaning the orifice, but most of the cars we see have been clogged for so long that you will need to replace the whole breather system.
On P1 cars (2005 and up S40, V50, and C30), we’ve mostly seen two issues in the PCV system. One issue may be that the hose from the oil separator assembly to the top of the camshaft case is cracking and breaking open.
These broken hoses are easy to spot, not because they’re easy to see, but because the customer will complain about a high-pitched (“flying saucerâ€) type of noise. You can confirm that this hose is at fault by removing the oil filler cap while the car is idling. If the noise goes away, the hose is leaking. Most cars have received a replacement part by now, but they still show up in service bays.
Also, if the car has low mileage make sure that the PCV repair is not covered under the factory emissions warranty before you do any work. In some states such as California, the emissions warranties are much longer than the factory warranty. It’s just good business (and good “Karmaâ€) to make sure your customer doesn’t have to pay for a covered repair.
Lately on the higher-mileage P1 cars, oil leaks have been seen coming from the bottom of the crankcase oil separator assembly. This is an all-in-one type of part — it has the oil trap, breather box, and oil filter stack in one unit. There are two ways you can repair this oil leak. You could just replace the seals at the bottom of the unit, or replace the whole unit, which comes with new seals (Part #31228685). Both repairs involve the same amount of labor, but if the car has over 90K on it, it’s best to sell the customer the whole assembly because of the sludge and carbon build-up inside the oil trap, and because you’re going to do an oil change anyway and the new assembly comes with a new oil filter and housing.
Once the PCV system stops working and the engine starts building up carbon, oil leaks are likely. Sometimes front camshaft seals are actually pushed out of place so that the timing belt becomes wet with oil. You know what happens if the belt jumps off or breaks — the valves would say “nice to meet ya†to the pistons.
Serious neglect
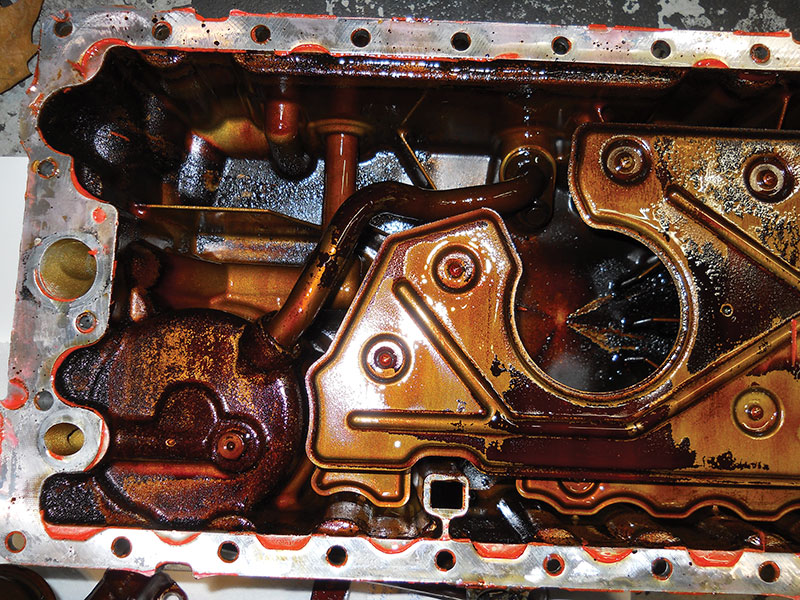
A car in for service recently demonstrated the damage a clogged breather system can cause. The oil pressure light came on at idle when the car was hot. After confirming that the breather was clogged, the oil pressure sending unit was removed and a mechanical gauge connected to confirm the low oil pressure.
As suspected, the reading dropped to 10 psi at hot idle and rose to normal above 1,200 rpm. Cracked seals for the oil pickup tube can cause this condition, so the oil pan was removed. The amount of carbon and sludge was incredible. The passageway that connects to the oil separator was totally clogged and there was a quarter-inch of sludge and carbon in the bottom of the pan.
Removal of the pickup tube revealed the cause of the low oil pressure. The pickup seals were bad, plus the pickup tube’s screen was completely plugged.
A rod and main bearing cap were pulled to inspect for damage. The bearings looked good, and so were re-installed and torqued to spec. The recommended repair is the installation of a new breather system, an oil system cleanout, and new pickup seals, along with a new updated oil pickup (Part #9186116) that has a much larger screen so it won’t clog as easily in the future.
To think all that could have been avoided by regular attention to the PCV and more frequent oil changes. You should make crankcase pressure testing part of your routine service and diagnostic procedures. It’s good for your customer and your shop. Catching a clogged breather in the early stages can save your customer a lot of money.
Hands-on
The PCV system most frequently serviced these days is on 1999-2007 Volvo five-cylinder turbo engines, the standard system for Volvo models during those years. This is the year range that’s typically found in aftermarket service shops since the cars have outlived their factory warranty. So, we’ll take you through the step-by-step repair and replacement procedures for this system.
When doing this job, it’s a good idea to read and take note of some of the live-data PIDs before and after the job. It’s interesting to see the difference in the fuel trim data. It will make you a believer.
As always with a job like this, start by removing the negative battery terminal. Now raise the car so you can remove the splash pan and air guide. Loosen the coolant drain at the back of the engine above the right axle — you only need to drain a little coolant so the level drops below the thermostat. Lower the car and remove the charge air pipe, fuel rail cover, and the cover over the coils. Remove the two bolts at the top of the electric fan and the bolt for the dipstick tube. Take out the dipstick tube and pull the electric fan assembly up and out of the way (you can disconnect it or just set it off to the side) to give yourself more room to work.
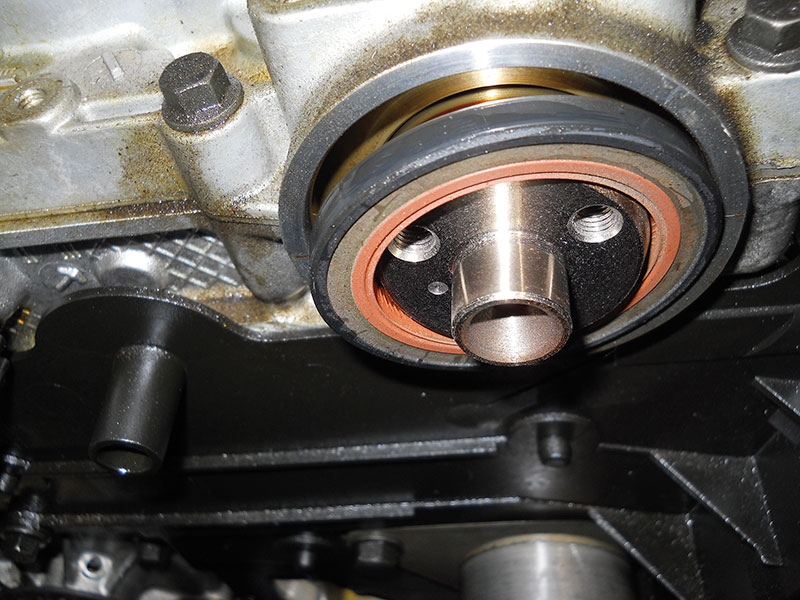
Loosen the large clamp at the intake tube going into the throttle body and pop it off, then reach down and unhook the big connector for the throttle body harness. Remove the bolts that hold the fuel rail in place and release the quick-disconnect fitting for the fuel feed line — be careful about residual fuel pressure! Carefully wiggle the fuel rail out of the intake manifold and lay to the side. Raise the car again and unscrew the bolt from the intake manifold support bracket. You can now take out the bolts for the intake manifold itself. Once it’s loose, lift it up slightly and use a 17 mm wrench or a stubby socket to remove the banjo bolt for the breather system at the right bottom of the intake manifold. This banjo bolt is the hardest part of the job because it’s at a weird angle and it’s in a tight spot. Reassembly can be challenging.
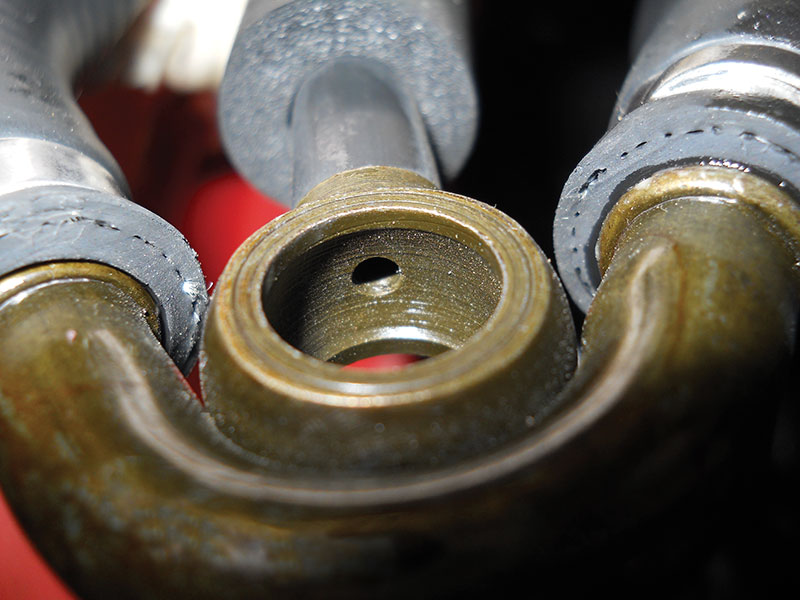
If the car has low miles, you may be able to get away with cleaning out the hole in the banjo fitting. You can do this by just removing the power steering pump to access the bolt and fitting. But many of the cars you’ll see in your shop will have well past 100K and will need to have the whole PCV system replaced.
With the banjo bolt out, remove the clamp on the soft breather hose at the top of the engine, and you should be able to lift the intake out of the car.
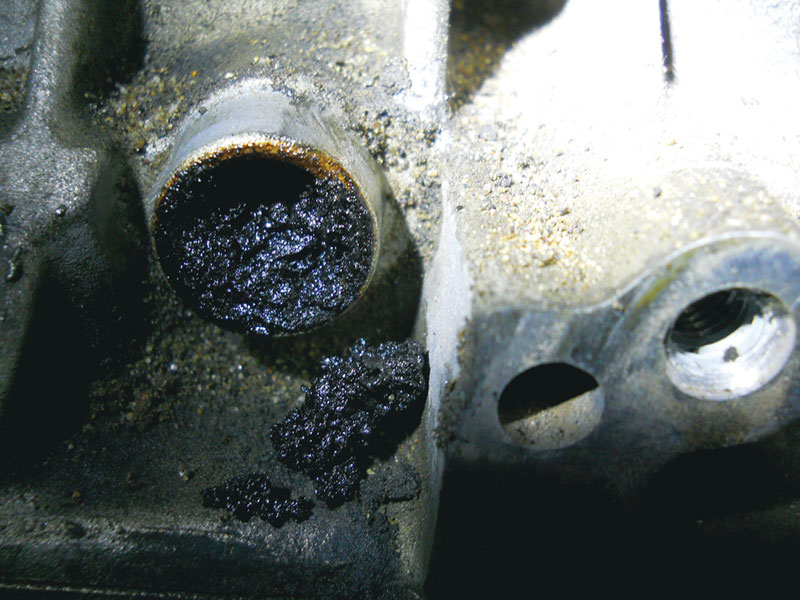
Remove the oil separator box and breather hose assemblies and inspect the hole in the side of the engine, where the box connects. It will be partially or fully clogged if it’s been building up for a while. If this passageway is completely blocked, you may want to get the customer to authorize removing the oil pan so you can clean out the breather passage from the bottom. In most cases, this will not be necessary. If you do end up taking the oil pan off, make sure you replace the oil pickup seals and the old pickup tube with the updated part.
Clean the passageway with a pick and some aerosol parts cleaner. Once that’s done, you can reassemble the breather system with new parts. The aftermarket parts for this job don’t quite fit right, so it’s best to only use Volvo Genuine Parts for this job. A full service kit for this job isn’t available, so make sure when you place the order with your local Volvo dealer’s parts department, you ask for all the hoses, clamps, and other related parts for this job. Don’t skimp on the clamps, either. They’re expensive, but they will guarantee that you achieve a properly-sealed PCV system, and that the job will have been done right the first time.
Download PDF


0 Comments