

Volvo has been making all wheel drive vehicles for over 20 years now. Wow! Has it been that long?
Amazing.
What exactly does all wheel drive mean? The Purpose All Wheel Drive is a type of four-wheel drive system, and is used to give a car more traction for cornering and all-weather safety. A 4WD system uses a transfer case to engage the front and rear axles, locking them together.
Alright, let’s get to it. In this article, we’ll be talking about maintaining all wheel drive vehicles, diagnosing some familiar and unfamiliar problems.
Your basic Volvo all wheel drive system consists of two axles in front and two axles in the rear, and a transfer case or, as Volvo calls it, an angle gear, that connects the front wheels to the rear using a driveshaft.
Volvo has used Haldex Traction’s AWD system for nearly all of their models since the introduction of their FWD/AWD platform. However, before the switchover to the Haldex system in 2003, Volvo used a viscous coupling to transfer torque to the rear axles. A viscous coupling is an assembly of closely spaced plates soaking in a dilatant fluid (a thickening fluid). This viscous coupling links the front and rear drive axles.
When the vehicle is traveling with relatively equal traction on the front and rear axles, the two halves of the coupler rotate at nearly the same speed. When the car loses traction and the front wheels begin to spin, the side of the coupler attached to the front axles will begin to spin faster than the side attached to the rear axles.
This difference in speed causes a shearing effect on the dilatant fluid that the coupling is immersed in. When the fluid heats up, it quickly transforms from a liquid into a state resembling a solid, locking the plates together and forcing the two sides of the coupler to be locked together. This type of AWD system required almost no maintenance and was fairly reliable.
Replacing Viscous Coupling 1998-2000
The viscous coupling can be replaced, first making sure to leave the vehicle in Neutral so you will be able to turn the driveshaft. Raise the vehicle in the air. Remove exhaust components that might be in the way of removing the driveshaft.
Mark the driveshaft at both ends so you can reinstall it in the same orientation. Remove the bolts from both ends of the driveshaft. Remove the center support from the vehicle and remove the driveshaft.
Now that the driveshaft is out, unbolting the viscous coupling unit consists of removing four bolts at the differential and the mounting bolt at the front of the viscous coupling. Remove the six bolts at the differential pinion gear. Remove the complete unit.
Install the new viscous coupling, secure the bolts and tighten. Install the driveshaft and tighten down. Secure the center support bracket and tighten. Install the exhaust system and secure all mounting rubbers. Test drive the vehicle to make sure there is no vibration or unfamiliar noise.
Volvo introduced the first generation Haldex system for the All Wheel Drive systems used on 1998-2000 Volvo V70XC and 1998-2000 S70 AWD models.
The first-generation Haldex AWD system is the first reactive hydraulic AWD system produced by Haldex Traction. This means the AWD system relies on wheel spin to activate the torque transfer from front to rear wheels. It uses a mechanical pump connected to the input and output shafts of the Haldex clutch assembly.
Normal driving with ample traction means the car is nearly entirely front wheel drive. When wheel slip occurs, the difference in rotation speed between the input and output shafts drives the hydraulic pump. Operation of the clutch pack is almost entirely mechanical.
A mechanically driven pump and a mechanical linear throttle valve were used to determine wheel slip and lock-up of the clutch pack, converting the system from 90/10 front/rear torque distribution to 50/50 torque distribution within 90 degrees of wheel slip.
Second generation Haldex 2001-2003 Volvo V70XC and 2002-2003 S60 AWD models
Haldex’s second generation is also a reactive AWD system, just with the addition of computer-controlled solenoids to control the clutch plates. This system reacts within 90 degrees of wheel slip.
When wheel slip occurs, the difference in rotation speed from front to rear axles activates a mechanically driven hydraulic pump. The pump forces hydraulic fluid through a computer-controlled solenoid, which then engages a set of clutch plates to transfer torque to the rear axles.
Third generation Haldex 2004-2009 S60, 2003-2008 XC70 models
The Haldex third generation system is the first proactive AWD system deployed on Volvos. As soon as the engine is started, an electric pump pre-pressurizes the AWD transfer clutch. When the traction control computer senses wheel spin, the pre-pressurized clutch pack is engaged instantaneously and torque is transferred to the rear axles. Once engine torque is transmitted through the Haldex unit, the mechanical oil pump takes over from the electric pump and continues to supply pressure to the hydraulic clutch pack.
Fourth generation Haldex 2009-2014 Volvo XC90, 2010-2012
This is virtually identical to the third generation system, but does away with the mechanical hydraulic pump.
Haldex fifth generation, 2013-2016 Volvo S60, 2013-2016 Volvo XC60
The fifth generation of Haldex’s AWD system focused on tighter integration of components and a simplified construction. The fifth generation system simplified the design and uses only a computer controlled high pressure hydraulic pump to replace the accumulators and solenoids used in previous versions.
Angle gear five cylinder Volvo resealing
Oil leakage from the angle gear halves can be resolved by resealing and/or replacing the seals. The angle gear itself does not normally need to be replaced. However, if you hear any noise or binding while driving, or if there is any angle gear backlash, bearing damage, or excessive pinion shaft play found during disassembly, you should replace the entire unit.
Volvo Technical Journal 18513 will also help in resealing these units.
- Remove the 13 mm fill plug and drain the fluid. This plug can be found on the side of the angle gear closest to the passenger side and has a copper crush washer.
- Remove the axle seal, right side crown wheel ring gear shaft seal, and pre-load adjustment nut o-ring. You can remove the seal with a screwdriver or pry bar. Before removing the crown wheel, make sure to mark its position in relation to the housing. You can use an impact punch.
You should also measure the height of the crown wheel to ensure it’s reinstalled back to the same position. Remove the locking bolt and anchor and remove the nut. Volvo has a special socket for this but you can use a long screwdriver or pry bar to back it out. It just threads in, so spin it counterclockwise to remove. Once the nut is removed, tap out the seal. - Remove the pinion shaft seal from the angle gear. First mark the driveshaft flange in relation to the angle gear flange and remove the flange. Mark the position of the driveshaft flange center nut in relation to the housing and remove the nut. Remove the seal, inspect the carrier plate, clean the mating surfaces and reinstall the seal.
- Clean the angle gear using alcohol around the sealing surfaces and blow the area clean with air when finished.
- Next remove the ten screws and the cover separating the two halves. To make it easier you can tap them using a plastic hammer to release them.
- Check the pinion gear and crown wheel for any type of abnormal wear or damage.
- Check the pinion shaft for axial play or any kind of binding, and also check the bearing races in both halves of the angle gear.
- If you find a bearing race is damaged, if the pinion shaft has play, if there is abnormal gear wear, or if there is any kind of binding, replace the angle gear.
- If you find these parts to be serviceable, remove the left side crown wheel shaft seal and replace.
- This is the tedious part. Measure 3 mm from the inside of the flange and draw a line along the inside circumference.
- You’ll need to file this so make sure you protect the bearing race from debris.
- File off the inner edge of the cover, essentially making a tapered 30 degree angle up to the line that you drew.
- After filing, you can now polish the chamfered edge with some emery cloth. Polish in a radial motion and clean when done.
- Remove and clean any remaining liquid gasket from both flanges. You can use a Scotch-Briteâ„¢ type pad and finish cleaning with alcohol when done.
- Apply a 5 mm bead of chemical gasket approx. 1 mm from the chamfered edge you just filed.
- Complete the following within 4-5 minutes to ensure that the two halves are torqued together while the sealant is still wet.
- Pay close attention to the routing of the sealant as shown. This is for the opening from the opposite side half which should be about 43 mm wide.
- NOTE: Don’t apply sealant to both halves.
- Install the ten bolts and tighten them crosswise to 18 Nm. Then angle tighten them crosswise 85 degrees.
- Install the axle seal.
- Install the pre-load adjustment nut o-ring from the angle gear. Lube the new seal, install, and reinstall the nut back to its original location. Tighten the locking nut to 50 Nm.
- Install the pinion shaft seal.
- Install new left side and right side crown wheel shaft seals.
- Install new bleeder pipe and filter.
- Fill the angle gear with Genuine Volvo fluid part number 31259380 and install a new drain plug gasket.
- Install the angle gear in reverse order, test drive the vehicle making sure of no vibrations and noises.
Volvo six cylinder angle gear reseal
- Remove seal 8636015 with a seal removal tool (a screwdriver may also work, but be careful not to mark up the sealing surface). Be careful not to damage the bearing seated below the seal. Lubricate the new seal with oil. Make sure the angle gear is supported so that no pressure is on the input shaft. Once supported, you can remove the eight bolts to lift the cover off.
- Pay attention. Find seal part number 8636016. Record the depth at which it is installed and then remove it. Again lubricate the new seal and install it to the same depth as the original.
- Now let’s work on the opposite side. Hold the gears and chain in place and flip the assembly on its side so that the gears and chain lay flat on your bench. Lift the cover off of the gears and leave them as they are. Remove seal part numbers 8636014 and 9480961. Flip the cover over to install the new seals.
- Lubricate both of the seals and place the cover back over the gears and chain. The cover should go on relatively easily.Hold the cover, chain, and gears in place, while flipping it over to install the new gasket 8636802. No additional gasket sealer is needed.
- Clean the mating surface of the outer cover and place it back on top over the bearings. Make sure there isn’t any gap between the two halves and torque the bolts to 22 ft-lbs. in a criss-cross pattern.
- When installing the angle gear, positioning the chain gear onto the transmission, and fitting the axles into the angle gear/chain gear, be sure to install them straight to avoid damage to any of the seals.
- Refill with oil part number 1161745 to the level of the fill plug.
- Go over your work, make sure you didn’t miss a step and take it for a test drive making sure all is good.
Now that we’ve gone over resealing the angle gear, let’s talk about the rear differential and its components.
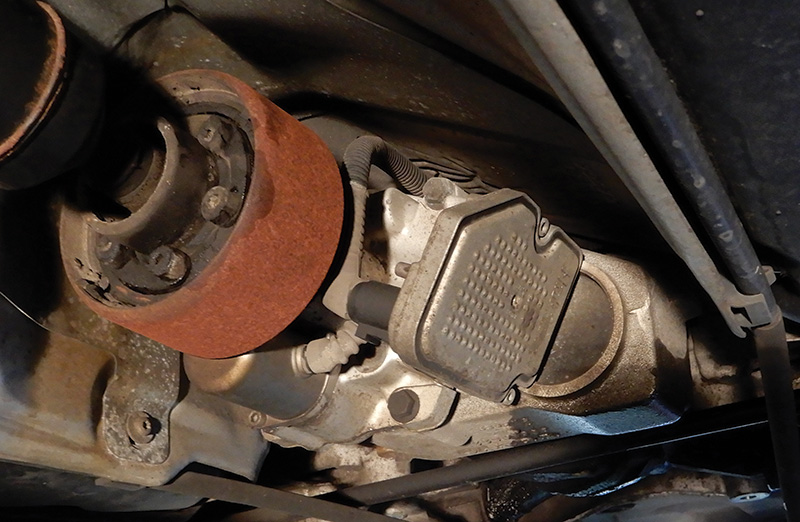
The rear differential sits behind the Haldex. The two axles for each side run the power to the wheels making this system an AWD vehicle.
Changing the fluid on these units can sometimes be a challenge. Sucking the fluid out through the fill plug can be done and then you can fill it through the same plug using Volvo part number 31259380.
Replacing the differential fluid is just a good idea, like changing the engine oil. This can make the unit last longer.
In case you might have to replace the differential, here are the steps in doing that replacement.
Make sure the vehicle is in Neutral and disconnect the battery negative terminal. Raise the vehicle in the air.
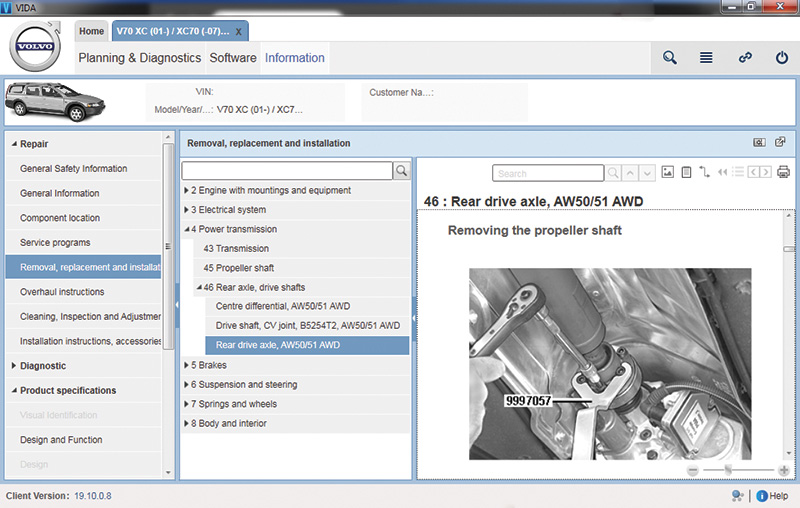
Remove the exhaust system from the catalytic converter back. Disconnect all rubber mounts. You will need to have help removing the exhaust system and setting it aside. Use Volvo tool number 9997057 to hold the driveshaft while removing bolts at both ends. Make sure to mark the driveshaft so that it can be reassembled in the same orientation.
If the vehicle is equipped with a vibration damper on the Active on Demand coupling flange, use tool 9512940 to hold the driveshaft and remove the bolts. The flange can be removed by using two 8 mm bolts that thread into the flange and can be pressed off. Disconnect the center support bracket and remove the driveshaft.
Remove the rear wheels and remove the center bolt for axles on both sides. Remove the shock absorber bottom bolt from both sides. Remove the bolt for the lateral links, and remove the links for the anti-roll bar on both sides. Remove the bolts for the track rod (stay) on both sides and set aside. Remove the brackets for the e-brake and let the cables hang. The bottom control arms on both sides need to be removed from the vehicle.
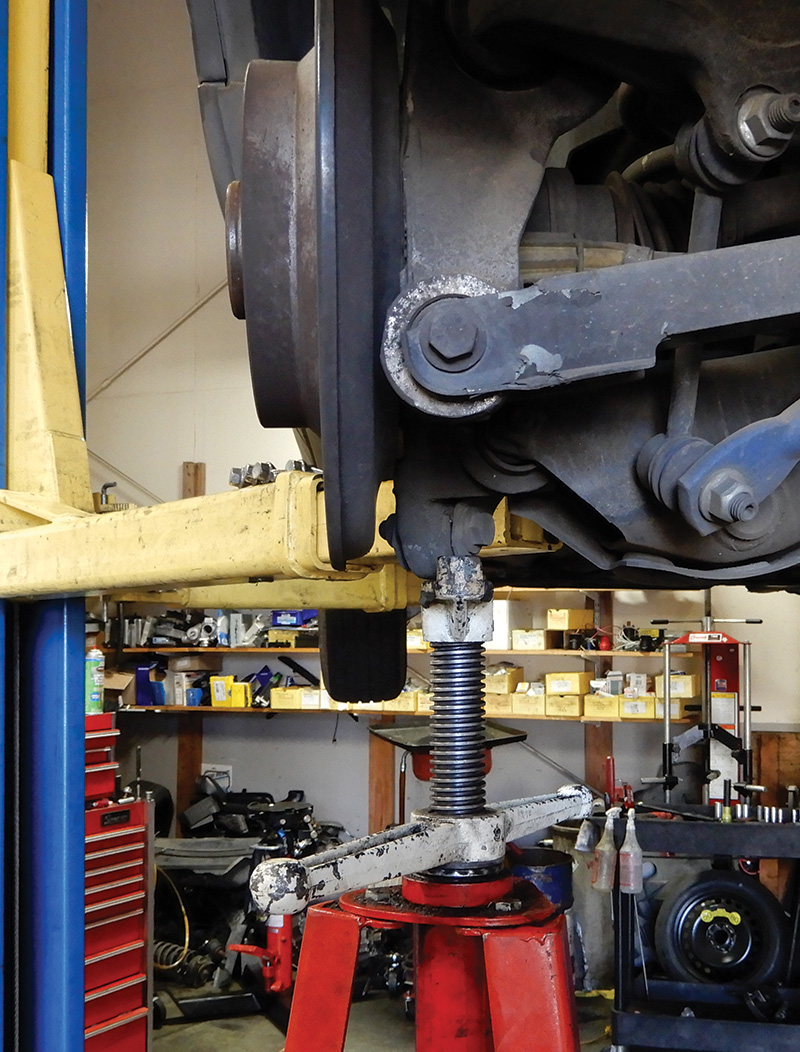
Disconnect the electrical connector at the Active on Demand unit. Remove the anti-roll bar (sway bar). Set a transmission jack under the differential unit and strap to the jack, using caution so the unit is stable and will not move around.
Remove the eight bolts that hold the rear subframe to the chassis and lower the unit slightly. Disconnect the breather hose at top of the final drive unit. Now lower the unit with axles until the axles are slightly below the wheel bearing housing. Remove the axles from the wheel bearing hub and lower the unit away from the vehicle.
Now that unit is out, remove the axles and Active on Demand unit and transfer them to the new final drive (differential), making sure to clean all parts and being careful when installing the axles not to damage the seals.
Secure the new unit with axles installed onto the transmission jack. Raise the jack up and insert the axles into the wheel hubs, making sure that the splines line up and slide in easily. Jack the unit up, connect the breather hose and jack the rest of the way up into place. Insert and tighten the eight bolts that hold the final drive in. Remove the jack and install the anti-roll bar (sway bar).
Install the lower control arms and the track rods and tighten down. You will need to jack up at the wheel hub assembly to line up the control arms.
Once both control arms and track rods are on, insert the bolts for the shock absorbers and the lateral link, leaving them loose at this time. Install the links on both sides for the anti-roll bar and tighten.
Connect the electrical connection at the Active on Demand unit. Install the driveshaft and tighten, making sure to line up the marks that were made during disassembly. Install the center support.
Fill the final drive unit with Volvo fluid part number 1161620-8 until it drips out, insert the plug and tighten. Check and fill the Active on Demand unit. Note that if this unit is replaced, it is necessary to test drive the vehicle and check again.
The suspension needs to be in its normal driving condition, meaning that you should lower the vehicle onto the ground or use a track hoist. Now tighten the shock absorbers and lateral link. Raise the vehicle back up and install the exhaust system using new gaskets and secure at hangers. Tighten the axle bolts and install the tires. Look over all work done to make sure everything is tightened and in place. Of course the vehicle should have the alignment checked after this procedure.
Download PDF


0 Comments