


With the right tools and the right instructions, it just becomes time consuming.
Remember the old 240s when you had to take half the dash apart to replace the blower motor? Well this job isn’t quite the same, but the dash still has to come out.
Let’s look at one example
The blower motor on a 2015 Volvo XC60 is up underneath the dash, and the dash will have to come out in order to replace the blower motor. Although this job can be very daunting, with the right tools and the right instructions, it just becomes time consuming.
First, start by moving both front seats as far back as you possibly can. This will give you room to work on the dash and all of its components.
Open up the tailgate so you can put all the trim pieces and dash pieces in the back seat. Turn the ignition on and push the button at the climate control for recirculation. This will help to remove the blower motor. Roll down the windows and disconnect the battery negative terminal.
Remove driver’s air bag assembly first. You will need to use a small screwdriver to pop the air bag loose. Turn the steering wheel so you can insert the screwdriver in the hole at the back of the steering wheel. Insert the screwdriver in the small hole on the back of the steering wheel at an angle and release each side of the air bag.
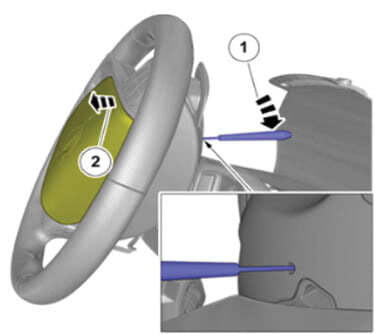
Disconnect the air bag electrical connectors, and set the air bag in the back seat out of the way. Set the steering wheel to straight ahead, and insert a screw at the clock spring so the clock spring will not move.
Remove the center nut at the steering wheel, being sure to mark the position of the steering wheel. Set the steering wheel out of the way. Remove the trim around the steering column. Pull up on the top trim, being careful where the trim is connected to the plastic trim around the DIM (Drivers Information Module). You will have to remove two Torx T25 screws and pop the trim loose, after which you can remove the trim components.
Remove the trim panel underneath the steering column to expose all connections at the column. This requires the removal of three T25 screws. Now remove four screws at the clock spring and electrical connection, and pull the clock spring straight up, making sure not to bend or damage the little pin connectors. Remove both the turn signal switch and the windshield wiper switch.
Remove four screws to remove the DIM and disconnect the electrical connector. Remove the parking brake switch from the dash (two screws hold it in place), and then disconnect the electrical connector. Set these aside with the other switches. Pop out the headlight switch assembly and disconnect the electrical connector. Remove the sensor at the front of the dash, pop it up with a bone tool and disconnect it.
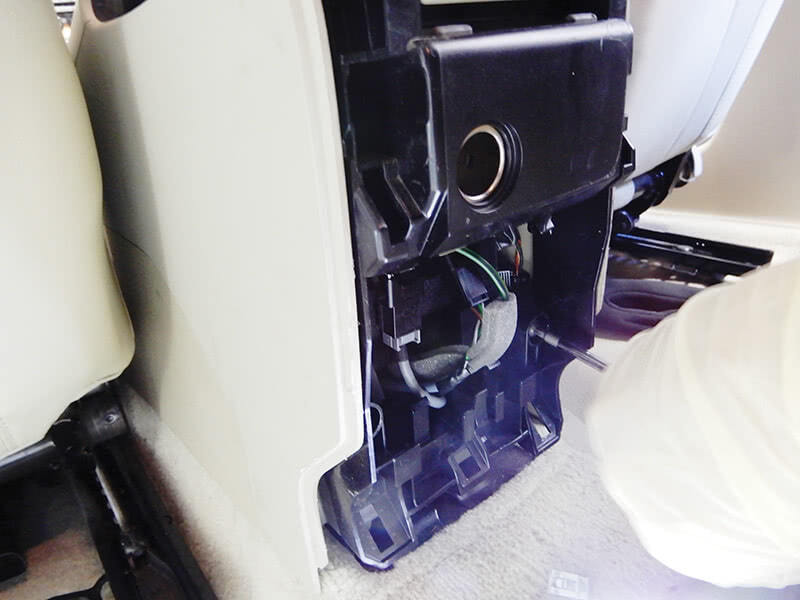
Remove the driver’s kick panel. Be careful and disconnect the electrical connector for the light. Slide the OBD II connector out of its dash position, and let it hang out of the way. If the dash is equipped with speakers, remove them. Pull up on each grille carefully so as to not break it and remove the speaker from the dash. Remove the A pillar trim pieces on both sides.
Move to the passenger’s side and remove the kick panel after removing two T25 screws. Empty and remove the glove compartment. To remove the glove compartment, remove the trim panel on the side of the dash to expose the dash bolts.
At the bottom of the glove compartment remove two screws, open the compartment and remove the light. Four screws hold the inner compartment; remove it and set it aside. Two more screws at back of glove compartment need to be removed. Now you will be able to remove the complete glove compartment.
Now it’s time to remove the center console. Remove the trim around the infotainment screen. Use a bone tool to pop the clips out, and disconnect the hazard warning switch.
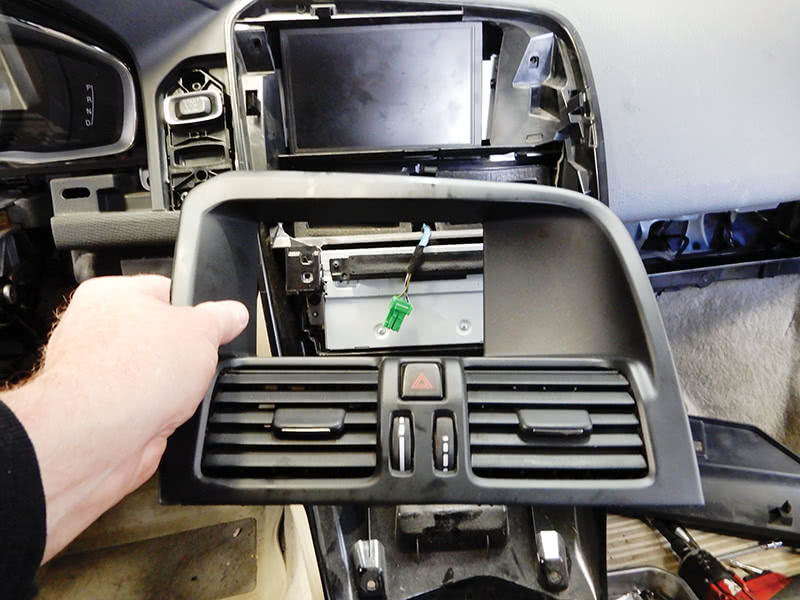
Pop out the trim around the CD entrance. Remove six screws that hold the console controls, disconnect the electric connector and remove.
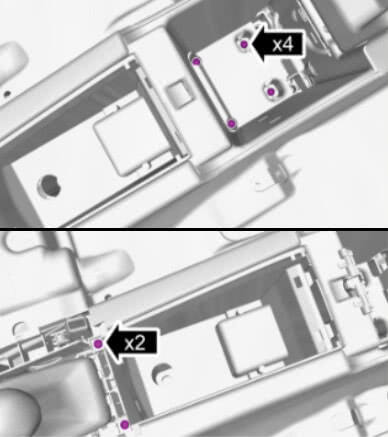
On both driver’s and passenger’s side remove the panels that are under the shifter console. Disconnect the shifter cable. Open up the top covers on the console and pull out the cup holder to expose screws. Remove five screws, one under the cup holder and the other four in the compartment behind the cup holder. Remove two screws at the top of the console at the back of the shifter. Then remove two more screws at the bottom of the console in front of the console near the front of the shifter.
On the back of the console, remove the trim by popping it out with a bone tool. Disconnect the 12 volt connector. Remove four top and bottom screws. Remove the back bracket from the console.
Remove the center console from the vehicle. The trim around the shifter and up around the infotainment system can now be removed.
Remove six screws that hold in the infotainment module and screen, disconnect the electrical connection and remove the units. Remove the trim around the ignition switch, remove the screws, and pull out the switch, disconnecting the electrical connector.
Remove the bolts at the shifter box and remove the shifter, making sure to disconnect the electrical connectors.
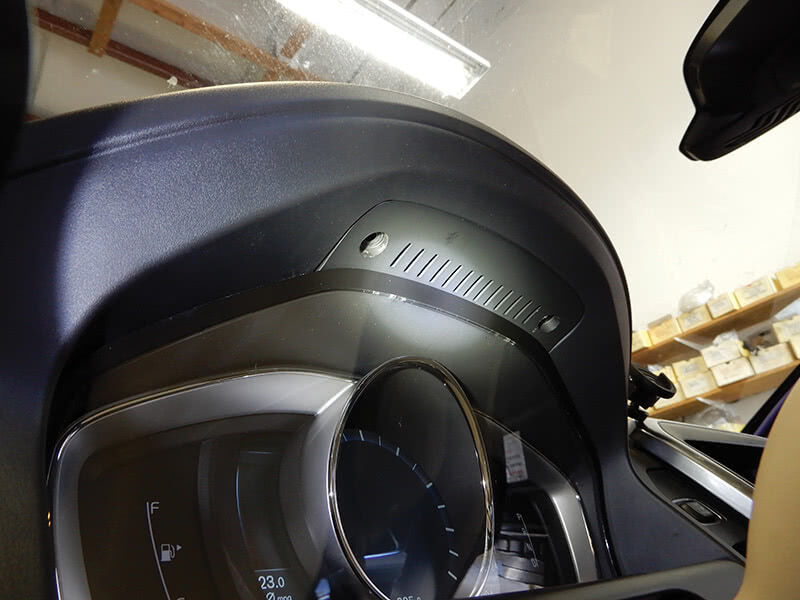
Now we can work on removing the complete dash. Behind the DIM there are fasteners that need to come out.
In the center of the dash, there are three bolts that must be removed: one right behind the navigation screen; the other two right below the climate control duct.
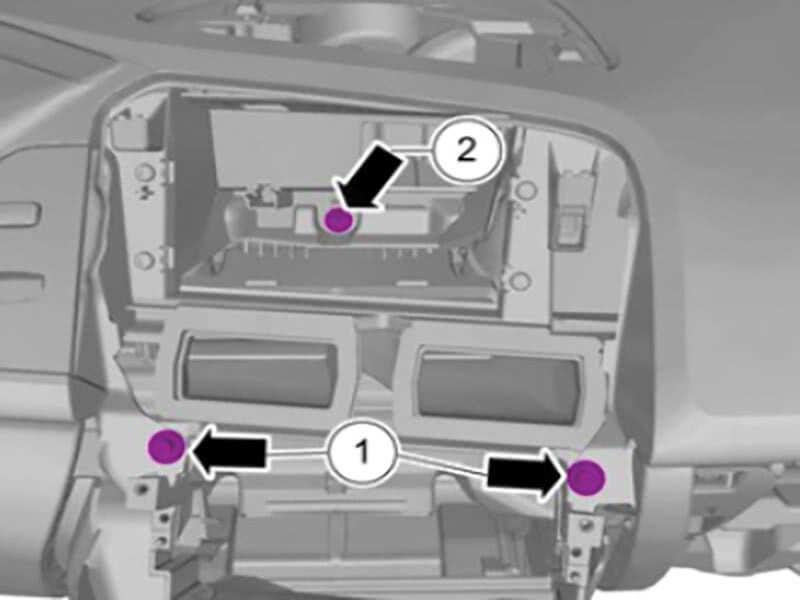
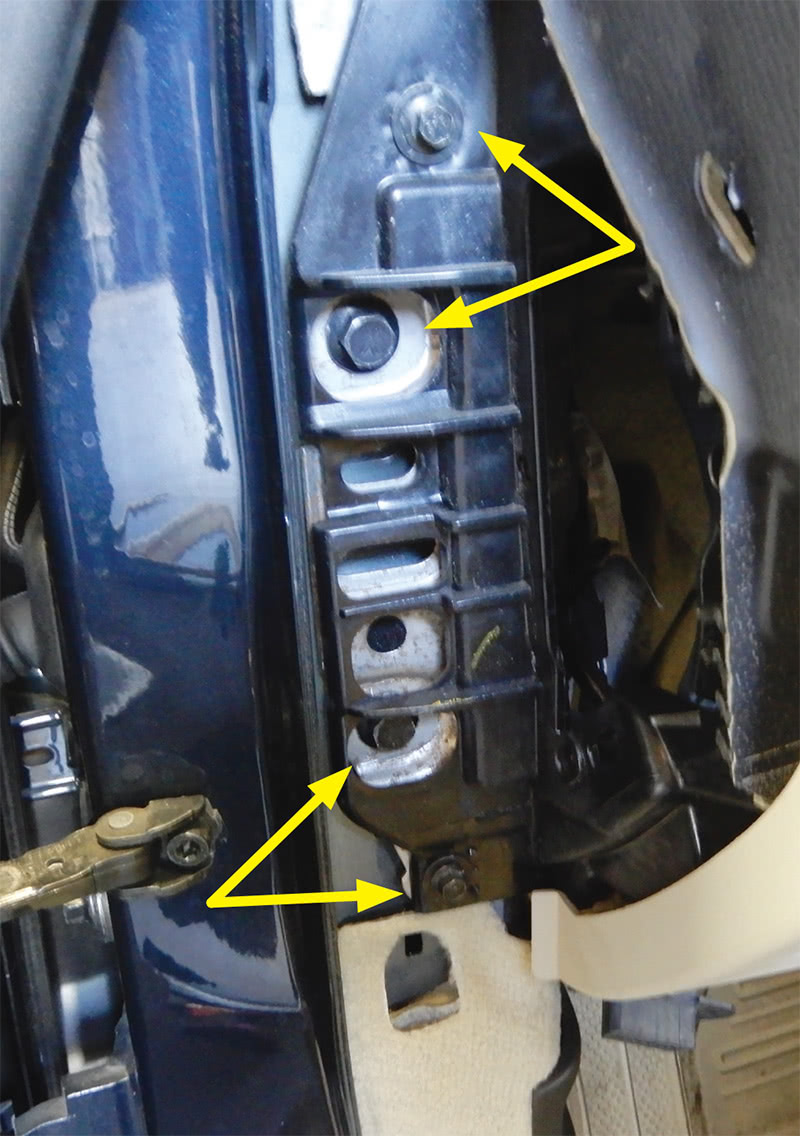
On each side of the dash there are two bolts that need to be removed, near the A pillar.
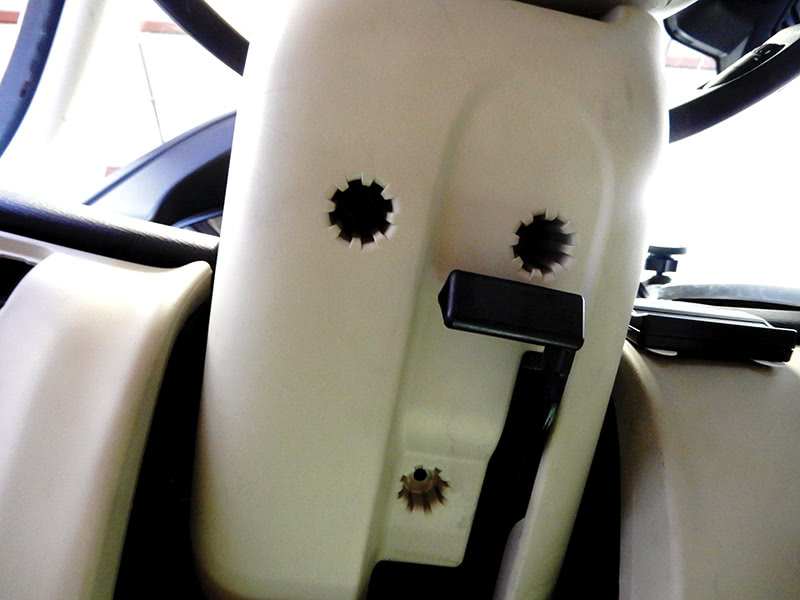
Remove the bracket that is behind the glove compartment and disconnect the electrical connector for the passenger air bag.
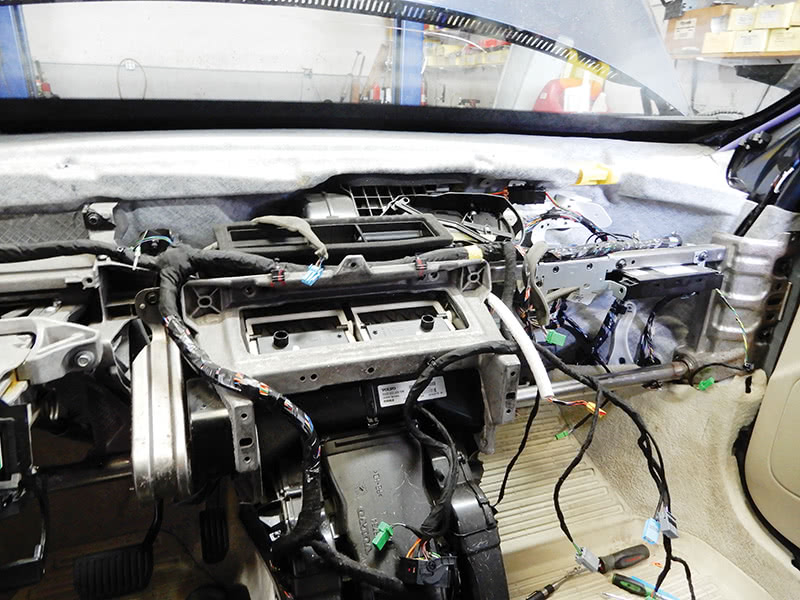
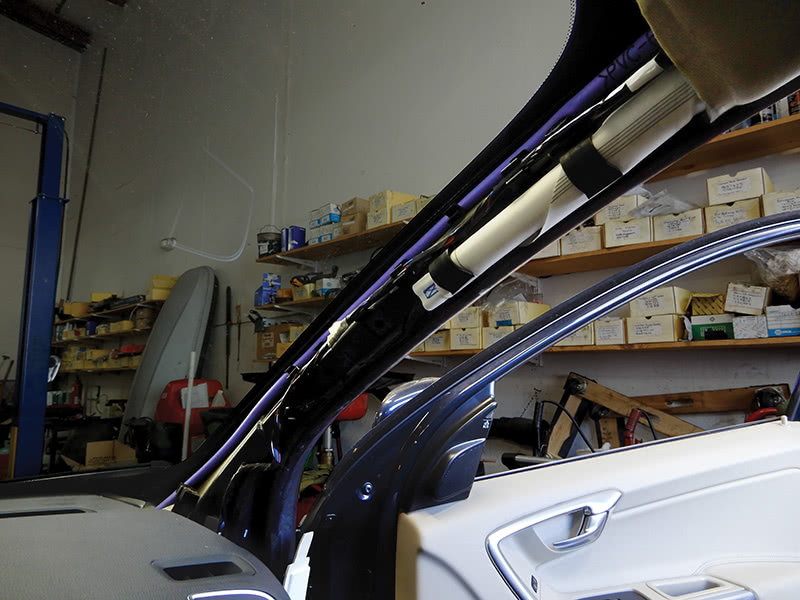
Now that all bolts and components have been removed, the dash can be lifted out. This will be a two-person job to remove the dash. With a technician on each side of dash, pull the dash straight out, making sure nothing is still connected. Remove the dash from the vehicle and set it aside, making sure not to damage it.
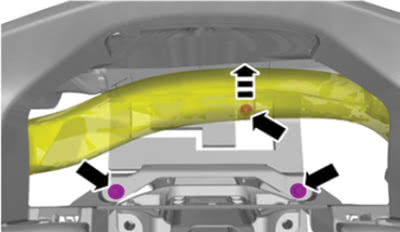
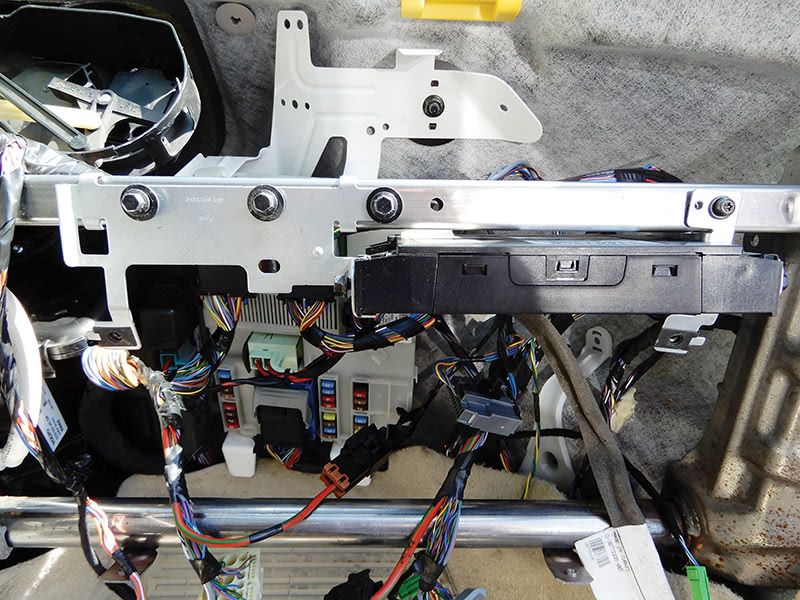
With the dash removed, now we can work on getting to the blower motor and removing it. Support the bar across the top of the dash; the passenger’s side will need to come out. You might want to take a picture just to make sure that when putting it back together, you get the correct bolts in the correct positions. Also pay attention to how the wire harness is positioned.
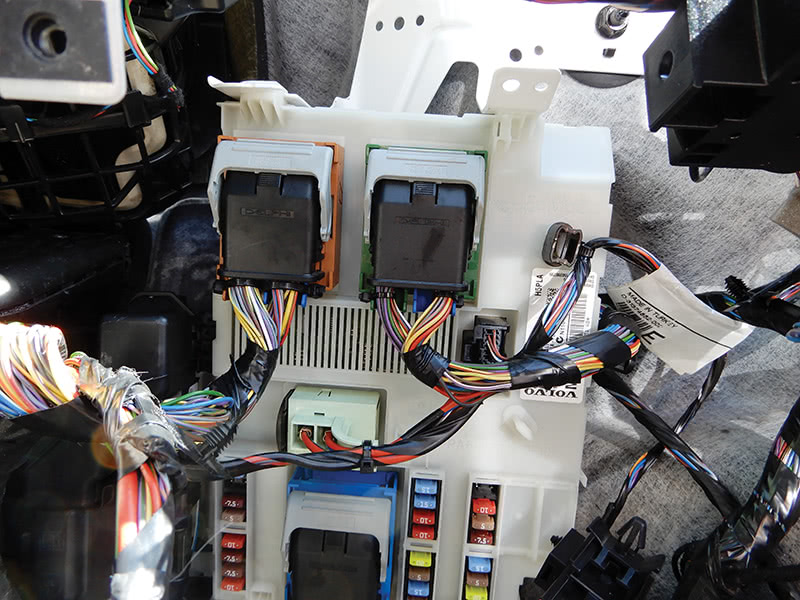
On the passenger side, remove the plastic cover over the fuses on the CEM (Central Electronic Module). Disconnect all connectors at the CEM and pop out the CEM from the vehicle. Remove the bracket that supports the CEM and the three bolts that hold it in place.
Remove the air quality sensor and disconnect the electrical connection; undo the harness for the sensor and move it out of the way.
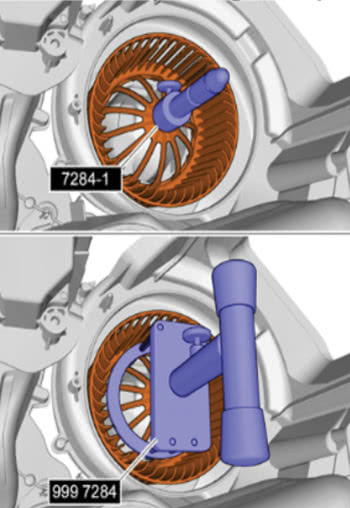
In the middle of the dash near the windshield, you will be able to see the blower motor. You need to remove three T25 Torx screws from the cover to expose the blower motor. Place Volvo special tool number 999 7284 onto the shaft at the end of the squirrel cage connected to the blower motor. Make sure that the tool adjustment is pointing up.
On the back side of the blower motor, disconnect the electrical connector, and if there is a screw on the backside above the connector, remove the screw. On the back side of the blower motor is a tab lock at the top of the motor. Pushing that tab down, turn the tool 15 degrees counterclockwise and remove the blower motor from the vehicle. Remove the tool from the old blower motor and install on the new blower motor.
Set the new motor and tool in place and turn to lock in place. On the back side of the blower motor, insert a screw through the blower motor and into the housing. This will help keep the motor in the correct position.
Let’s put it all back together
| NOTE |
| P3 vehicles up to and including some 2015 should get a piece of weatherstrip tape added under the wiper cowl to prevent water from running down the windshield frame and dripping into the fan motor. See TJ 27558 for more information. |
Connect the electrical connector at the blower motor. Install the bracket for the CEM, using the three 8 mm bolts. Install the support bar and secure into place.
Set the CEM into the bracket and push into place. Attach all electrical connectors carefully, making sure not to bend any pins at the module.
Time to set the dash back into vehicle; you need some help to do this. Set the dash in, making sure all wire connectors are close to their hookups. Install the two bolts on each side of dash near the A pillar, but don’t tighten them yet.
Install three bolts at the center of the dash, one behind the infotainment module and two below the center vents, one on each side. Now make sure the dash is in place and tighten the A pillar bolts on each side of the dash. Tighten the three center dash bolts.
Behind the DIM, install the three bolts and tighten them. Install the sensor at the top of the dash and pop into place. Install the ignition switch with bracket and set into place, securing the three screws that hold it into place. Set the infotainment screen into place and tighten the screws. Plug in the DIM and secure into place. Install the infotainment module making sure to connect the electrical plug.
Put the shifter box into place and tighten down. Install the shifter cable and all electrical connections at the shifter. Set the center console cup holder assembly into place. Connect the 12 volt electrical connectors both front and back. Install four screws at the back of the console and two on top in front on the console. The four screws inside the console compartment can now be installed and tightened.
Set the compartment cover and frame into place and snap in. Put the back console trim into place. Install the cup holder and secure. Now that the center console is in place, let’s install the trim piece that has the climate control module. Connect the electrical connectors and tighten down. Install the trim around the vents, connecting the electrical connector at the flasher switch.
Secure the DIM with the four T25 screws. Pop in the parking brake switch the headlight switch and the OBD II diagnostic socket. Install the steering wheel module, clock spring and both combination switches, making sure not to damage the electrical pins at the connections.
Add the trim at the bottom of the steering column and slide into place, securing with three T25 screws. Add the trim at the top of the column and around the DIM and secure. Install the steering wheel and make sure to remove the screw in the clock spring so not to damage it. Install the driver’s air bag, connect and push into place. Install the kick panel at the driver’s side and the panel at the console bottom.
Now over to the passenger’s side to finish this job up. Install the bracket by the passenger’s air bag and connect the air bag. Install the glove compartment, connect the electrical connector for the light. Install the screws inside the compartment and two at the bottom of the compartment. Secure the kick panel and console trim on the passenger’s side. Install the trim pieces on both sides of the dash and trim at the A pillars on both sides.
Connect the battery in the vehicle and check to make sure everything is working correctly.
As with previous models, replacement of the blower motor on newer vehicles is not a simple job. Attention to detail and patience will assure a satisfying outcome.


0 Comments