

Common sense troubleshooting by the numbers
All too often, air conditioning articles toss around words like “superheat,” “subcooling,” “non-condensables,” and “latent heat,” as if everyone knows what they are. These words may be fine, but we don’t use them every day, and most likely we don’t really understand what they mean if they stand by themselves without context. But understanding them and their application to air conditioning work will enable us to do a better job of diagnosing faults correctly, and of doing appropriate and quality A/C service work.
Re-evaluating Your Tools
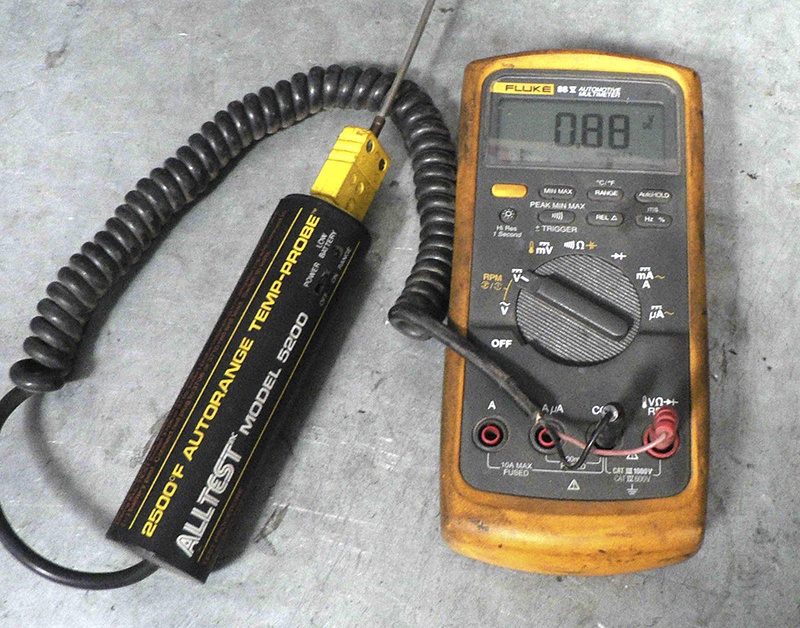 Add a temp probe to your DMM, Or spring for a special tool |
A set of pressure gauges and their readings have been solid tools for air conditioning diagnosis since the day A/C was introduced. They’re still important tools, but today’s vehicle designs and service port locations can limit their usefulness. In this article we hope to introduce an important addition to your arsenal of diagnostic tools: the “contact pyrometer” – or, more simply, a temperature probe that you put in contact with air conditioning lines.
Although a contact pyrometer isn’t a Nissan/Infiniti “required tool,” it’s inexpensive and easy to use in conjunction with your existing equipment, such as a DMM.
If you have the budget for it, there are stand-alone pyrometers that provide up to four channels of temperature readings simultaneously.
Diagnosing Still Starts with the Basics
Some air conditioning repairs can be gravy work, but the tough diagnostic jobs can become real headaches unless we understand some basic operational principles.
Nissan training has helpfully labeled our locations as Hot, Warm, Cold, and Cool, but we can do better than that by first applying some numbers to them, then providing guidelines as to what the numbers mean. As we go along, we’ll define some of the words mentioned at the beginning of the article to show how they can help us in A/C diagnosis.

This is an image of the refrigerant loop from Nissan training material. Let’s use it to see why we can do a better job of diagnosing a problem with a temperature probe.
The Condenser is the Subcool Place
We’ll start with the job of the condenser, the place where “subcooling” takes place. Subcooling is the “latent heat” that the condenser continues to shed even after the refrigerant condenses into a liquid. The marvel of refrigerant is this ability to absorb and release latent heat until it changes state – that is, when it changes from a gas to a liquid and from a liquid to a gas.
Subcooling is directly related to “superheating,” which is the latent heat that the evaporator continues to absorb even after the refrigerant turns into a gas. In other words, the ability of the evaporator to cool the passenger compartment is directly related to the amount of subcooling that takes place in the condenser.
When everything is working properly in a fully charged system, all the refrigerant charge flowing into the condenser will change to liquid shortly after entering. When this occurs, proper “subcooling” has taken place; we’ll have nothing but liquid refrigerant hitting the expansion valve for maximum cooling effect.
If the refrigerant charge is low, there will be voids in the liquid line (bubbles), and cooling effectiveness will be reduced. Additionally, lubricating PAG oil won’t circulate properly if there’s not a full charge. A/C compressors with a low charge will run considerably hotter and noisier as a result.
How “Cold” is Subcool?

Using this A/C evaluation check sheet will assure that you don’t miss anything.
So, what if we measure the temperature on both sides of the condenser?
Although it would be useful to measure the pressure, when was the last time you saw a high-side fitting on both the compressor and the liquid line? I think you’ll agree, the answer is “NEVER.”
Fortunately, pressures and temperatures are closely related in an air conditioning system. Since we can’t measure the pressure or the flow in an A/C system, we’re going to use our contact pyrometer to get an idea of what’s happening.
There’s not much in the way of published specs on what the temperature changes in an automotive A/C system should be, but here are some numbers that have worked for us. Like anything else, if you start checking temperatures on various vehicles on your own, you’ll rapidly get the feel for what’s typical, and for what happens when things aren’t right.
Testing Do’s and Don’ts
A comprehensive check chart will go a long way in maintaining the consistency of your cooling system work.
Such a chart really helps to pull all the numbers together in one place, which allows the technician to make an intelligent diagnosis. It also helps reduce the number of problems caused by poor customer communications, such as a
complaint of “poor cooling” when the real problem is the fan blowing only on Low, or the duct air getting routed only out of the defroster outlets. We’ve included an example of such a chart.
If you observe these rules:
- DO have the engine at idle
- DO have the A/C set to High Blower and Recirculate
- DO have all the vehicle doors open
- DON’T put a fan in front of the condenser
- DON’T crank the engine rpm up with a throttle stick
You can use these observations:
(Note: These temperatures are for illustration only. Always check the approved Nissan/Infiniti service manual specifications from the technical website as there can be great differences depending on temperature and humidity).
- Condenser inlet to condenser outlet difference: 20 to 50 degrees F.
- Evaporator inlet to evaporator outlet difference:
- Expansion valve system (most Nissan vehicles): 4 to 14 degrees F. increase (the “superheat” reading, actually).
- Fixed orifice tube (used on some Nissan Quests): -5 to +5 degrees F., with zero degrees being optimum.
- Ambient temperature to duct temperature difference: 30 degrees F. of drop, minimum.
- Temperature drop across any other component in the system: 2 degrees F., maximum. Anything more indicates a restriction.

Start the diagnosis by testing the refrigerant.
Notice that when everything is right, the drop between ambient temperature and duct temperature should be very close to the same as the drop across the condenser. That is because the refrigerant is being used to “pump” the heat from inside the car and deposit it in front of the radiator so it can be dissipated to the atmosphere.
Problems, Problems!
So, what goes wrong? Naturally the most common problem is an undercharge condition. This usually results in a duct temperature that is less than 30 degrees F. cooler than ambient, and a customer with a complaint.
If you measure the temperature drop across the condenser in this case, you might be surprised to find that it’s greater than 50 degrees F. If you’re a flat-rater, and you can’t detect a leak in the system, you might be tempted to shoot eight ounces of refrigerant into the system to see what happens.
So what’s the trouble with that? Maybe nothing, but you’ll be much better off checking the refrigerant purity, and seeing how much air is in the system. Anything more than 1% air is too much; 0% is preferred.
Air is a “non-condensable.” That is, no matter how much you compress and cool it, it’s not going to turn into a liquid, and it’s not going to aid in cooling.
The optimum way to get the best outlet temperature is to evacuate the old refrigerant, pull a vacuum of 29 in. Hg for ONE HOUR with the system warm (that is, an underhood temperature of about 90 degrees F.), then recharge to the precise specification for the vehicle.

Use the specs on the underhood A/C label, or the Service Information website.
Look for the refrigerant label under the hood, or refer to the ESM (Electronic Service Manual) available on the Nissan Service Information website (http://www.nissan-techinfo.com), or the Infiniti Service Information website (http://www.infiniti-techinfo.com), as the case may be.
A common question technicians ask is, “If one hour is the correct time for a vacuum, why does the machine default to ten minutes of vacuum?” Although it’s a fair question, we don’t necessarily have a great answer for it. Perhaps the manufacturers think that 10 minutes is better than nothing. But consider what pulling a deep vacuum does: ideally, it removes all of the air, and boils the water out of system by dropping its boiling point. That takes time. Having the underhood temperature warmer will accelerate the process.
Moisture in the system creates all sorts of problems. It reacts with the PAG oil to create acid that eats stuff up. It can freeze in the expansion valve and cause hard-to-diagnose intermittent cooling issues by restricting the refrigerant flow.
So, set up the machine to deep vacuum for an hour, and go work on something else until it’s done.
Case Study #1 – 2004 Altima
This article can’t cover every possible scenario, but we’ll start by looking at a 2004 Nissan Altima with a customer complaint of, “A/C not working very well.”
Here are the Altima’s readings:
- High side: 125 psi
- Low side: 18 psi
- Ambient temperature: 93 F.
- Duct temperature: 70 F.
- Condenser inlet temperature: 160 F.
- Condenser outlet temperature: 104 F.
- Evaporator inlet temperature: N/A (not accessible)
- Evaporator outlet temperature: 86 F.
We have a drop in air temperature of only 23 degrees; the condenser drop reading, at 54 degrees, is too high; and the evaporator outlet, at 86 degrees, is way too high.
Testing the refrigerant shows no contamination, and 0% air. If we were going to “flat-rate” one by shooting in 8 oz. of refrigerant, this would be a good one to do it on, but let’s not.
The whole system only holds 18 oz., so it’s important that we fill it accurately. You should suck it all the way down, extracting 10 ounces of R134a, and pull a one hour vacuum.
Let’s look at our new numbers:
- High side: 190 psi
- Low side: 30 psi
- Ambient temperature: 95 F.
- Duct temperature: 50 F.
- Condenser inlet temperature: 153 F.
- Condenser outlet temperature: 113 F.
- Evaporator outlet temperature: 55 F.
See anything interesting here? The change between ambient temperature and duct temperature is now 45 degrees. The change across the condenser is now 40 degrees. This gives us a high degree of confidence that everything is working nearly perfectly. All the heat collected inside the car is being dumped outside and dissipated by the cooling fan.
Now, let’s switch the fan to Low blower and watch what happens to the numbers:
- High side: 180 psi
- Low side: 24 psi
- Ambient temperature: 95 F.
- Duct temperature: 45 F.
- Condenser inlet temperature: 145F.
- Condenser outlet temperature: 121 F.
- Evaporator outlet temperature: 44 F.
As you can see, switching the fan from High to Low blower changes the numbers – particularly the temperature drops – quite a lot. This is because we are not extracting the maximum “cold” out of the available “cold” (latent heat) in the evaporator.
Some people like to check final readings on Low blower because it makes for lower numbers. That’s fine, but it doesn’t work for the purposes of using the diagnostic numbers. Likewise, it’s not fair to blow a hurricane at the condenser with a high speed fan, or drip water over the condenser with a hose, or crank up the engine speed. None of these will help diagnose a problem realistically.
Naturally, we should check this system for a leak. But unless you’re better than we are, you’ll have a hard time finding the source of a leak that resulted in the loss of just 2 oz. per year of refrigerant in four years – but more on that later.
Case Study #2 – 1995 Sentra
Now let’s consider another one, a 1995 Sentra with 240,000 miles on the odometer. We’ve already tried sucking it down and refilling with the exactly proper charge.
Here are the Sentra’s readings afterwards:
- High side: 200 psi
- Low side: 38 psi
- Ambient temperature: 103 F.
- Duct temperature: 75 F.
- Condenser inlet temperature: 137 F.
- Condenser outlet temperature: 121 F.
We have an ambient temp of 103 degrees and the duct is doing only 75 under our idle conditions. We drive it down the road and manage only 69 degrees. This customer is not going to be very happy.
So, what’s wrong? Our pressures don’t look too bad, with 38 psi on the low side and 200 psi on the high side. We check temperatures and we have only 137 degrees going into the condenser and 121 coming out.
We can safely say that this Sentra’s compressor is just not up to doing the job. At that kind of an ambient temperature, we should have a condenser inlet temperature way above 150 degrees F. It’s not at that temperature because the compressor can’t make the pressure or the heat.
With the fitting being located on the liquid line, the high side pressure can’t give us a conclusive diagnosis. Sorry, there are no after-repair readings. Not many owners of 240,000-miler Sentras are buying compressor jobs.
Case Study #3 – Air in the System
We didn’t come across a Nissan or Infiniti with air in the system before press time, so the following numbers are from a 1998 model of a different make. However, since it’s an expansion valve system like most all Nissans and Infinitis, the principals are the same.
The customer complained that sometimes the cooling was “inadequate.” Our guess is that the air also had moisture in it, which would freeze in the expansion valve and restrict flow, since the temperature drop in our test is pretty good in spite of the non-condensables.
Testing the VW’s refrigerant showed no contamination, but it did show 11% air.
Here are the “before” readings:
- High side: 240 psi
- Low side: 28 psi
- Ambient temperature: 94 F.
- Duct temperature: 56 F.
- Condenser inlet temperature: 199 F.
- Condenser outlet temperature: 105 F.
- Evaporator outlet temperature: 45 F.
Notice that the numbers are just about fine for customer comfort, but terrible for the compressor longevity. That high temperature of the condenser inlet is directly related to the compressor case temperature and the oil performance.
Here are the readings after pulling a one-hour deep vacuum, then properly recharging it:
- High side: 240 psi
- Low side: 42 psi
- Ambient temperature: 100 F.
- Duct temperature: 52 F.
- Condenser inlet temperature: 151 F.
- Condenser outlet temperature: 123 F.
- Evaporator outlet temperature: 54 F.
Notice that the ambient temperature has changed, so the other numbers are affected too, but the most obvious difference is in the condenser inlet and outlet temperatures, which have changed radically for the better.
Oil Crises

Changing the pump’s oil maintains its ability to pull the deep vacuum needed.
Do you measure the oil you pull out of the system when you vacuum it? You’d better. The example 2004 Altima holds only 5 ounces, so you don’t want to short change it. Always use new PAG oil appropriate to the application and let the vehicle pull it in with a vacuum.
Nissan bulletin NTB95-068 and Infiniti bulletin ITB96-007 list the PAG types and amounts, as well as the R134a charge quantities, for ‘90s-era models (available for download on the Nissan/Infiniti Tech News web site, www.infiniti-techinfo.com). Specs for newer models can also be found on the Nissan and Infiniti Service Information web sites.
Speaking of a vacuum, do you change the oil in you’re A/C machine vacuum pump on a regular basis? Notice the warning on our Robinaire machine telling us it’s time to change the pump oil.
The oil in the vacuum pump gets diluted and contaminated by the refrigerant oil pulled out of each system, eroding the pump’s ability to pull the deep vacuum necessary to proper maintenance.
Most of the machines meeting the J-2788 standard are very easy to service. By the way, this SAE standard dictates very high accuracy, automatic air purging, and 95% recovery of used refrigerant, which has added a lot of confidence to AC servicing.
What about leak detection
Despite fancy and expensive leak detectors, it’s hard to find leaks in an R134a system for a number of reasons.
The single greatest one is probably the fact that oil doesn’t mix well with R134a – not at all like it did with R12 – so that when there’s a leak, there’s often no sign of the telltale oil stain typically shown by R12 systems.
Although most Nissan and Infiniti models since 2000 have shipped with refrigerant containing UV dye, even dye testing doesn’t work as well with 134a systems as it did in R12 systems, since oil is the carrier for the dye.
The lesson is: do as careful a job as you can with your detector, and try to test the system under the worst possible conditions – preferably right after a hot shutdown.
Forget about leak testing with the engine running; the cooling fan will dissipate the traces of refrigerant too fast.
Note too that 134a is heavier than air, so always test for leaks along the bottoms of components. (Now, how does that stuff get all the way up in the stratosphere – air currents, maybe?)
Keep cool!


0 Comments