

From the last installment, we have an understanding, an evaluation and a preliminary number… Now what?

Left: As parts were decanted, sorted, and identified, we carefully laid out the bones on the floor to see if we could tell what we had and what we didn’t have so we could start finding missing pieces. No matter how good your plan, you’ll miss things. A parts manual and assembly manual are excellent resources to have at hand if you get a basket case in for reassembly. This is just part of the reason why a basket case costs a lot more money than a car that arrives assembled. We’ve been through this at least three times now and in every case it adds a ton to the workload and to the cost of the finished project.
Now the fun begins. First, order manuals and get them coming in. Parts, assembly, and repair manuals are available for nearly everything ever built. You’ll need them, so you might as well order them now — and don’t forget to allow for them in your initial cost quotation. Next, grab your camera and start taking photos. Hundreds of them. Review your photos before you begin teardown and note the quality of your images. In focus and well lit? Do they show you what you want to see? If so, you’re good to begin teardown, but if you didn’t capture what you had hoped then retake your photos right now — any taken after teardown don’t do you much good. An old pilot once told me that the three things that don’t help you when you’re in the air are the runway behind you, the air above you, and the gas in the truck on the ground. With restoration work, it’s the photos not taken, the information not documented, and the progress reports not forwarded to the customer.
Lighting is the key to good photography. There are two things to remember. One, reflected light whether from sunshine or artificial overhead lighting will create reflections and glare on shiny parts, but you can avoid the worst of that by watching your camera angle relative to the light source. Just remember that the angle of the reflection is equal to the angle of incidence, so just move a little higher, lower, left, or right to reduce glare. The second thing to remember is that the use of a flash can and often does “blow out” the picture center and leaves the edges darkened. Use a tripod and a remote shutter release to avoid the need for a flash. If you have a newer camera, flash pictures are less prone to blow out because the electronics do a better job of trimming flash output to match the subject.
Keep the Main Thing the Main Thing – Extend Your Hands with Vendors

I just love the lines of cars built from the early sixties to 1970. In an era where styling was king, these cars were like a sexy woman — curves and hips, and flowing lines. While this style of resto-mod work looks pretty good, this old road warrior is going to look fantastic dressed in its original green paint with bright chrome.
The most important part of this work is its flow and project timing — the management part of the job. You’ll need magnetic trays, sheet pans, bussing tubs, and tons of shelving, hooks, and storage. Keep vehicle systems stored together and work through one component or system at a time. Take it apart, clean, rebuild, paint, and refurbish it, order parts if needed, photograph your progress as you work on it, and reassemble it and bag it up for installation later. Combine orders to make as many large orders as possible to control your shipping costs. It’s not uncommon to have several hundred dollars in shipping and freight in this line of work.

Right:Here’s what Project ‘68 Camaro looked like part way through the process. The door has been partially repaired and we’ve hung it again in preparation for installing the rear quarter panel. The firewall is the starting point — align the door to the firewall — then the quarter to the door. Build from the firewall forward and the firewall aft. There’s a lot of pre-fitting, double-checking and prep work to do before the panel is welded on, but you can see what the thought process is.
For the work that you don’t keep in house, establish a list of credible and skilled vendors to whom you sublet some of your work. Meet or discuss with them your expectations before giving them a trial, and review their finished product with them afterwards and give them your feedback, good or bad. Good vendors will not take offense if you have an issue with the work. They’ll appreciate the opportunity to make it right for you, and the true professionals will work hard to earn and keep your business.
Let’s face it, there’s just not enough time to master all the disciplines involved in completely rebuilding an old car. The “10,000-hour rule” states that it takes 10,000 hours to become competent at any complex job. That’s five working years! It’s not just the time, it’s also the matter of affording all the tooling and equipment that goes with the job. Who wants to run a plating shop in America today? The startup costs would be staggering, not to mention the environmental regulation exposure. For things like interior work, plating, or re-chroming, glass, dash boards, and instrument repairs, it only makes good sense to develop a vendor list and use their talents to extend your business, making their hands your hands. By assigning work to your vendors and tracking completion dates, you effectively add employees without the cost of adding employees! Work is getting done at remote locations while you’re completing your tasks back at home.

Shelving, engine stands, transmission stands, lifts, and equipment — it’s all got wheels. Makes cleaning the shop a ton easier, too!
Keep a vendor log on each car, noting the person you contacted, the parts sent, the shipping date and the anticipated return date. In that log, I suggest you also document how good their work is and make notes about promises kept or broken. Eventually, you’ll narrow your list down to the best of the best and those are the ones you’ll use every time. Just by managing a few details you have dramatically increased your personal effectiveness.
There are a lot of parts on cars — even old ones — and if you’ve never taken them all off, blasted, cleaned, and painted them all you’re going to be stunned at the organizational skills you’ll need to hone, develop, and stick to, day in and day out. Fail here and small projects grow into uncontrollable messes that take untold extra work to sort out.

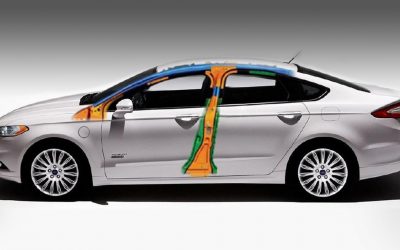
One of the things that your preliminary inspection does is determine if there are body panel fit problems. If you spot gradually widening or diminishing body gaps, you have to chase down the cause before you start disassembly. Otherwise, you might re-introduce the defect as the car is built back up. The only stable dimension is usually the firewall, and everything builds fore and aft from there. Here, a new reproduction hood is fitted to the existing hood opening to see how the gaps from hood-to-fender and hood-to-cowl filler align. If there’s a problem, you should plan your fix now — if it’s good now, it’ll be good later. There’s nothing worse than trying to muscle freshly-painted parts into position to adjust away a problem that should have been identified at the start of build.
Rules & Tools We Can’t Live Without
- Storage shelves, bags, tags, pans, tubs, and magic markers. There’s a lot of stuff to keep track of!
- In the paint booth, less dirt is less work. Sure you can nib and buff it off, but why go to all that extra effort?
- High-quality paint guns. Separate guns for sealer, primer, color, and clear coat are what make a quality paint job.
- General metal working tools: mill/drill, lathe, cold saw, shears, cut-off wheels, box breaks, bead rollers, shrinkers/stretchers, hammers, dollies, and TIG and MIG welders. If you can cut it and weld it, you can build it.
- High-quality hand tools. Good tools are a pleasure to use and they’re not as likely to round off forty-year-old fasteners.
- Torque wrenches. If it has a spec, torque it. If it doesn’t have a spec, use an application like iEngineer to find a suitable recommendation.
- A high quality camera. You’re going to need it…
- The Internet. You’ll be looking up everything.
- A computer, dedicated to this work if possible. Forms, documentation, storing your pictures, and using the Internet — you’ve got to have a computer.
- Patience. A mountain of patience. If you’re excitable, do yourself a favor and avoid this work like the plague. Every time you get upset it’s going to cost you money.
Vendors We Can’t Live Without
- Marquart’s Custom Creations: Interior specialists and all around fine young men.
- Just Dashes: Outstanding quality. A little pricey, but the work is first rate.
- Advanced Chassis: Fabrication work, welding, problem solving. These guys are great to work with. Nicest people you’ll ever talk to. See the accompanying feature in this and the last issue of Performance Technician.
-

You saw the before photos, and you saw the in-progress photos. Here it is after it was completed. It’s as pretty as it was the day it came off the showroom floor.
D and G Chrome in Cincinnati: Die cast, bumper repair, and re-chrome, polishing, and trim repair. Send it and forget it — it’ll come back just right. Make sure you get a quote. The EPA hasn’t done us any favors when it comes to heavy metal process work, so it’s expensive.
- Pro-Strip: A local company (to us) that does a bunch of our metal stripping and prep work for us. There’s probably an equivalent near you.
- Panacea Powdercoating: Show-quality powder and ceramic coatings.
- PPG: Everything paint-related. The name says it all.
- Eastwood: Hundreds of items for the restorer. You’ll just have to explore the website to get an idea of what they can do for you. Specialty paints and coating, materials, tools, equipment, and supplies.
- NAPA: This responsible, national company still sells carb kits, plus gaskets, tune-up parts, and belts and hoses, just to name a few of the parts we get from NAPA. Check there first — you may be surprised.
- Summit Racing: Tons of parts, friendly call center, and next-day shipping, at least at our location.
- Tire Rack: Tires and wheels. They’ve got ‘em.
 Old repairs, poor quality repairs, brazed-in work, a quarter-inch of filler — you just never know what you’ll see once you blow the paint off of an old car body. I’ve seen them come in with spray foam sculpted to look like parts and spray painted to hide the fact that there was no metal there, just the foam. This kind of thing falls under criminal conduct in my book. The point is that you’ll see all sorts of things done that ought not to be done. So, don’t be surprised. It still boils down to, “Do they know how to do it?,” and, “Do they give a damn?” |
 Many paint-removal facilities first bake the parts to cook out old body seam sealer and loosen the paint on the surface. Then they typically attack the residue with plastic blast media and carefully-regulated air pressure to finish it off. Needed repair work aside, it’s not going to be paint ready — it’ll still need work with a sander or DA — but it’ll save you a ton of time if you get the big chunks off first. |
 Just before the color goes on, the 1968 Z28 got a dark-tinted primer coat so that the forest green color coat had a dark base under it. All the horizontal surfaces were wet-sanded with 600. Vertical surfaces are typically done with 600 down to at least a natural break line on the side of the body, or in some cases all the way to the bottom of the rockers. How far you go down the vertical depends on body style and the customer’s dictates. Going all the way to the rocker takes quite a bit more work and, typically, once below the midpoint on the side you can’t really see the difference between 600 and a little coarser grit, say 400 wet. If the car is a driver and not a show car, it really doesn’t make sense to spend a lot of money finely sanding panels that will only get rock damage. Personally, I prefer drivers anyway. What good is it if you’re scared to drive it? |
 The tooling and equipment requirements for doing correct body repairs can be daunting. You could use a MIG and plug weld the quarter panel on, but the correct way is to spot weld it just as the factory did. In addition to the small-tool and equipment list, you’ll also end up spending money on paint booths, sanding stations, frame racks, and measuring systems. You can do this kind of work without spending that kind of money, but the results will be variable at best. |
 When and where possible, you can combine your cut-in work and the first color coat. It all depends on the project and how much of the car is dismantled. No point in making extra work or shooting overlapping color coats if you don’t have to. Paint takes on a different look depending on temperature and humidity, so shooting as much as you can in one session just minimizes having an appearance problem that you’ll have to fix. |
 As our Z28 progressed, we encountered a problem with the NOS GM sheet-metal quarter panel. It wasn’t quite stamped-corrected, and the trunk deck-to-quarter panel gap was way too wide, particularly as it approached the taillight housing cup. But you know the rule: If you’ve got a cut-off wheel and you’ve got a welder, you can make it fit! So, a slot was cut and the panel pushed over to get the gap right. Then the gap was welded shut and finished. You can’t even tell it was done. |
 Project RR is moving ahead, and while it looks like there has been a lot of progress you can still see that a lot needs to be done. The headers have cooked the steering coupler at the gear box, and the aftermarket Oberg filter, engine oil cooler, and transmission cooler all have to come off the car. The fenders and firewall have had to have all parts removed in order to prep for paint — and we’ve still got a few parts to locate. The 1980s restorer stripped out the original column shifter, so we’re on the hunt for those parts now. |
 If you have enough damage and access to quality replacement sheet metal, then certainly panel replacement is the better option, but for small areas making your own patch panels is a less-expensive and faster alternative. Equipment like a sheet metal break, a shrinker-stretcher and a power roller make life a little easier, but it’s the hands, hand tools, and patience of the artisan that makes it look as if the panel has never been modified after all is said and done. |
 “Back in the day” before products like Duraglas and fillers specially made to adhere to zinc/galvanized metals, lead was the filling material of choice and there are only a few old timers and a handful of young enthusiasts who now practice the art. The downside is that without careful metal preparation, over time the paint blisters off the area where the lead lies. Melting it out and replacing it with modern materials makes a more durable repair. |
 This NOS GM quarter panel is hung, spot welded, and seam-sealed. You can see that the lead seam on the sail panel has been replaced with modern materials. While it looks like a lot of material has been applied, it’s very thinly spread, tapering off to nothing, to hide the seam transition. |
 As Project 68 Camaro moved through stripping, body repairs, preparation, and finally into paint, the small completed panels are staged up in preparation for reassembly. This is where it starts to get exciting. |
 The decision to repair, replace, or cut patch panels and weld and finish is determined by how much damage is present, how many old repairs might be lurking beneath the surface, and the availability of quality reproduction or NOS sheet metal. If you end up patching, you need at least an inch of rust-free margin around the corroded area — two inches is better. Once the rust forms, it’s hard to keep it from breaking out again, although there are some advanced-formula rust converters out there now that appear to offer you some options if a wide enough margin isn’t available. We’ve used them in limited applications, but the vehicles we’ve used them on haven’t been in service enough years yet for us to be able to tell you how well they work long-term. |
 Old-school techniques like overfilling and sculpting the car should only be done if there are no other options, and the customer must be fully informed of what processes you used to avoid later P.R. problems. Working the sheet metal and minimizing fillers is always the preferred method, but it takes a little more time and skill to get these kinds of results. A good metal man is an artist — with perfectionist tendencies. |
 needs some tender loving care. Earlier modifications have presented us with some engineering challenges. The ignition system requires an update, the engine is leaking at several points, and the old header system was melting all sorts of parts and pieces under the hood -- the steering coupler, the wiring harness, and hoses were all crispy. We’re going to have to make a few changes to make this vintage tire roaster street-worthy again. Sometimes what looks good doesn’t work so great! The goal is to make it fun and reliable again -- and fast enough to get the owner in trouble, if he so desires.") Project RR (Road Runner) needs some tender loving care. Earlier modifications have presented us with some engineering challenges. The ignition system requires an update, the engine is leaking at several points, and the old header system was melting all sorts of parts and pieces under the hood — the steering coupler, the wiring harness, and hoses were all crispy. We’re going to have to make a few changes to make this vintage tire roaster street-worthy again. Sometimes what looks good doesn’t work so great! The goal is to make it fun and reliable again — and fast enough to get the owner in trouble, if he so desires. |

0 Comments