

Winter rains and snow always wreak havoc on roads. Pothole season can bring more than average traffic into your shop for alignments. This article will explore the adjustments you should expect to see on Nissan vehicles, how and when to perform steering angle sensor calibrations, as well as some extra information about the often-overlooked alignment diagnostic angles.
If there’s anything in the automotive world that goes together like peanut butter and jelly, it has to be “tires and alignment.” But how often should a vehicle have its alignment checked? Once we know it needs an alignment, what must we mechanics be prepared to see and adjust on Nissan vehicles?
With modern Nissan vehicles, some alignments aren’t finished until a scan tool is used to set sensor data. Likewise, why are so many customers being told “not to worry about” certain suspension angles that are out of specification? This article should prepare you to identify when alignment should be recommended, how to make needed adjustments on various types of suspensions, when the CONSULT scan tool is required following adjustments, and some tips about useful information hidden in diagnostic angles like steering axis inclination.
I Think I Need an Alignment
Good communication is key for any shop. If the customer simply asks for an alignment, but the office staff never asks them what symptom they’re experiencing, you may get caught in the middle as the mechanic. It’s always a good idea to understand exactly what the reason is for doing an alignment on request. Based on the description of the problem, your intuition and experience may save time and effort by avoiding a needless suspension alignment.
Inspect the tires first. Many customer complaints originate with neglected tire inflation or rotation. If you discover evidence of premature edge wear, feathering tread patterns, or a recently bent rim, you can make an appropriate recommendation for alignment. Unless the tires are replaced, you can also advise the customer that the symptoms they’re experiencing may not be corrected with the alignment. Expectation management is primarily an office staffer’s job, but you can protect yourself from repeatedly re-aligning the same vehicle to no effect!
Nissan does not publish an official interval for preventive alignment. However, one should be performed whenever a suspension component is replaced or disturbed. The service manual for any repair will identify whether alignment is required. Even for repairs where you don’t think the alignment is affected significantly, it is best practice to verify the angles are within specification.
Identifying the Suspension Design
Most Nissan vehicles fall into four categories of suspension design, each with different considerations for how to perform the alignment adjustments. As you know, not all suspension angles are necessarily adjustable. Knowing what is possible to adjust is critical for knowing whether something is bent. Each model mentioned below is from MY 2012:
Category 1
Small economy cars like the Versa, Sentra, LEAF, and Juke utilize MacPherson struts in the front, and a solid rear axle beam. Only the front toe is adjustable, all other angles are set rigidly from the factory.
Category 2
Full-sized coupes or sedans like the Altima and Maxima utilize MacPherson struts in the front, but they have independent multiple links in the rear. The front toe is adjustable, and so are the rear camber and toe.
SUVs like the Rogue and Murano have suspension designs similar to the Altima or Maxima but with different link engineering.
Category 3
Heavy duty trucks like the Frontier, Xterra, and Titan have complicated independent double wishbone front-end suspensions, but a solid rear axle. Front caster, camber, and toe are adjustable, but nothing is adjustable in the rear.
Category 4
Sport performance vehicles like the 370Z and GT-R are designed with independent double wishbone suspension in the front, and independent multiple link suspension in the rear. Front toe is adjustable, and both camber and toe are adjustable in the rear.
Let’s discuss what it would take to do an alignment on these designs.
Considerations Before You Begin Any Alignment
First of all, Nissan always recommends performing a four-wheel thrust alignment on all its vehicles, regardless of whether the rear end is adjustable. The phrase “thrust” refers traditionally to the direction in which the rear-wheel drive tires are pointed. Therefore, a thrust alignment ensures that the vehicle is aligned in relationship to itself, even if the thrust cannot be set. Otherwise, a front-end only alignment could result with the front wheels toed to the right, and the rear wheels toed to the left.
Second, Nissan always recommends verifying proper wheel size and inflation, as well as confirming that there is no suspension play in wheel bearings, ball joints, tie rod ends, strut mount points, or control arms. The service manual for any vehicle includes specifications for measuring unacceptable suspension play in relevant components.
Last, following any alignment adjustments performed on vehicles equipped with a steering angle sensor, the CONSULT scan tool is required. We will dedicate a section to this step below.
Considerations for Alignments in General
Suspension angles should always be adjusted in the following order, starting in the rear before moving to the front: ride height, caster, camber, toe. Each angle affects the next in that order. No modern Nissan has adjustable ride height. If needed, the correct height measurement is published for reference in the service manual.
While stationary with wheels pointed straight, caster does not have a direct effect on any other angle. However, caster is usually adjusted by physically moving the same components that create the steering axis pivot points, which will necessarily affect the other angles.
Likewise, when adjusting camber, one often must physically shift the same components that determine toe. On vehicles with a bent component that has changed camber, it may be impossible to correct excessive toe without repairs.
Double check to be sure that the steering wheel is secured and hasn’t shifted before making final front end toe adjustments. If you end up using excessive elbow grease to free up rusty or stiff components, recheck your steering wheel position. It will probably frustrate you more than the customer if they come back with an off-center steering wheel after your alignment.
Considerations for Category 1 Alignments
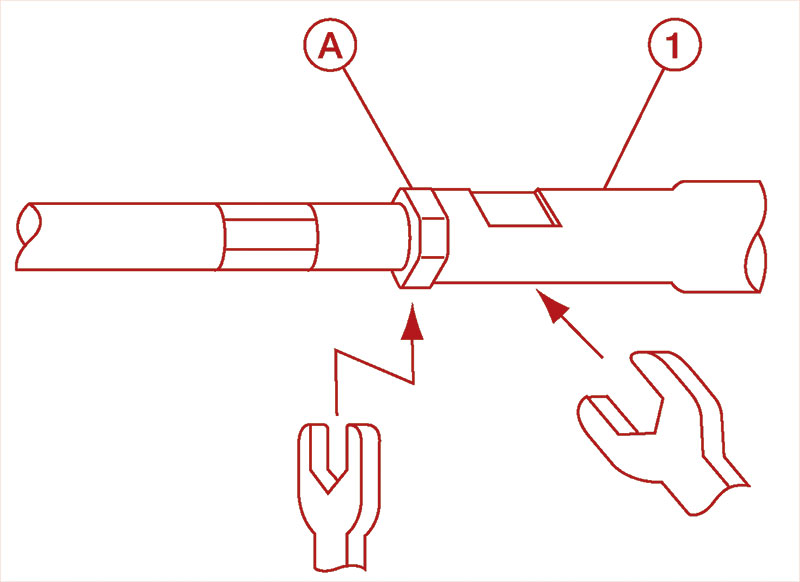
Loosen the lock nut (A) and hold the outer rod (1). As easy as it gets.
If you’ve only ever done one alignment in your life, it was likely on a car equipped with a MacPherson strut front end, and solid beam rear end! This ubiquitous design can be found on nearly every FWD car.
The front toe can be adjusted by lengthening or shortening the tie rod end links. Loosen the lock nut, use an appropriate wrench to hold the outer rod link by the flattened portion, and twist the inner rod as needed for the adjustment. The left and right rod links should be adjusted proportionally; in other words, you should not ever hyper-extend one link to complete the adjustment. Alternate between left and right sides to shift the toe to as close to the center of the specification as possible. Torquing down the lock nut is likely to move the adjustment slightly, so verify the number before moving on.
If needed, loosening the lower strut mounting bolts and manipulating the strut can sometimes slightly affect the camber. Bear in mind that the strut and/or knuckle are likely bent if camber is excessively out
of specification.
Since the solid beam in the rear has no adjustments, the official Nissan way to correct alignment is with complete replacement. If the rear angles are only slightly out of specification, it may make the most sense to recommend that the customer perform more frequent tire rotations. However, it is also possible to install alignment shims between the rear spindle and beam mounting points. Do not compromise safety for alignment; there is no official Nissan recommendation for performing rear beam alignment adjustments.
Category 2 Alignments
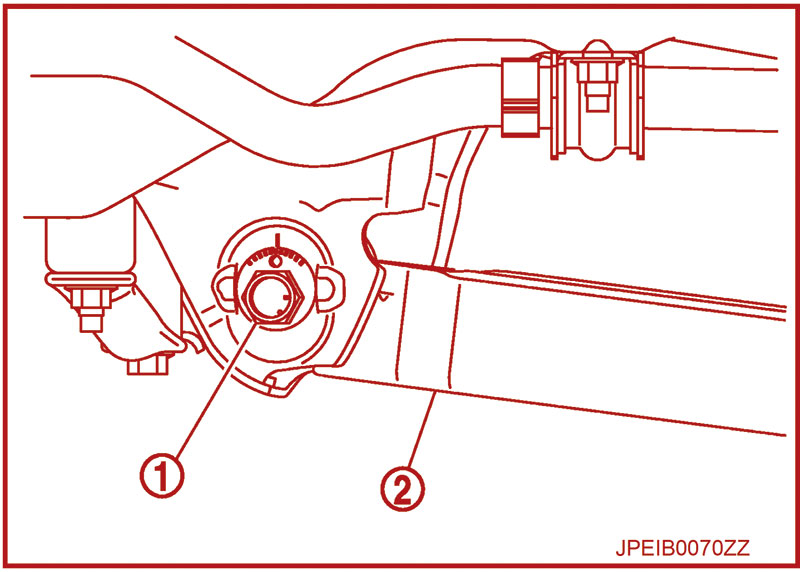
On this Rogue, camber is set on this arm…
Many Nissan vehicles utilize independent multiple links for their rear suspension designs, and have adjustments for camber and toe. While the actual engineering of each independent link may vary by model, the general concepts are the same. Adjustments are performed by rotating one or both of the eccentric alignment bolts located on two different lower links of either side. Each bolt has tick marks that correspond to approximately 0.08 degrees of adjustment. If you’re curious, the exact amount is published in each model’s service manual.
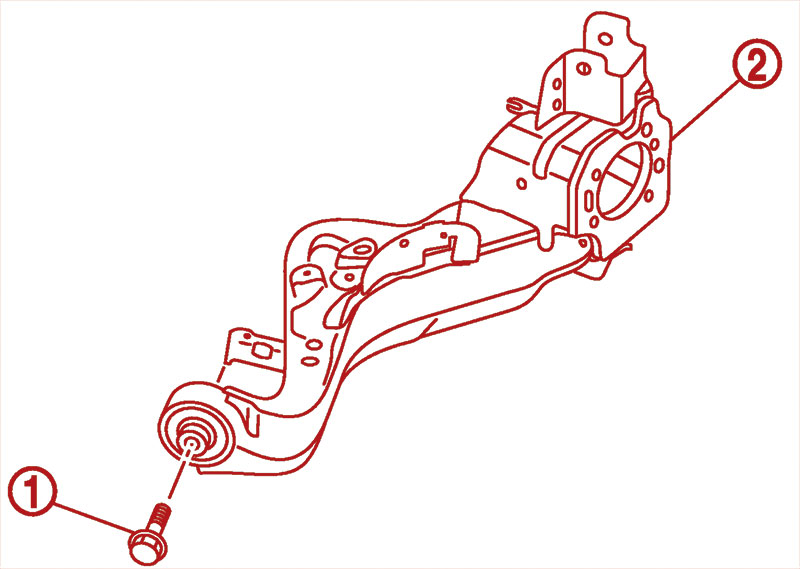
and the toe is set on this one!
Start with the forward-most lower link’s bolt. It should primarily affect camber. The rear-most lower link’s bolt should primarily affect toe. Sometimes, it is unavoidable that either bolt affects both camber and toe at the same time. Rotating both bolts in the same direction should adjust camber; and rotating both bolts in opposite directions should adjust toe.
 |
 |
| This Maxima’s design will likely require a bit of trial and error to dial in. | |
Category 3 Alignments

On this 2013 Frontier, each tick mark corresponds to about 0.05degrees of adjustment.
Nissan trucks have fully adjustable front-end suspension. It is important to note that some trucks come equipped with straight bolts installed. This means that before any adjustment can be performed, the existing hardware must be replaced with the appropriate Nissan alignment bolts and cam washers. All alignments should be performed when the vehicle is unladen – that is, with nothing in the truck bed and no one in the cabin.
Making adjustments on this design can become quite confusing since you’re moving things in 3D space, compared with 2D planes when working on just toe or camber separately. Thankfully, Nissan includes a relationship table in the service manual that should eliminate the guesswork that often happens when working with this suspension design. That’s right: get a service manual out for this one!
Replacing ball joints on a truck is a common procedure that requires an alignment. It’s worth pointing out that there is an official special service tool for this application that can save time and effort. Look on Nissan TechMate website for J-24319-01 “Gear Arm Puller.”

This table can quickly show you which bolt to hold and which to rotate in order to move the suspension toward the green.
Category 4 Alignments
Alignments on sports cars like the 370Z are not inherently more challenging than any other designs already mentioned. Despite double wishbones, the front toe is adjusted with tie rod ends as described above. We have also discussed how to adjust multiple independent rear links as well.
Finishing the Alignment Properly With the CONSULT
Due to federal safety regulations, all vehicles MY 2012 and newer are standard-equipped with Vehicle Dynamic Control (VDC) or some variant in the name. This also means that for many alignments on a 2012 and newer Nissan vehicle (or as needed on older cars) there is one final step when finishing an alignment: telling the car’s computer you just did one. Let’s discuss setting the neutral position of the steering angle sensor.

If you’re not sure whether the car actually needs this step after a repair, the service manual will tell you.
Skipping this step can result in uneven brake wear, erratic handling, or the illumination of dash board warning indicators.
For any Nissan, the steering angle sensor re-learn procedure is located in the service manual under the Brake Control section (BRC). Furthermore, the re-learn procedure always requires the CONSULT; there is no alternative method for reinitialization.
Using the CONSULT to perform the procedure and verify success is easy. Connect the scan tool, and navigate to WORK SUPPORT. One of the options is “ST ANG SEN ADJUSTMENT.” Follow the prompts within the tool to finish the procedure; it will require that the vehicle be parked on level ground. To verify the neutral position, navigate to the DATA MONITOR section, choose “ST ANG SIG” for a PID, and drive. The PID should read between +/- 2.5 degrees when going straight ahead.
Beyond “Toe and Go” – Looking at Diagnostic Angles More Critically
Some alignment equipment will give printouts that include a number of measurements we haven’t yet discussed: SAI, included angle, turning angle differential, cross caster/camber, total toe, and maybe more! Sometimes one of these angles may print out in red ink, and the customer will ask “what’s wrong with this?” We’re all guilty of suggesting “not to worry about that” because it doesn’t result in tire wear, but what is the point of measuring this information if we don’t use it for anything?
Excessive Cross-Camber May Cause Drift
Cross-camber is the difference between the two camber angles. If the two camber angles are independently within specification, but at the opposite limits of their spec, excessive cross-camber can occur. All other things being equal, the vehicle will have a tendency to pull toward the side with more positive camber. Typically, a cross-camber measurement should be no greater than 0.5 degrees, but this specification is published in the repair manual.
Excessive Cross-Caster May Cause Drift
Cross-caster is the difference between the two front caster angles. Since most vehicles do not have adjustable caster, one of the front wheels may be set back by comparison due to collision. All other things being equal, the vehicle will have a pull to the side whose caster is the least positive (that is, whichever is closer to negative), and often corresponds to the wheel that is set back.
Total Toe is What Matters Most for Tire Wear
At the end of the day, total toe should be set to the specification to prevent uneven tire wear. When one side of the suspension is toed out/in, the opposite side will toe out/in to compensate. It is the compensation that creates an off-center steering wheel, or for feathering patterns to develop on the tires. Run your hand across the tread, perpendicular to the tread grooves. If the tread blocks have steep edges in one direction compared with the other, we can quickly identify toe-related wear by feel. If the edges catch your hand as you rub toward the inner edge, this is excessively negative (toe-in); if the edges catch as you rub toward the outer edge, this is excessively positive (toe-out).
Steering Axis Inclination
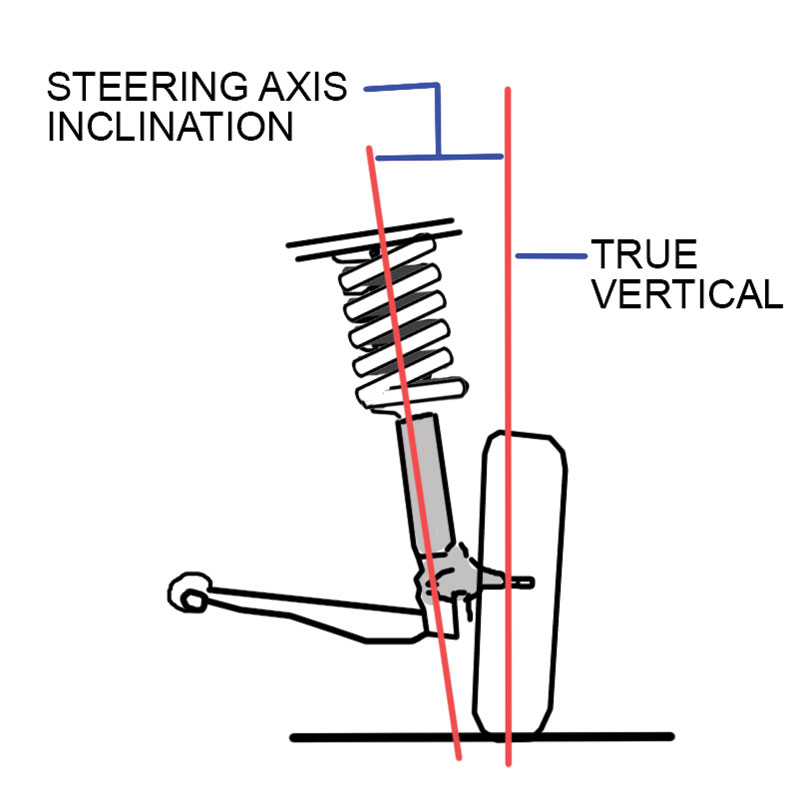
Visualizing the SAI.
SAI is important for two reasons: engineering and diagnostics. From the engineer’s perspective, correct SAI ensures that the vehicle has proper steering return-to-center, resistance to bump-steer, tire scrub radius, and stability at higher speeds. From the mechanic’s perspective, incorrect SAI often tells us which suspension component is bent.
SAI lies on the same plane as camber, but what exactly is it?
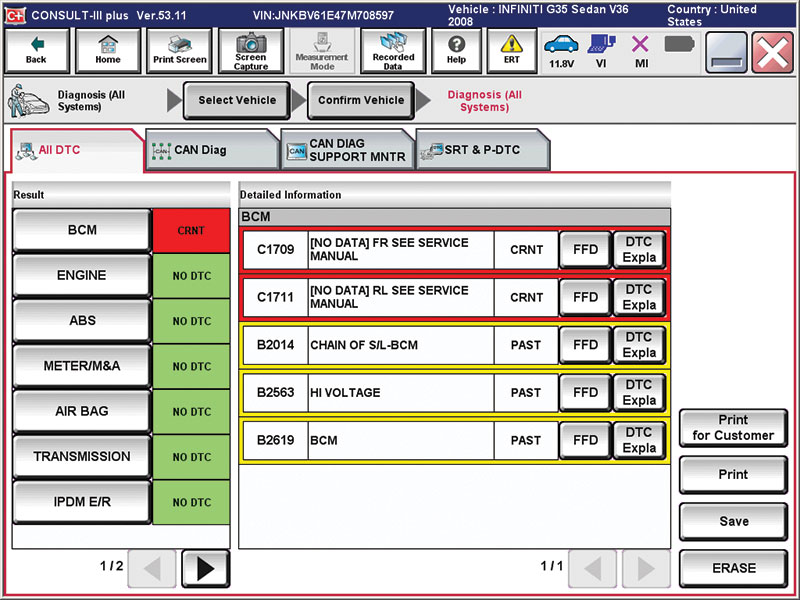
Perform a scan on either ALL SYSTEMS or just ABS. Once the scan is completed, choose the WORK SUPPORT tab of the ABS computer.
SAI is an imaginary line drawn through the upper and lower pivot points of the steering. The angle is measured between this line and a 90 degree vertical upward line through the center of the wheel. It would follow the line of the MacPherson strut tube, or would connect the upper and lower ball joints on a double-wishbone design. SAI can perhaps be conceptualized as a “door hinge” that is rigidly attached to the body of the vehicle on one side, and on the other the wheel swings in an arc.
Take the door hinge analogy. Imagine we had a suspension design with zero SAI; the wheel would rotate around the straight up-and-down hinge, just like a door in real life. Problems appear when the wheel encounters any type of resistance force like a bump: it’s super easy to swing the door open or closed. When we add SAI by tilting the hinge inward, the spindle must now travel up and down as the hinge “opens and closes” through its arc. Because there is a portion of the arc where the wheel would go into the ground, steering into this range will actually have to hoist the suspension and compress the springs. Once the steering or road forces have stopped, the springs will also push the wheel back toward its resting center.
Likewise, the SAI has a relationship with wheel width and rim off-set to create a scrub radius. Follow the imaginary lines of both SAI and the 90 degree upright through the center of the wheel into the ground. They will not likely intersect at exactly the ground (this would be zero scrub radius). If they intersect above the ground, this is positive; intersecting below the ground would be negative.
The more excessive the scrub radius – either positive or negative – the greater the steering wheel effort required. This is worth mentioning in case the customer has just changed the wheels to something different than stock; changing the wheels is more likely to affect scrub radius than the suspension.
Since SAI is not adjustable, whenever it is out of specification, there must be something bent or broken in the suspension. Diagnostic charts like the ones below can help you interpret which component is bent. Take note that the “included angle” is simply the SAI plus the camber. Compare your angles against their specification, and then compare with the chart for a logical first location to inspect.
| Double Wishbone design (370Z, Frontier, Titan, Pathfinder, Xterra) | |||
| SAI | Camber | Included Angle | Probable Cause |
| OK | LESS | LESS | Bent knuckle |
| OK | GREATER | GREATER | Bent knuckle |
| LESS | GREATER | OK | Bent lower control arm / frame mount point, or camber adjustment needed |
| GREATER | LESS | OK | Bent upper control arm / frame mount point, or camber adjustment required |
| LESS | GREATER | GREATER | Bent lower control arm / frame mount point / knuckle |
| MacPherson strut design (Most vehicles) | |||
| SAI | Camber | Included Angle | Probable Cause |
| OK | LESS | LESS | Bent knuckle and/or strut |
| OK | GREATER | GREATER | Bent knuckle and/or strut |
| LESS | GREATER | OK | Bent control arm / strut out at top mount point |
| GREATER | LESS | OK | Strut in at top mount point / damaged cradle |
| GREATER | GREATER | GREATER | Strut in at top + bent knuckle and/or strut |
| LESS | GREATER | GREATER | Strut out at top + bent knuckle and/or strut |
| LESS | LESS | LESS | Strut out at top OR bent control arm + bent knuckle and/or strut |
| LESS | GREATER | LESS | Strut out at top OR bent control arm + bent knuckle and/or strut |
The Future of Alignment Work
The automotive industry will be forever performing alignments until cars start to fly! The biggest changes we must face are the relationship between suspension angles and the computers that depend on their measurements. Learn about the diagnostic angles to help track down drift and pull complaints, as well as identify which parts are bent. Just because an angle doesn’t wear tires, it doesn’t mean it should be ignored. Nissan engineering ensures safety and drive quality, so you might be improving the ride by fixing the alignment right the first time.


0 Comments