
Don’t be the one to make an embarrassing and expensive mistake

Here are the essential components of the Mercedes-Benz tire pressure monitoring system. Note that the sensor is mounted at the valve stem, and is vulnerable to damage during tire work
Being an independent, you don’t often have the opportunity to make repairs on late-model Mercedes-Benz vehicles. Regular maintenance services perhaps, but most repairs will naturally go back to an authorized M-B dealer to be done under warranty.
That is, except for tires. There’s a good chance that a road hazard will bring a late-model Mercedes to your door to have a damaged tire fixed or replaced. When that happens, you sure don’t want to so unaware of the tire pressure warning or monitoring system that you damage it in the process. Also, some of the cars that are equipped with the tire pressure monitoring system are already out of warranty. So, StarTuned is bringing you the following recommendations directly from MBUSA.
 in the tires and transmits this data by radio to special antennas in the wheel housings. The downstream microcomputer identifies the signals from each wheel by their individual codes and can therefore keep the driver fully informed of the air pressure in each of the four tires. If one of the tires starts losing air, a warning symbol is automatically activated in the central display. This symbol is color-coded to indicate varying degrees of urgency.")
The tire pressure monitoring system monitors the air pressure (and temperature) in the tires and transmits this data by radio to special antennas in the wheel housings. The downstream microcomputer identifies the signals from each wheel by their individual codes and can therefore keep the driver fully informed of the air pressure in each of the four tires. If one of the tires starts losing air, a warning symbol is automatically activated in the central display. This symbol is color-coded to indicate varying degrees of urgency.
No interchange
First off, for the 2006 line some models have switched from Beru to Siemens tire monitoring systems. While the theory of operation is the same, the components of the two manufacturers are not interchangeable with each other. In other words, if you mix Beru and Siemens parts, the system will no longer function. So, if you should have an incidence of a damaged component, make sure you identify it accurately before you order a new one.
Unfortunately, in most cases of damage to the pressure monitoring sensors during the tire demounting/mounting process, such damage isn’t recognized immediately. So, the wheel will be put back on, the lugs torqued, and the car taken off the lift and driven away before there’s any indication of a problem. That makes this situation especially damaging to both your schedule and your reputation.
Note: Damaged Sensors cannot be claimed under warranty.
Any time you get a late-model Mercedes-Benz in for tire work, look at the valve stem as a preliminary. If the car is equipped with a tire pressure warning system, the stem will be made of aluminum, not rubber or steel.
When it comes to breaking the bead seal between the tire and the wheel, the most important thing to remember is to place the tire machine’s “shovel” at the opposite side of the rim from the valve stem. In other words, depending on the type of equipment you have, make sure that neither the outside or inside bead breaking device will bear on the area of the wheel where the valve stem is positioned — that’s where the sensor is mounted. There’s a good chance that you will break it if you don’t observe this. Ditto for the mounting operation – the sweep of the bead mounting device should not include the area of the stem.
Speaking of mounting, you’re probably used to slathering a copious amount of soapy, slippery lube on the wheel and the tire bead. With tire pressure monitoring systems, however, it’s very important to avoid getting this solution on the sensor assembly as it may penetrate the sensor and ruin it. Be sparing, and avoid the sensor area altogether.
Reset
Avoiding mechanical damage to the components of the system is important, but there are also electronic issues to deal with. Whenever the new tires or wheels are installed, or even when the air pressure is adjusted to specifications, it’s necessary to reset the tire pressuring monitoring system, just as was done during pre-delivery inspection.
Instructions for the particular model at hand will be explained in the Owner’s Manual, but we’ll run through those for early tire pressure monitoring-equipped Models 215 and 220 as our example:
 Set tire pressure on all four tires to the proper value (see the label located on the fuel filler flap).
- Turn the ignition key to Position 2, but do not start the engine.
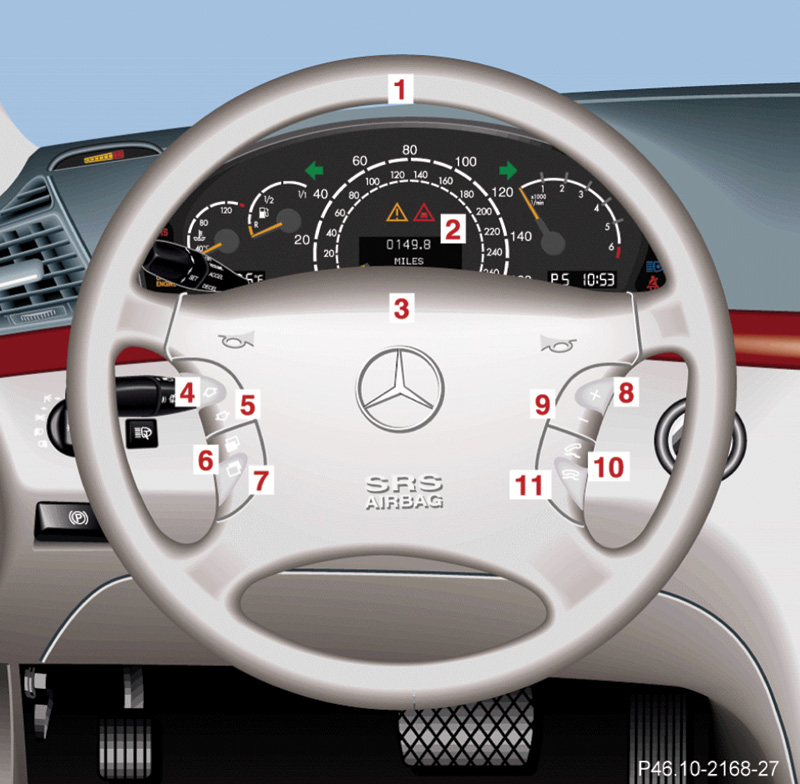
- Using the left “menu” button (6, Figure 1) located on the steering wheel, call up the trip/main odometer.
- Continue by pressing the left upper “page” button (4, Figure1), until the tire pressure display appears in the display located in the instrument cluster.
- Next, press the “R” button on the instrument cluster and hold until the following message appears: “TIRE PRESSURE MONITORING REACTIVATE?” Selecting “YES” reactivates the tire pressure control.
Upon setting the proper tire pressures and reactivating TPC, the tire pressure values will not yet be indicated in the instrument cluster display. So, it is necessary to drive the vehicle for a few minutes in order for the tire pressure values to be indicated in the instrument cluster display.

System error
Troubleshooting
If you should ever need to diagnose one of these systems, the best thing to do is to log onto www.startekinfo.com and use the logic trees, such as the ones shown here:

System/Information and warning messages


0 Comments