
In an accident, anything can happen. That’s why it’s called an accident. Supplemental Restraint Systems coupled with seatbelts control the chaos to an admirable extent. Now all we have to do is put it back together.
Of the many safety features that have come along over the past few decades, the airbag is among the most technologically advanced. Modern airbag systems have crash sensors placed throughout the vehicle that signal the SRS control unit about how severe the impact is and from what direction it’s coming, and also where passengers are sitting. The computer then performs a symphony of electrical commands that retract the appropriate safety belts and deploy the necessary airbags. All this happens in under 50 milliseconds — absolutely amazing.

After the mishap, the vehicle is brought into your shop and you have to put it all back together. The most important part of this effort is that it must function as the vehicle was engineered to do before the accident. Your shop’s liability is on the line. It’s critical that you know what Volkswagen expects to be done in this situation, exactly. Being the manufacturer/distributor, the company is the final word on the vehicle. We need to dot our “I”’s and cross our “T”’s, and make sure the airbag control unit is still up to its potentially life-saving task. Also, the wiring must be intact so that it is still capable of sending and receiving signals to and from the sensors, safety belt retractors,and airbag squibs. Here, we’ll review the procedures that will help you get the job done right.
First Things First
As just mentioned, any body shop must know the factory-recommended procedure for repairing the airbag system, which will reduce your liability in any future issues with this particular vehicle. With insurance companies offering warranties on the service work performed, the burden is on you to do the work according to the pronouncements of the manufacturer, in this case Volkswagen.
Well, what are the factory-recommended procedures? First, you have to look at the type of accident that occurred. If it was not severe enough for airbag deployment, all that’s required of you is to repair the body damage, but you’ll also need to check the airbag control unit for any codes. If the vehicle is a 2004 or earlier, you will need to replace the control unit if the vehicle experienced a front impact with airbag deployment. On 2005 and later vehicles, replacing the control unit is not required, but is recommended, particularly if it has diagnostic trouble codes.
Each time the ignition key is cycled, the airbag module goes through a self-check in which it monitors circuit and component integrity to make sure the system will function during a possible future accident. Big note: Before starting any service work, the technician must disconnect the battery ground cable. On older vehicles, a brief waiting period is recommend before starting a repair. On late-model Volkswagens no waiting-time is required. Use www.erwin.vw.com to determine the proper procedure for your specific vehicle. These procedures prevent any accidental deployment of airbags or safety belt tensioners.
You are required to address any DTC’s you find, and, most importantly, you must check and replace any pyrotechnic safety belt that may have deployed as a result of the accident. In order for an airbag to do its job, the vehicle’s occupants should be in the seated position. A loose safety belt will not work as effectively as a tight one. As pyrotechnic safety belts deploy, they reduce slack in the safety belt, therefore improving safety.
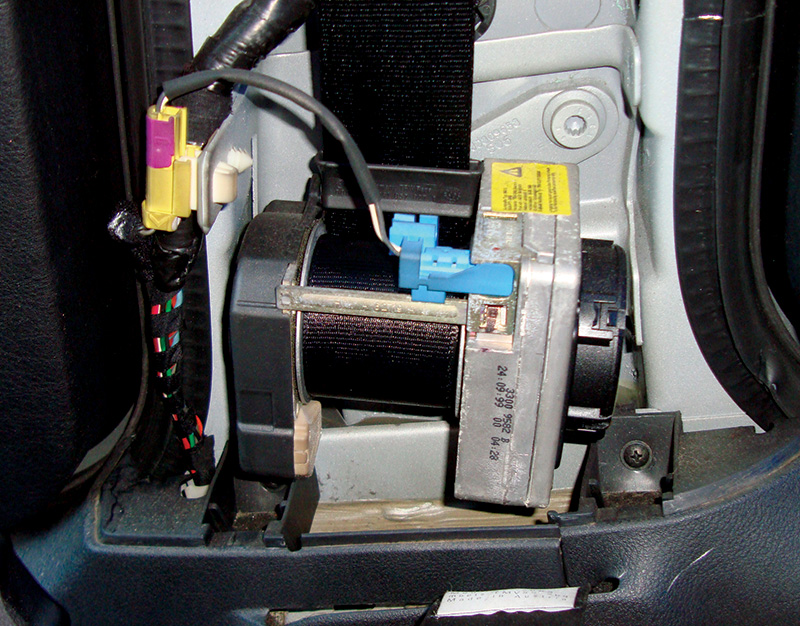
Even though the accident may not have been severe enough to deploy the airbags, it may still have fired the safety belts. The automatic tensioning device is part of the safety belt assembly mounted in the door “B” pillar. You should never allow your techs to remove these units with an impact gun, for their own safety. Also, when doing any welding on the vehicle, make sure the temperature does not exceed 100 deg. C around the pyrotechnics to avoid accidental firing.
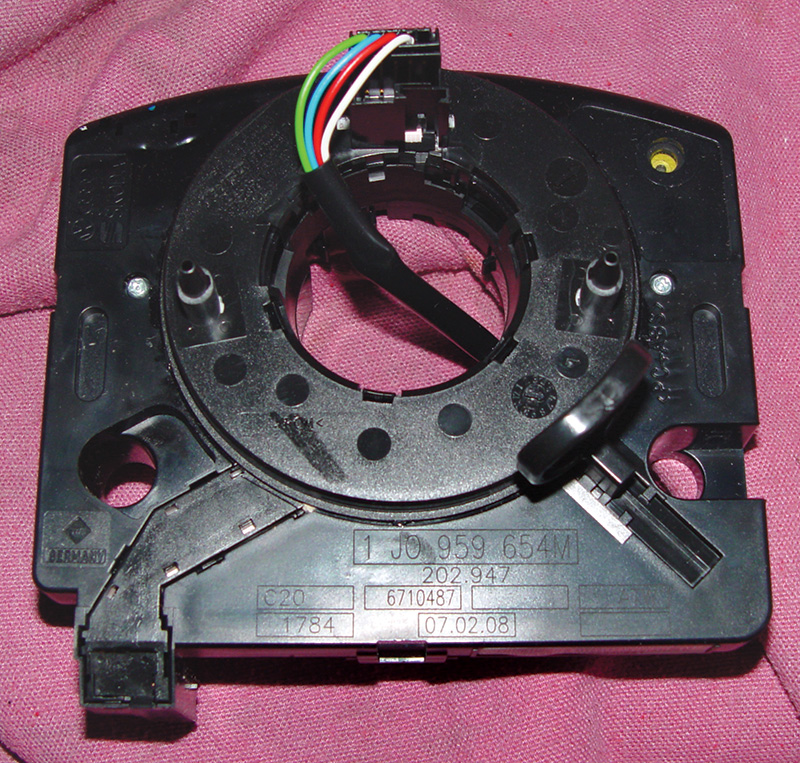
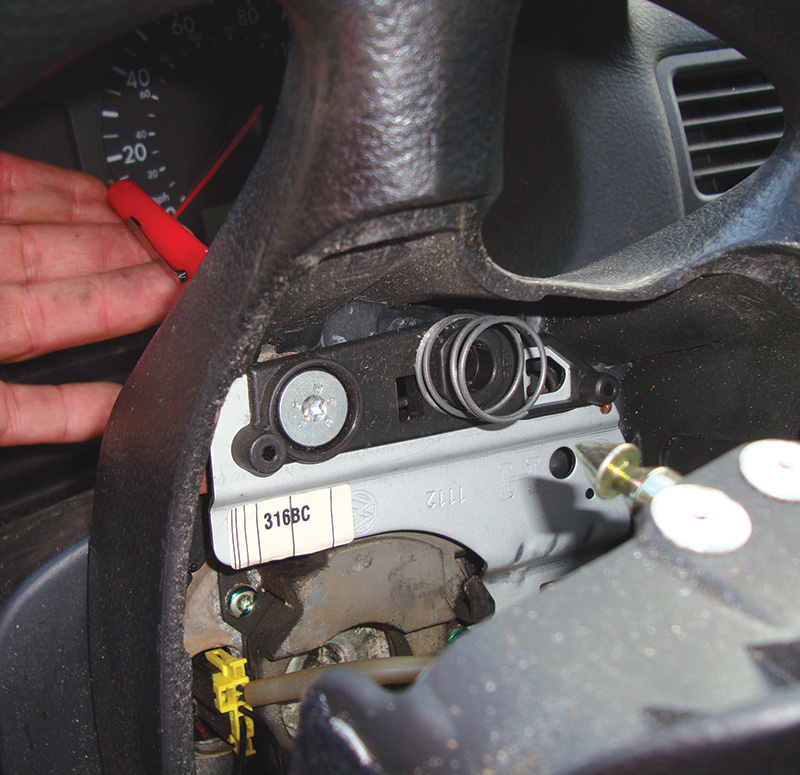
If the accident was severe enough for airbag deployment, more extensive work must be performed. Obviously, you must replace any airbags that have deployed with new units that have the proper interior color coding. You do not have to replace airbags that have not deployed unless there is physical damage to them. In the case of a passenger’s side airbag deployment, you also have to replace the instrument panel carrier, or frame, because it may have deformed or become weaker as a result of the incident. If the driver’s side airbag has deployed, the steering wheel slip rings and clock spring must also be replaced. They have been stressed and may not work after having had firing voltage passed through them.
Side airbags, particularly the curtain type, need some special attention. The interior trim can be used up to six times (quite a bad driving history). If any of the interior trim was damaged in the accident, even slightly, however, it must be replaced so that under another deployment it breaks away in a predictable manner. If it’s cracked, or any clips are broken, it may break away improperly and hurt vehicle occupants.
The control unit may have to be replaced depending on the year of production. It will have to be replaced if there is physical damage, or a DTC for an internal failure. You may want to support this replacement recommendation with a printout of DTC’s from your scan tool, or from the repair shop to which you’ve farmed out the work.
The safety belts will have to be checked if they have fired their automatic tensioning devices, and for physical damage as well. First, look at the safety belt material. There cannot be any holes, tears, or over-stretching. The nature of the weave allows the material to stretch as it absorbs some of the force the human body exerts upon it. This dissipates some of the inertia of impact. Second, in addition to pyrotechnic devices on safety belts, there are also inertia locks in their reels. You should tug on the safety belt as fast as you can and the belt should lock. If not, you must replace it. After the repair, road test the vehicle in a clear and safe area between 10 and 15 mph and do a panic stop. The belts should lock up and keep you in an upright seated position.
Any undeployed airbag or safety belt pyrotechnic tensioner must be fired before it is discarded. Using an external heat source is dangerous. For proper disposal procedures, refer to www.erwin.vw.com.
Also remember that when servicing any airbag, particularly for the driver’s steering wheel and passenger’s side units, keep the deployment side up.
The Diagnosis
If you’ve completed the repair, but still have an illuminated airbag warning light, you should pull the DTC’s and diagnose the problem. In the odd chance that you don’t see any codes, try going into the instrument cluster module and pulling and clearing codes there. If the warning light still comes on, you should have a code in the airbag system.
If the control unit was replaced, it will need to be coded properly. First, you must “log-in” to the control unit with the five-digit service code number, then enter the “Coding” feature with the proper five-digit code for the specific vehicle you are working on. This can be handled through your Volkswagen parts supplier and/or service department. Volkswagen strongly recommends that you only use new OEM-supplied parts for each component of the airbag system. Used parts are out of the question. In the case of an airbag control unit, the coding numbers are specific to the vehicle. If the end-of-line programming for the control module does not match the airbag equipment, then you cannot trust the codes you are seeing. If you see a code for “Seat Occupancy Detection,” but cannot find one in the passenger’s seat, the airbag control unit end-of-line programming is wrong (possible used part?). The end-of-line programming indicates to the control unit what options are on this vehicle. If the programming is wrong, it will not accept the login PIN because it will look for those options, and when it does not find them will flag a DTC for incorrect equipment. Since an airbag control unit can only be coded once, you need to stay away from used parts.
With the proper coded airbag module, you can then go about diagnosing the problem. In the case of an airbag circuit code, you have to follow strict diagnostic procedures to prevent accidental deployment. Never pierce or back-probe the wiring in the airbag firing or sensor circuit while the system has power. These wires are a safety Yellow/Orange color so you can tell them apart from other vehicle wiring. You can disconnect the battery and perform resistance checks, but the airbags and safety belt tensioners must be unplugged from their harnesses. Although testing the wiring can lead to a proper diagnosis, it may be time-consuming to access the control unit and each individual airbag. Special service tool VAG 5056 can be installed in place of any airbag in the system, and it substitutes a known-good resistance value. You can then use the self-diagnostic features of your VAG 5052 to see if any codes were set with the airbag simulator tool.
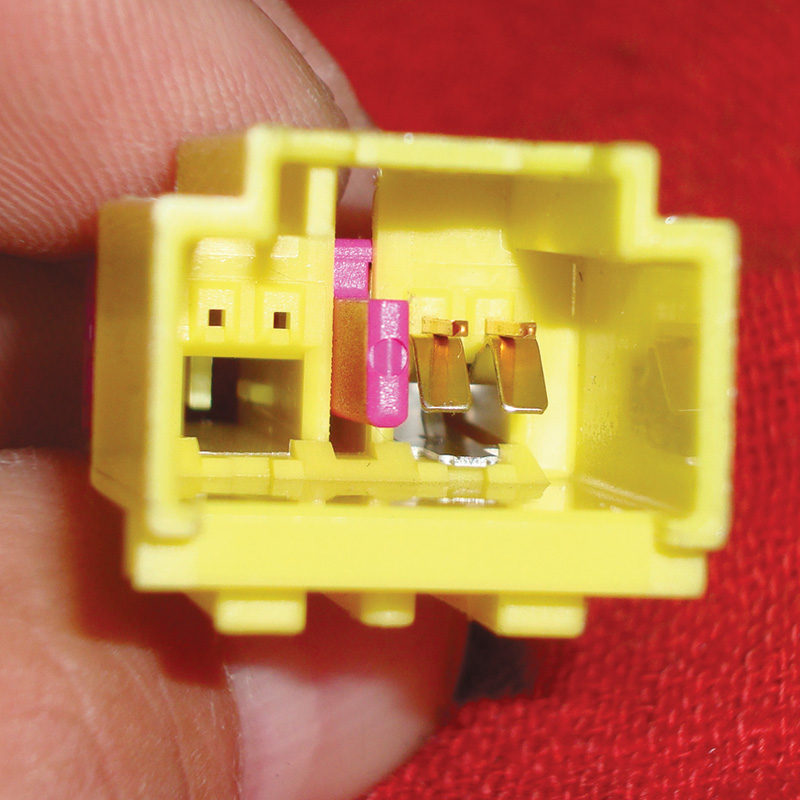
If a low circuit resistance code were to set, you can push a button on the VAG 5056 and see if a high circuit resistance code was set. If not, then the wires are either shorted together or open, and the airbag wiring harness should be replaced. If you are going to test wiring manually with a meter, you must first remove the static charge from your body. You can do this by touching a ground source such as metal piping. You then have to disconnect the battery ground cable, unplug the airbag control unit, unplug the airbag circuit or crash sensor you want to test, and additionally you should move any shorting bars within the connectors out of the way. These bars connect the two wires to prevent differing voltages from touching the wiring while the connector is unplugged. With the wiring shorted together, whatever voltage ends up on one wire will end up on the other, preventing the possibility of a power and ground source being available. After moving the shorting bars, you can set your digital multimeter (DMM) for a resistance test. You can test for continuity between the airbag control unit and the offending airbag or sensor on each wire. Also, check for continuity between each wire and ground — there should be none.
If the control unit is unplugged, you can reconnect the battery and check for voltage on each of these wires. Since the wiring is disconnected at the control unit and airbag or sensor, these wires should not have positive voltage or ground. With the key on, check each wire for voltage. It should not have any.
Wiring damage can be repaired if the problem area is found, but it must be a proper repair. No butt connectors can be used. Volkswagen requires that any repairs be carried out with their 1978 wiring repair kit with the ancillary 1978 airbag kit. Refer to www.erwin.vw.com for proper procedures for wiring repair. If it is feasible financially, replacing the harness should be your first choice. Reconnect all components, attach the battery ground lead, cycle the ignition key on, and allow the system to perform a self-diagnosis. Once the airbag warning light stays out and there are no codes, you have a complete repair.
Download PDF


0 Comments