

An improperly-repaired tire can lead to more than just customer inconvenience — it can result in a sudden failure with life-threatening consequences, not only for the vehicle’s occupants, but also for everyone sharing the road.

Patch Plug
Automobile collisions are the leading cause of accidental death in the United States. This is why professionals auto repair technicians must be willing to spend the time to educate their customers about proper tire repair and insist that the repair be done correctly, even if it means losing a sale to the guy down the street.

Rubber powder is a sign of tire damage.
In a 2006 National Highway Traffic Safety Administration (NHTSA) and Rubber Manufacturers Association (RMA) study of 14,000 scrap tires, 88 percent had been improperly repaired. Either a lack of knowledge of proper tire-repair techniques or consumer pressure for a less-expensive repair could be to blame for this high percentage. Regardless of the reason, the resolution lies with professional technicians like you. If technicians become aware of proper tire-repair guidelines and refuse to perform substandard repairs, the roads will be safer.
Can it be fixed?

Check for damage on the inside of the sidewall. Under-inflation can cause excessive flex and damage in this area.
If a tire is not in repairable condition, no attempt should be made to fix it. Simple enough, but what constitutes a repairable injury?

Mark the source of the leak before removing the tire from the rim. Some injuries can be hard to find again once the tire has been removed and there is no way to add air.
The first consideration is the location of the damage. Most technicians know injuries to the sidewall cannot be repaired; however, there often is confusion about how close to the edge a nail or screw can be before it becomes irreparable. According to the RMA, injuries on the shoulder or sidewall should not be repaired. The shoulder of a tire begins after the outermost vertical treads. If the nail enters in the tread area, but angles toward the shoulder, the tire should not be repaired.

Mark the area to be repaired to avoid “losing” the injury.
The shape and size of the hole also must be considered. Punctures up to ¼ inch can be repaired, but larger holes, gashes, star-shaped injuries, etc. relegate the carcass to the scrap pile.
If there are any pre-existing repairs, evaluate whether they were performed properly. If you find an improper repair, correct it, if possible, or scrap the tire. When in doubt, scrap it. No attempt should be made to fix tires that have less than 2/32 inch of tread depth remaining.
Use a tire buffer for a velvet-like finish.
Consider the speed rating and application. According to some sources, a tire will drop one speed rating after a repair; however, not all tire manufacturers use the same rule of thumb. When in doubt, and especially when working with cars that may double as weekend race cars, contact the tire manufacturer before repairing a speed-rated tire.

Use pre-buff cleaner and a liner scraper to remove mold release agent from the inner liner before buffing.
Last but not least, always remove the tire from the rim and inspect the inside for damage. Look for rubber powder in the tire. If you can grab a handful of powder, the tire should go to the scrap pile. Even if you don’t find the tell-tale rubber powder, use a bright flashlight and carefully probe with your fingers to find any deterioration on the inside the tire. Most often, this can be found in the sidewall area where the tire flexes when driven under low pressure.
Improper methods

Use an appropriately-sized carbide bit to clean the channel.
Aerosol or liquid sealant usually is installed by the customer, not a technician, but it deserves mention as the most improper of all repair methods. Any sealing compound is intended as a temporary emergency repair , but you may have found it while balancing tires, or noticed it oozing onto your tire machine when demounting. Sealants will ruin expensive TPMS sensors, so it is a good practice to warn customers of the costs associated with their use. Encourage maintenance and the use of the spare, instead.

Apply a thin coat of vulcanizing cement to the buffed area of the inner liner.
The most common improper repair is a plug. They are quick, easy and inexpensive to install. They make the shop a profit and make customers happy. But, this is not a win-win situation. The biggest problem with plugs is that the tire is not removed from the rim for inspection. A tire that may have severe internal damage may hold air after the repair, but could disintegrate suddenly on the road. This could result in serious injuries for your customer and a legal battle for your shop.
An internal patch by itself is not a proper repair, either. The problem with internal patches is that they only seal the inside of the injury. Water can enter the hole from the outside and cause the belts to rust and disintegrate over time, leading to ply separation.
Do the right thing

Apply just a thin coat to avoid puddling.
To reiterate what we said above, if you’re tempted to use a plug and get that distraught motorist out of your face ASAP, resist. Not only would you be taking on a big liability, but you won’t be able to charge nearly as much for the job.
The only proper tire-repair methods are a two-piece plug-and-patch, or a one-piece plug-and-patch. If the hole is at an angle of 25 degrees or greater, a two-piece repair should be used. If the angle of the hole is less than 25 degrees, either a one-piece or two-piece repair can be used.

Use an awl to work vulcanizing cement into the channel.
A good tire repair starts with a thorough inspection. Check that the tread depth is adequate and there are no sidewall bubbles or other tire defects. Find and mark the source of the leak using a dunk tank or leak-finder spray solution. If the damage looks repairable, remove the tire from the rim.

Peel the protective cover from the patch before installing.
Once the tire is off and you’ve confirmed that there is no sidewall damage or suspect prior repairs, mark the puncture with a large cross and circle the area you plan on patching. This step is necessary to avoid losing the hole after buffing.

Insert the patch stem into the cleaned and cemented injury channel.
It is difficult to get a patch to stick unless the surface is properly prepared. The inside of a tire is coated with a mold-release agent that serves a purpose similar to that of oil on a waffle iron: the mold-release agent is designed to keep rubber from sticking to the mold during manufacture. Since patch adhesion is important for successful repair, remove this anti-stick coating before trying to patch the tire.

Once the stem is through, pull it from the tread side. This is easier than trying to push it through because the stem will tend to get thinner when it is pulled and thicker when pushed.
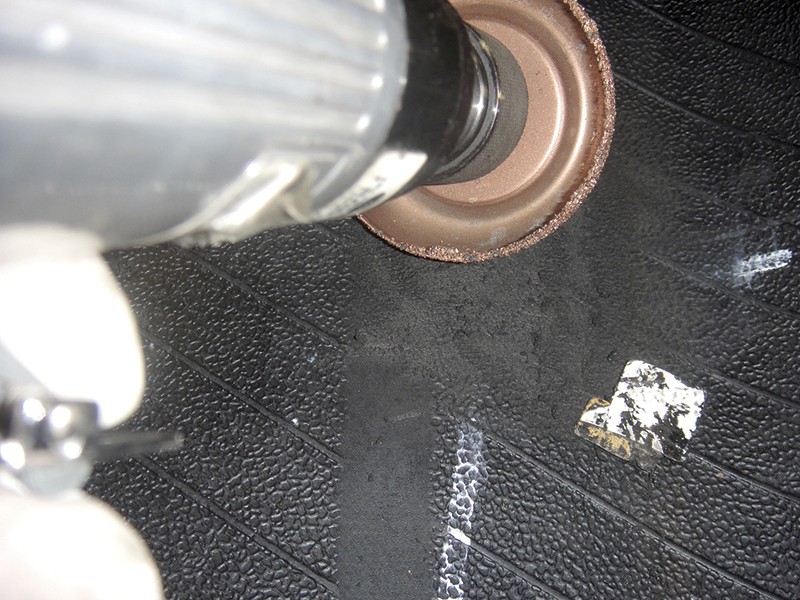
Start by cleaning the area with pre-buff cleaner, an inner liner scraper, and a clean rag. An inner liner scraper is a hoe-like tool used to remove silicone from the liner. This will eliminate most of the slippery stuff, and prevent it from getting rubbed into the rubber during buffing.
Next, buff an area slightly larger than the size of the plug and patch. Buff just enough to create a velvet-like texture and remove protruding mold marks to create a flat surface. The inner liner should be about 1/16 inch thick, so be careful not to dig too deep. If the inner liner is breeched, air may leak between the layers and cause sidewall bubbles.

Cut the stem flush with the tread.
If you buff a little too much and expose the steel belts, the tire will need to be replaced, or sent to a full-service tire shop for a section repair. Prep the injury channel with a low-speed rotary file (under 1,200 rpm). Do a minimum of three passes, starting with a pass from the inside to outside, then outside to inside, then inside to outside. Follow the path of the original injury. When in doubt, use a dull awl or similar tool to find the correct angle before using the rotary file.
Once the channel and inner liner have been prepped, use an awl or similar tool to insert vulcanizing cement into the injury channel, then work a thin, even layer of cement into the buffed area of the inner liner. Avoid using too much cement. More is not better. Wipe off the excess, leaving no standing puddles.
Read the instructions on the vulcanizing cement. It needs to dry to the point where it is tacky before the patch and plug are installed. The necessary time can vary depending on the weather. It will take less time on warm, dry days and more time on cold, humid days. About three to five minutes of drying time is average, but check the cement instead of relying only on time.
Once the cement is tacky, apply a thin coating of vulcanizing cement to the plug-and-patch stem. Avoid using too much cement in this step because it can leave a puddle in the center of the patch that will prevent proper curing. A thin coat is all that is needed to aid in installation. Peel the protective cover from the patch just before installation. Avoid touching or otherwise contaminating the sealing surface.

Put some work into stitching. This is an important step to ensure a good bond with the tire. Start from the center of the patch and work towards the outer edges. Continue to stitch until the clear plastic on top of the patch falls off easily.

Once the patch is stitched into place, repair sealer can offer some extra insurance against repair failure due to over-buffing.Once the repair is complete, mount the tire with a new valve stem or tire-pressure monitoring system reseal kit, then balance the wheel, and check for leaks, paying particular attention to the area that was repaired.
Your price is not unfair
A properly-repaired tire has value: It will be more reliable and safer to use. If you explain how proper repairs are performed and why they are important, you may be surprised at how many customers choose a proper repair; however, if the only information you give them is the price, they probably will opt for a plug. Yes, it takes time to educate your clientele, but you only need to do it once per customer.


0 Comments