In a commercial setting (as opposed to a laboratory), actually seeing the condition of the parts inside an engine is impossible without heavy disassembly, even if you have a boroscope. So, you have to extrapolate from what various tests, both traditional and high-tech, can tell you, plus think about “the big picture” before you take things apart and maybe make a big mistake.

That engine was perfect when it left the Mercedes-Benz factory. What happened? Usually, lack of maintenance, overheating, or just a tremendous number on the odometer.
We’re sure you’ve noticed that more and more gasoline engines are getting up toward 300,000 miles without major repairs. Good maintenance is of course necessary for reaching these heretofore unheard of mileages, but ingenious engineering and continuously-improving materials have certainly contributed.

We once saw a tech remove an intake manifold to fix a supposed vacuum leak when the real problem was a perforated duct downstream of the MAF.
Still, after any car (even a Mercedes-Benz, probably the longest-lived vehicles in the world) reaches those huge odometer numbers, an old saying applies: “Something’s gotta give.” Add in the unfortunate fact that many motorists don’t bother to have proper maintenance performed and you can see why you’re still being brought internal engine problems, whether wear, breakage, or deposits. While these failures don’t happen nearly as often as they did in the past, repairs are very much more expensive today so they can represent a large portion of your income. That is, if you do your diagnosis accurately.
Any technician who tells you he’s never made a wrong call on internal engine diagnosis must have a short memory. We see it happen all the time: condemning a rod bearing when that knock is actually emanating from a loose wrist pin, blaming a miss on valves when it’s really due to a rounded-off cam lobe, or even removing a cylinder head when an ignition problem is causing the symptoms. We hope the following will help you avoid such embarrassment and wasted time.
First off, collect all the clues and evidence you can before rendering the engine inoperable. When you hear something inside, it’s, well, inside, so even if you aren’t 100% correct, you may not have wasted time by dismantling that engine.
Listen up
As we often say in the pages of StarTuned®, listening patiently to the customer is crucial. Exactly what is the complaint? Unhealthy-sounding noises, rough idle, poor power, messy oil leaks, high oil consumption, low oil pressure, or even (horrors!) steam or blue smoke at the tailpipe? In the same conversation, try to find out what repairs have been made by other shops, and if oil and filter changes have been done regularly. Also, it makes sense to take a test drive with the customer so you can be sure you’re both talking about the same thing.
Before you do anything else, look the vehicle over. That means using a good light under the hood, removing the oil filler cap to get an idea of maintenance history, reading the odometer, and just generally getting an impression, which we always call “the big picture.”
If you haven’t started the engine before, do so now before you start testing. Uneven or long cranking points to weak compression. Listen for noises and look for smoke or steam. If the idle is rough, there are quite a few potential causes.

Our propane wand has helped us find vacuum leaks for decades. If idle speeds up when the flammable gas is introduced into a certain area, that’s where to look.
Now is probably a good time to do a bulletin search. A pattern failure that’s been identified can be a Godsend to your shop.
Nothing obvious so far? Then you might as well hook up your scan tool. You might find codes, although something like an OBD II P0300 (random misfire) isn’t really useful info. If you have XENTRY, you can go to the compression test routine and just press “start.” The system will take care of everything. Even on older vehicles back to the mid-1990s, you can kill individual cylinders to identify a miss.
Electronic diagnosis is fine as far as it goes, but here we’re going to talk about more direct troubleshooting. Those of you who are veteran techs can consider it a refresher, and if you’re just starting out in this business you might learn some traditional means you’ve never encountered before.
Compression: You can’t leave home without it

Even though there are excellent electronic means of diagnosing internal engines these days, there’s still nothing that can give you a better inside picture of the pressure tightness of that cylinder than the traditional dry/wet compression test. But don’t just look at the maximum reading. Instead, observe how the needle jumps with each of four impulses.
Insufficient compression can be the result of neglected maintenance, severe overheating, something broken in the valve train, or simply a huge number on the odometer. Blown head gaskets, once common, aren’t anymore because of the adoption of MLS (Multi-Layer Steel) head gaskets.
But before you start thinking about burned or sticking valves, valve train or camshaft drive or lift troubles, faulty ring sealing, or damaged pistons, make sure ignition is okay using your scope or a kV probe.
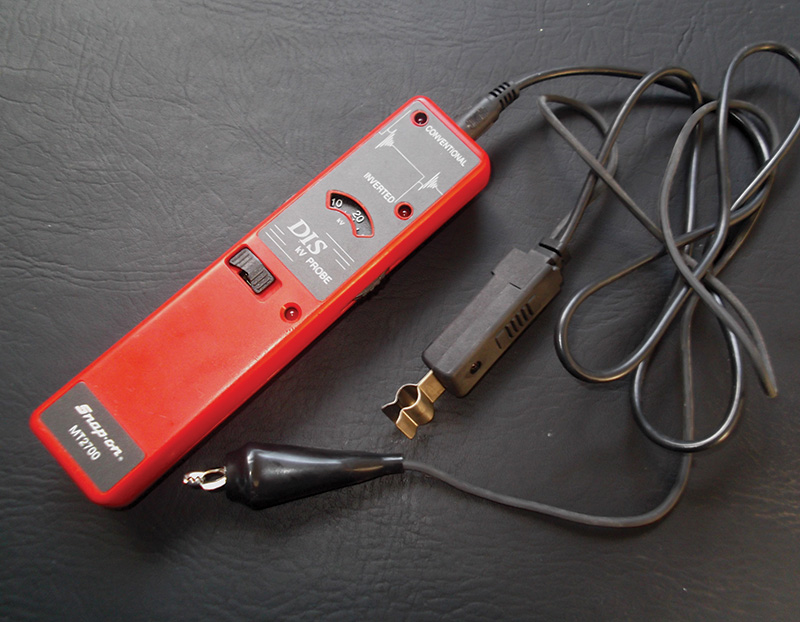
We’ve seen internal engine work done when the real problem was in the ignition system. This kV tester was handy in the old days, and is still useful on vintage models.
Old-fashioned mechanics would pull one spark plug wire at a time to find out if a particular cylinder had little or no effect on idle quality and speed, which is still a useful trick for older cars. As already mentioned, the equivalent can be done with a scan tool on modern cars.
Certainly, you’ve done the tried-and-true dry/wet compression test in your career, and nobody can dispute its continuing usefulness. There are subtleties in the procedure that many techs have never given any thought to, however. For example, you should record the first and fourth jumps of the needle. In a healthy engine, the first jump will be half or more of the fourth. A uniform leak from something like a burned valve will cause pressure to build gradually starting at a very low number for the first pulse, and not reaching anything like the specified psi. Worn-out or broken rings, on the other hand, will produce a big first bounce, but not reach the spec either as they’ll start to leak.
Next, squirt some oil into each cylinder. If the reading rises considerably, the rings or the bores are probably at fault. In cases where there’s little difference, think valves.
Experienced judgment comes in when deciding how much difference among cylinders indicates that a repair must be done. For a perfect idle and like-new performance, a variation of over 10 psi is an issue. But as long as the customer isn’t a perfectionist, quite a bit more than that can be tolerated. The trouble is, once a valve starts leaking erosion is going to make it get worse pretty quickly.
In spite of what we said about MLS gaskets earlier, low compression in two adjacent cylinders implicates a violated head/block seam. Check for evidence of compression at the radiator filler, and look for coolant in the oil or on the spark plugs. Also, you can hold the probe on an exhaust analyzer over the radiator filler neck to detect HC (hydrocarbon). Lots of techs still use old-fashioned bubble-type combustion leak testers. If you fill the system, leave the cap off, then start the engine and coolant floods out, you’ve pretty surely found a blown head gasket.
Hissssss
The cylinder leakage test has been done ever since service garages have had air compressors. With the valves closed (TDC with the crank locked), use an air-hold to put full shop psi into the spark plug holes and listen. Hissing at the intake points to the inlet valve, and the same sound at the tailpipe indicates the exhaust.
Don’t be fooled if you hear air escaping at the oil filler hole — rings have end gaps, after all. If you compare cylinders, you should be able to find out if one lets more air pass than the others. Looking for bubbles in the radiator will tip you off to a leaky head gasket or a cracked casting.

While cam drive systems are wonders of engineering, they are highly stressed and may cause problems at high mileages.
To make this test less subjective, you can use a cylinder leak-down gauge — actually two gauges in tandem — to find out what percentage of the shop pressure is escaping. With the spark plugs out, bump the engine over until the cylinder in question is at TDC of its compression stroke. Don’t jump to any unfortunate conclusions if an older engine produces a big percentage. As long as there’s consistency among cylinders and the idle is okay, this isn’t grounds for major repairs. Late models normally show very low numbers, on the order of 10%. A high reading on one cylinder that has no recorded misfires might have a particle of carbon holding a valve open.
Keep in mind that other things besides faulty valve or cylinder sealing can result in low compression. Valve train failures such as a bad cam lobe can restrict cylinder filling. Check lift before removing that head. Also, no compression at all may be caused by a hole in a piston.
Whenever you run into a sudden no-start and the compression readings are irregular, a jumped timing chain is probable. With interference engines, you’ll have to remove the head anyway for the replacement of bent valves.
Negative pressure

Very few techs use an old-fashioned vacuum gauge anymore, but it can at least give you an idea of an engine’s pumping ability. Compare the readings to those in the data stream.
We should mention the use of the venerable vacuum gauge. While it won’t give you definitive information, it can at least reinforce the results of other tests. With the engine warm and at idle, you should expect to see something on the order of 15 to 20 in. Hg. A steady low reading may be caused by a vacuum leak or late valve timing due to a worn or jumped camshaft drive mechanism. If the needle drops at regular intervals, suspect a leaking valve, whereas if such drops occur irregularly, a sticking valve is indicated. Floating over a wide range suggests a bad head gasket seal. Rapid needle vibration is evidence of loose valve guides.
A clogged cat or dented exhaust pipe will interfere with cylinder filling. Hold 2,500 rpm. The reading should drop when you first open the throttle, then stabilize. If it continues to fall, there’s excessive backpressure.
Knuckles on a wooden door
Knocking is a deep, distinctive sound, and it always means expensive trouble. We typically see rod bearing shells that still look good at over 200K, but once the Babbitt is gone the steel backing is going to take a toll of those journals. So, we don’t get many simple bearing jobs anymore. Also, at high mileages the big ends of the rods are going to be stretched out of shape, meaning that the head has to come off and the piston/rod assemblies out.
It’s pretty hard to tell a worn-out rod bearing knock from that caused by a loose piston pin, but it doesn’t really matter. You’ll have to remove the oil pan in either case. If the appearance and the clearances of the bearings are okay, a wrist pin must be at fault and the job will escalate.
This brings up the question of whether it’s worth it to tie up a bay long enough to do a major engine repair (machine work?), or if it would be better for both the sake of the customer and the profitability of your business to buy and install a remanufactured unit from your local Mercedes-Benz dealer’s parts department. Collect the numbers for both routes and have a discussion with the car’s owner.
Elixir of life

Once you’re sure of your diagnosis, the question becomes whether it makes more sense to fix that engine, or to install a reman from Mercedes-Benz.
Without a steady supply of clean oil, the best internal combustion engine in the world will melt itself down into a lump of very expensive scrap metal in no time. The pump moves volume and the clearances turn that into pressure. The flow of liquid lubricant must be maintained.
Whenever you get a low oil pressure complaint, the first things to check for are the level in the crankcase and the contamination level of the lubricant. Use an accurate mechanical gauge as techs have sometimes been tricked into removing the oil pan when a faulty sending unit was the real problem. When you take your readings, remember that the engine has to be at normal operating temperature — we’ve seen 40 psi cold drop to 6 psi hot. Remember that a pump or bypass relief valve problem, or the presence of low viscosity oil, may be the culprit, not worn-out bearings.
In cases where the needle jumps up and down, think a low level or a leak at the pickup. Steady low pressure is probably due to worn-out bearings. If the pump is bad, it will cause low pressure, too, but since it’s the best-lubricated component in the engine, it’s the last thing to suspect.


0 Comments