
Debris, contaminants, or an incorrect angle of contact with the glass can cause wiper blades to squeak, judder, and leave streaks. Here’s how to stop it all.

There are several types of windshield wiper performance complaints that require different factory-recommended repair solutions. Issues include wiper blades squeaking or shuddering, leaving streaks, pulling water back from the A-pillar area during the downward stroke, and other complications related to poor contact between the rubber edge and the windshield.
Causes may include worn or damaged blades, contaminants on the windshield, or wiper arms that rest against the glass at an angle outside of the factory tolerance when measured in specific positions. These problems can happen in any Mercedes-Benz model.
Start with the blades
Actually, safety first: Be sure the ignition is off and the key well-secured away from the car, at least 3 feet away (such as on top of your toolbox). Serious injury/dismemberment can occur if ignition can be switched on while technicians are working on the system. That being said: Wiper blades are wear parts and subject to natural aging and use-related damage. Wiper shuddering and skipping across the windshield often results from blades that have been damaged or deformed, or from contaminant films on the glass. Dirt particles, grains of sand, insect parts, or other debris damages wiper edges. Using the wipers on an icy morning without first de-icing the glass can permanently abrade the rubber and cause it to leave streaks.

Look for bent or damaged wiper arms. Press down on the arms near where the ends attach to the rotating shaft, feeling for broken or loose fittings. Replace any damaged components.
Lift the wiper arms off of the windshield. Wipe the rubber edge with a clean, dry cloth. Run your finger along the wiper’s edge to check for damage. If you feel any rough texture to the rubber surface, replace the blade.
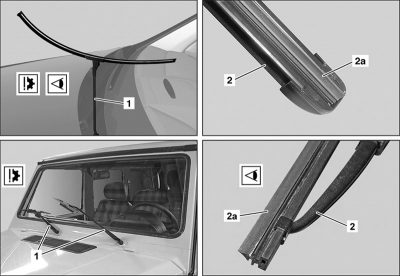
Check the rubber insert for hardening, cracks, wear, and correct seating in the blade guides and end caps. If you find problems, replace either the rubber insert if available separately or the entire blade, depending on the wiper type.
Standard Mercedes-Benz replacement wiper blades are equipped with a sensor dot, which turns yellow after several month’s exposure to the weather, indicating the wiper should be replaced. StarParts blades are also available for price-sensitive customers, but these do not include the sensor dot.
Blade lifecycle
Keeping the windshield clean can improve wiper performance and help prolong wiper life. Long stretches of lying unused can allow wiper blades to become deformed or deteriorated, much like tires can develop soft spots or dry rot after lengthy intervals between uses. Due to wear, damage, or natural aging, encourage your customers to replace their wiper blades twice a year.
Contaminated windshield
Inspect the windshield to first rule out stone chipped areas and other defects. Then check for contamination by spraying the glass evenly with water. If the water wets and runs down the windshield uniformly, as opposed to beading up or channeling, there is no contamination.
Differences in friction between contaminated and clear areas or wet and dry spots cause the blades to vibrate against the glass and squeak. Contaminants that contribute to these problems include wax, silicone-based washer fluid, water-repellent coatings, atmospheric fallout and residues from a car wash or appearance treatment.
Water that is not draining evenly off of the windshield looks like separate rope strands running down. Wherever water beads up and drains like little rivulets, that portion of the glass likely contains a film of residual contaminants. Clean the windshield with Mercedes-Benz Car Washing Agent A000 986 40 71. If moisture continues beading anywhere, re-clean that area.
Lift the wiper arm away from the glass during windshield cleaning. Do not clean the wiper blades, as the concentrated cleaning agent may harm the factory coating on the blades.
If streaking, skipping, or noises continue occurring after cleaning the windshield, it is time to check the wiper blade angle of incidence.
Wiper arm angle
The angle at which the wiper blade contacts the windshield must be slightly off of perpendicular to provide good wiping performance. An incorrect angle of incidence of the wiper arms to the windshield can prevent the rubber lip of the wiper insert from flipping over when the arm reverses direction. Not flipping at the appropriate time causes the wiper blade to shudder and skip.
The range for the angle of incidence is approximately three to four degrees for most Mercedes-Benz vehicles and may vary by model. For example, the angle of incidence must fall within 2 to 6 degrees for some AMG GTS coupes (Model R190), or 3 to 7 degrees for other models such as the 2010 and newer E 350 (W212) and CLS coupe (C218).
Setting the wiper at the correct offset within this narrow window helps ensure not only good wiping performance, but also low blade wear, reduced noise, and no skipping as the blade moves across the windshield.
Measure the wiper blade Angle of Incidence
Before adjusting the wiper arm you must check to confirm that the angle of incidence is outside of the factory-specified tolerance.
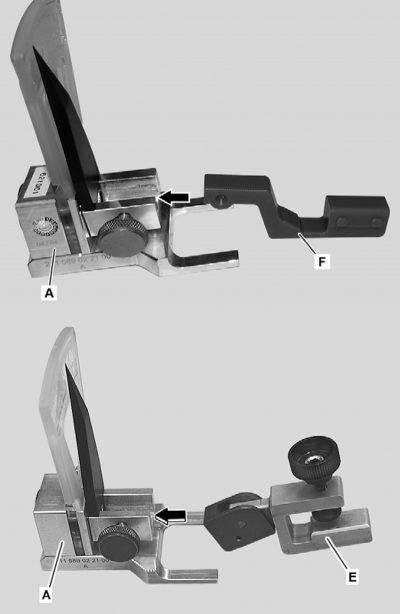
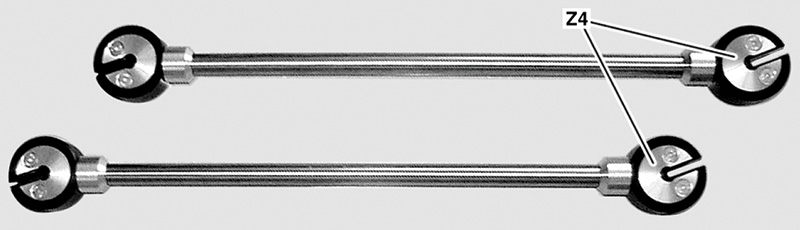
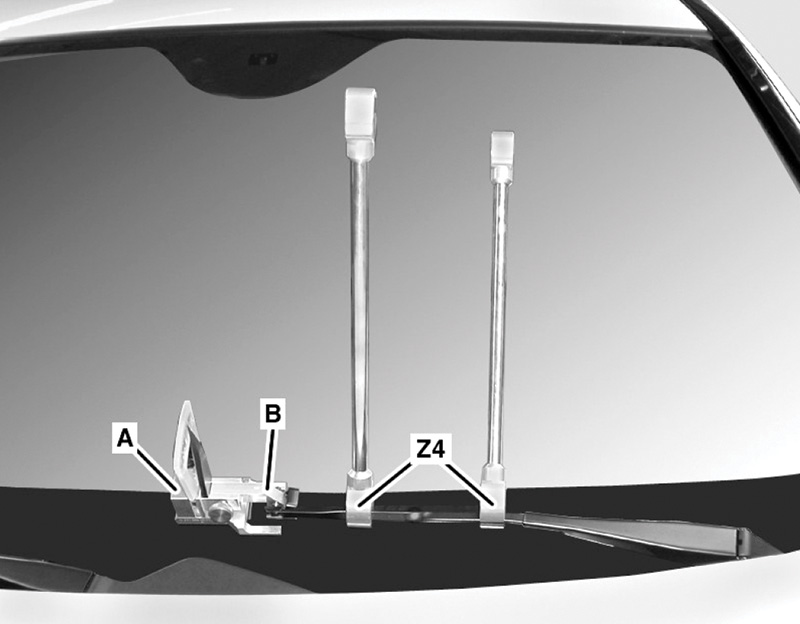
Use the Angle Adjustment Tool Set (Mercedes-Benz part number W211 589 02 21 00) to check wipers. The set includes an angle gauge (known as a Goniometer) and two alternative adapters. The angle gauge measures the actual angle at which the wiper arm holds the blade against the glass when parked or in the reversing position. The adapter holds the arm in place during measurement.
Different adapters and blade angles may be required on various years of the same vehicle model. Before checking and adjusting the wiper arm position, refer to the Mercedes-Benz WIS for adapter details and angle of incidence specifications by vehicle model and year.
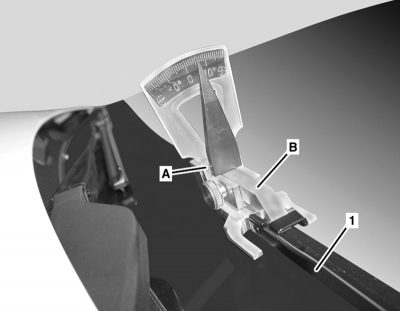
Checking the angle of incidence is simple and quick. You remove the wiper blade, insert the wiper arm into the adapter and angle gauge, place the assembly against the windshield, and record the angle measurement.
The procedure may differ in minor ways by model. For example, which adapter to use and whether to place the wiper arm in the park, center, reversing, or some combination of positions during measurement could each differ depending on the model and year. The arm is parked when it is at the base of the windshield. The wiper is in the reversing position when it is at the end of its wiping path and ready to swing back down the windshield.
Different wiper positions for angle measurement
There are two primary methods of adjusting the wiper arm angle of incidence. Under certain conditions, you can adjust an individual arm at the windshield. Alternatively, if both arms are out of specification by the same amount and in the same direction, you need to reposition the wiper system unit under the hood.
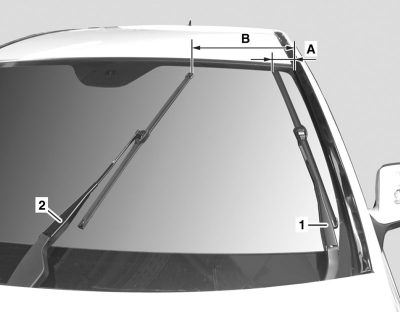
You determine which adjustment method to use by measuring the angle with the wiper arm placed in two different positions. Depending on the vehicle model, the two positions are either the park and reversing position, or the park and center position.
Most Mercedes-Benz chassis designs introduced to the US market from 2006 to the present measure the angle of incidence with the wiper arm in the park and reversing positions. Examples include the 2006 and up B-Class (246), 2008-2014 C-Class sedan and wagon (W204/S204), 2012-2015 C-Class coupe (C204), 2010-2016 E-Class (212), 2014-to-present GLA (X156), 2013-to-present S-Class sedan (222), and 2011-2018 CLS-Class (218).
Older models featuring body styles marketed in the US up until the early 2000s often used park and center positions for measuring the angle of incidence. Examples include the 1994-2000 first-generation C-Class (W202), 1997-2003 CLK coupe (C208) and convertible (A208), and the 1996-2002 E-Class (210).
Reference points for comparison
Once you have measured the angle, which factory specifications you compare your findings against may also differ based on model and year. The arm angle on the 2014-2019 CLA (C117) and GLA (X156), and the B-Class (W246) ranges from +4.0 to +5.0 degrees for the driver’s side wiper in the park position. On the 2008-2014 C-Class (204) sedan and coupe, 2011-2018 CLS (C218), and 2010-2016 E-Class (W212) sedans, the angle range is slightly wider — from +3.0 to +7.0 degrees for driver’s side wiper measured in the park position.
Whether you measure the wiper arm in the park or reversing position can also affect the choice of which angle of incidence you use as a reference point for comparing the measured values. For example, while the angle on the 2010-2016 E-Class sedan (W212) and Coupe (C207) each range from +3.0 to +7.0 degrees for driver’s side wiper measured in the park position, the range for the same wiper measured in reversing position is -1.2 to -5.2 degrees. The angle of incidence may also differ for the driver and passenger side wipers on some models. Refer to WIS for application-specific instructions and angle of incidence tolerance ranges.
Measurement results determine adjustment options
Depending on the measurement findings, the repair can often be accomplished by adjusting only the wiper arm. On pre-2003 models for which you measure the angle of incidence in both the park and center positions, adjust the arm if the center measurement does not meet the factory specification.
If the angle of incidence on these older vehicle models exceeds the tolerance range when measured in the park position, adjust the wiper system unit under the hood. On 2003 and newer models you adjust the underhood wiper system unit only if both the driver and passenger side wiper angles are off-specification in the same direction when measured in the parked position.
After adjusting the unit, check wiper arm angles again. In rare instances, you may have to fine-tune the adjustment of an individual arm after correcting the position of the wiper system unit.
For Model 210 E-Class sedans, Model 202 C-Class sedans and Model 208 CLK coupes, equipped with the innovative single-arm wiper system, you check the wiper arm angle of incidence with the arm in the center and park positions. If, when measured in the center position, the test value falls outside of factory specifications you should adjust the wiper arm only, unless the arm angle value exceeds the tolerance range when measured in the park position, in which case the entire system gets adjusted. This system’s adjustment is a little more complicated, so refer to the WIS instructions.
To ensure the correct angle of incidence, replace wipers with only genuine Mercedes-Benz blades.
Prevent scratching or shattering the windshield by placing a clean shop rag or other suitable aid between the arm and the glass whenever the wiper blade (or the angle gauge) is not mounted on the arm.
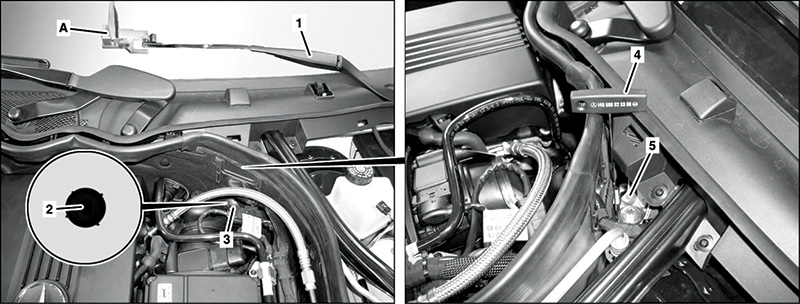
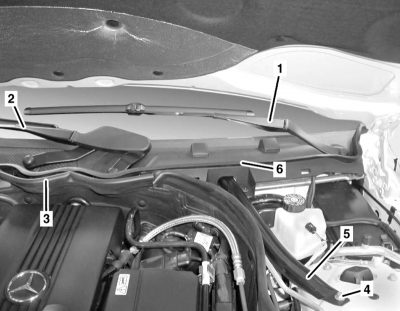
If you must remove or disassemble the wiper system, do so without changing the position of the mounting bracket when reinstalling the unit at the partition wall. This applies to the C-Class (204), E-Class (207/212), and CLS (218). Changing the location of the bracket will cause the contact pressure of the arms to fall outside of the factory specification and reduce the effectiveness of the wiping function.
Clean, smooth, and set at the correct angle to the windshield. See, you can make wiper blades behave.


0 Comments