
Often, repairing a wiring harness makes more sense than replacing the whole thing. Mercedes-Benz makes it easy to do a high-quality, long-lasting job.

Often, repairing a wiring harness makes more sense than replacing the whole thing. Mercedes-Benz makes it easy to do a high-quality, long-lasting job.
Our customers deserve only the very best, and when we give it to them, they come back for more. As with people, when cars age they come down with maladies rarely seen in youth. Nothing follows this analogy more than wiring harnesses. Replacing a harness due to damage, however, can be awfully expensive, and customers tend to get upset when faced with a large bill. Mercedes-Benz fully understands this, as proven by their extensive efforts to make wiring harness repairs both technically easy and a true value for the customer. In this article we will explore the many facets of wiring harness repairs.
Let’s start with the “Why.” With just a little thought, you can probably come up with a dozen reasons why a repair might be better than a replacement — reduced costs for the customer, much faster repair times, and savings of all that effort to remove and reinstall a harness that is 99% perfect — but the real question is, “Why should I use Mercedes-Benz’s methods and materials to repair a wiring harness?” After all, those tools and connectors are not inexpensive.
The reason goes back to the opening sentence: Our customers deserve only the very best, and when we give it to them, they come back for more. Is there really anyone who thinks twisting two wires together and taping over the “repair” is okay? We certainly hope not. Proper repairs really are not at all difficult, and they work and last at least as well as the original, if not better.
We’re going to go through many of the considerations and methods here, but there is simply no way we can cover every detail in a magazine article. Instead, simply read the applicable documents in the Mercedes-Benz Workshop Information System (WIS). There are several hundred(!) of them, covering virtually every possible eventuality.
Shalt and Shalt Not
|
Damage assessment |
AH00.19-P-1000-05A |
|
General repair methods for wiring harness |
AR00.19-P-0100A |
|
Repair wiring harness as per specified repair method |
AR00.19-P-0001A |
|
Replacement part solutions and what can/cannot be repaired |
AH00.19-P-1000-08A |
|
Approved repair methods |
AH00.19-P-1000-04A |
|
Approved repair methods |
AH00.19-P-1000-04A |
|
Remove contacts from connectors and plugs |
AR00.19-P-0120A |
|
Female and male contacts, overview of Family types |
GF00.19-P-7000A |
|
WIS has several hundred documents related to wiring harness repairs. These are the main docs, each leading to the details for each situation and contact family type. |
|
Most wires found in a vehicle can be repaired. According to WIS document AH00.19-P-1000-08A, we are able to repair normal copper wires smaller than 6 mm2, so long as there are not more than 10 wires in a branch being repaired. Certain repairs require the use of a repair harness, a short (and inexpensive) harness made for specific circumstances, such as airbag/SRS squib connector, the Pyrofuse connector, LED ambient lighting, and contacts on those very tiny 0.13mm2 wires.
We are also able to replace plastic connector housings, and individual electrical pins (technically, a male contact is a pin and a female contact is a socket, but here we will call them all “contacts” for simplicity). There is even a special kit for repairing the so-called “flat wire” used in some door panels and headliner assemblies.
The list of prohibited items is a bit longer, but they make a lot of sense. To start with, you should never try to repair any high-voltage cables (such as in electric or hybrid models, 120V AC auxiliary power sockets, or the Magic Sky Roof system, for example). Of course, shielded coaxial cables (often used for antenna and engine sensor signals), D2B/MOST fiber optic cables, aluminum wiring, and high-speed video data lines are generally impossible to repair properly in the workshop. Also include the complete connectors for critical safety systems, such as the airbag and ESP control units, because even a tiny error here can have serious consequences.
The bottom line is, if you’re not sure, check in WIS. If you’re still uneasy about the repair, defer to the absolute security of a complete harness repair. As with any repair, the person performing it and his or her employer are generally responsible for any mishaps caused by an improper procedure or part.
Damage Assessment
We start by assessing the damage, a process detailed in WIS document AH00.19-P-1000-05A. Can we be sure of what caused the damage, and prevent a recurrence? No sense in repairing it only to have to fail again. Are we sure we know the full extent of damage? Overheated wires can cause damage hidden in a wire bundle, and far from the most obvious damage. Is the damage repairable? We know that not everything can be safely repaired. Once we know about the damage, we need to pick a repair option, and see which parts are available to support the repair
Wire Repairs

Installing a Radial Raychem connector, which is somewhat like an electrician’s wire nut: Strip and twist the wires, twist on the right size connector, and heat it with an air gun equipped with a concentrator shield.
There are three basic kinds of repair: Repairing a wire, an electrical contact, or a connector housing. Let’s first discuss wire repairs.
When one or more wires are skinned, cut, melted, or otherwise damaged, we can repair it. If only the outer tubing is damaged, we can cover the area with PVC electrical tape. If the insulation of a wire is damaged, and we have enough slack, we simply cut the wires to a clean edge, strip the insulation, and reconnect them using a properly-sized Raychem connector. If we don’t have enough slack, then a piece of repair wire (of the same cross-section!) can be used. We do have to be careful to not have too many Raychem splices right next to each other, since they do take up some space and can interfere in some cases.

For a Raychem Axial connector, which is only good for two wires, just strip, twist, and heat the connector using the same hot air gun as with a Radial connector. The little solder ring in the middle melts for a permanent connection and the hot-melt sealant keeps it waterproof. The covering shrinks with heat for a tight fit.
Raychem connectors come in two flavors (Axial and Radial), and in several sizes. The Axial style is often called a butt splice, because the ends of the wires are butted against each other. Axial repairs take up only a small additional space, but can only be used when joining two wire ends together. The Radial style looks something like an electrician’s wire nut, and can be used to connect two or more wires together. These are also used to reconnect a Z-splice in a harness if you had to cut it apart for troubleshooting.
Both types of approved Raychem connectors contain solder and soldering flux for a permanent and low-resistance connection, along with a sealant to make the repair waterproof. Thus, these methods can be used outside the passenger compartment where weather might be a factor.
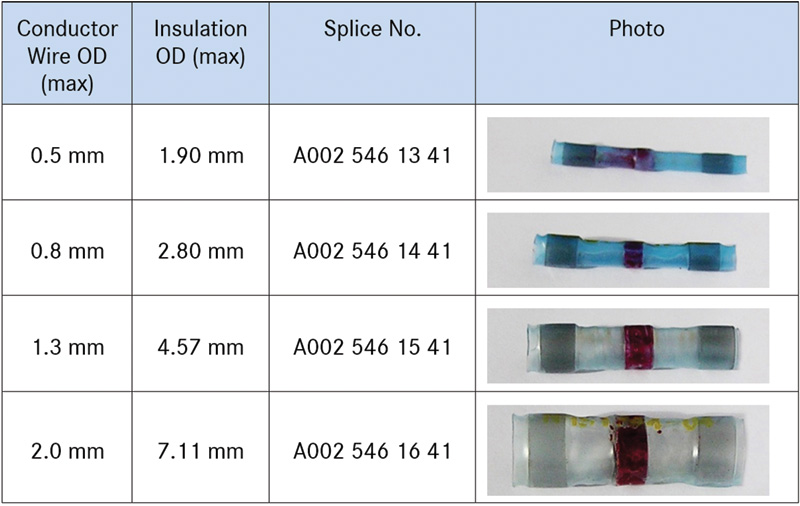
Raychem Axial connectors, as with Radial connectors, come in different sizes. The EPC can help pick out the right size for the wires you’re connecting.
To use a Raychem connector, first pick the correct size based on the wires being connected: The total of all wire cross-sections for the Radial, or the wire size for the Axial type. Strip the wires 15 mm, being careful not to nick the copper strands. Twist the wire ends together (install the axial connector onto one wire first), then position the Raychem. Heat the Raychem with a heat-controlled hot air gun equipped with a concentrator shield, starting at the solder ring. Heat until the solder ring melts (it’ll be obvious) and then slide towards the ends until the sealant is melted and the heat-shrink is fully shrunk. Don’t try to use a lighter or other flame, you’ll just burn the Raychem no matter how careful you think you can be. Wrap some cloth tape around the repair to finalize it.
Mercedes-Benz also approves the use of Rapid Connection Technology (RCT) for two to ten wires in the size range of 0.35 mm2 to 0.75 mm2. These cannot be used outside the passenger compartment or trunk, because they are not waterproof, nor can they be used for CAN Bus or safety-relevant wiring. To use these, pick the right size connector (2, 4, 6 or 10 wires), cut the wire ends square and even (don’t strip them), lay them carefully into the connector and squeeze the connector shut and latched with a pair of pliers. Cover it with some felt tape to prevent rattling.
Rapid Connectors:
| Contacts | 2 | 4 | 6 | 10 |
| Part No. | A002 546 74 40 | A003 546 51 40 | A003 546 52 40 | A003 546 20 40 |
, with any wire ends about 2 mm (a) from the edge (arrow, center) and close it securely with pliers. (Colors added for reference only.)")
Rapid Connectors can be used where moisture isn’t a concern. Just lay the wires into the connector (top), with any wire ends about 2 mm (a) from the edge (arrow, center) and close it securely with pliers. (Colors added for reference only.)
Contact Repairs
If an electrical contact is damaged, the first step is to positively identify the contact type: Is it a JPT, SPT, MQS, SLK 2.8, MCP 2.8, MLK1.2 or…? Mercedes-Benz uses several dozen different types of contacts, and a correct identification is absolutely crucial to a correct repair. To identify a contact, find the connector in the wiring diagram and make a note of the component designation, such as X138/1 or A80, as well as the number and cross-section of wires.
Next, find the connector in the Electronic Parts Catalog (EPC). Use the search feature (F11) to find the connector or control unit, or navigate to the system or harness images until you find it. The description of the connector in the EPC includes the size (such as 10-pin) and contact family (such as MQS). Note that some connector housings have a part number on them, see if you can find that number in the EPC: This works most of the time, but not always.
Once the contact family is identified, go to group 54, subgroup 019 in the EPC to find the part number you will need. Be sure to consider each of these factors: The contact family, the sex of the contact (male or female, pin or socket), the cross-section of the wire, and whether the connector uses a seal or not (connectors outside the passenger compartment and trunk generally use seals). Note that some contacts are only supplied as “pig-tails,” which are pre-crimped connectors on a piece of wire. These are installed using Raychem connectors. In the end, if you can’t figure out the right contact, your dealer should be able to help. Whenever we place an order for a contact, we buy a few extras just in case.
 near the control unit is for the electrical connectors. The description tells us the component designation, connector family and number of pins in the connector body.")
The symbol (such as 935) near the control unit is for the electrical connectors. The description tells us the component designation, connector family and number of pins in the connector body.
With the correct part on the way, the second step is to un-pin (remove from the connector body) the existing contact. Unless you want to buy more parts, it is very important that you use the correct unpinning tool. We’ll talk more about tools later, but just be aware that there is a tool for every connector, and the individual tools are not terribly expensive. We have the MQS and JPT tool in our shop, and we can borrow any of the others from our local dealer when the need arises.

The EPC shows the part numbers for the contact in Group 54, subgroup 019. Here we see four SPT contacts, each for a different range of wire cross-section.
If the contact is on a pigtail, we prepare the ends for the Raychem repair. In the case where the individual metal contact is supplied, we need to have and use the correct crimping set. Again, we’ll discuss tools in a moment, but for now just understand that there is a set of crimping pliers that can accept several different crimping die sets. There is a die set for each contact family, and it is really important that you use the right one.
Some connectors are either ring terminals (often used for grounds), or the old-style 2.5 mm or 4 mm round soldered contacts. Both are the only kind of contacts that need to be soldered. In fact, soldering other contact families (which some may consider instead of using the correct crimp set) is a bad idea because the solder wicks up into the stranded wire and makes it brittle…and brittle wires break when subjected to vibration.

A few of the unpinning tools. The handle is universal; the tools themselves fit into the handle. Look closely and you can see that the 220 589 01 99 62 tool is for unpinning the SLK 2.8 family of connectors. Individually, the tools are relatively inexpensive. We have some of the common ones here in the shop, the rest we can borrow from our dealer.
But back to crimping: These tools are relatively expensive, but again, we borrow the correct one from the dealer when we need it. We don’t repair harnesses every day. Using the crimper makes it almost trivial to produce a perfect crimp. Did you know that a properly-crimped contact is superior to a soldered connection? In any case, the crimp die set has a slot to position the contact perfectly, you insert the pre-stripped wire into the contact and squeeze the handles. A ratchet ensures the correct pressure is applied every time, and out pops a perfect connection. We sadly can’t demonstrate the right procedure here, so instead we recommend that you practice it four or five times to get the hang of it before doing it for real. It’s not difficult, but a little practice goes a long way. Your local dealer has technicians who have been trained on this, so maybe they can coach you.
 with the crimping die set for the JPT/MCP family of contacts installed. You can also see the automatic stripping tool, a bag of electrical contacts, and some repair wire.")
The Mercedes-Benz crimping tool (bottom) with the crimping die set for the JPT/MCP family of contacts installed. You can also see the automatic stripping tool, a bag of electrical contacts, and some repair wire.
To complete the repair, just slide the new contact into place and give it a gentle tug to make sure it is locked in. If you are repairing more than one contact in a connector, we very strongly recommend tackling them one at a time, to be very sure that the wires cannot be installed into the wrong slot. It should be obvious that mixing up the wires is very, very bad.
Connector Body Replacement
The last kind of repair is replacing a plastic connector housing. Some connectors (generally the larger ones) shouldn’t be replaced because of the danger of mixing up contact locations, but if you’re only replacing the outside part (think of the latching cam on an ME-SFI control unit connector) then you’re okay.
The big danger in this kind of repair is mixing up the contacts, so we recommend unpinning one at a time, inserting it into the new housing before starting the next one. Of course, use the correct unpinning tool. Give each wire a gentle tug to verify that it is locked in place.
Most connector housings have a part number on them, and these can be ordered under that number. If the part number isn’t available, look up the correct number in the EPC: Sometimes the number on the housing is for just a part of the housing, or is a production number. Almost every connector housing is available as a spare part.
Tools

This is the basic harness repair kit. It comes with the crimp pliers and several die sets, wire strippers, and several unpinning tools. Also included is a carrying case and about 40 empty boxes to store connector pins. The supplementary car kit includes crimp sets and unpinning tools used in cars.
Mercedes-Benz sells a wiring harness repair kit, and most of the tools are available individually. The Basic Kit (W000 589 13 99 00) comes with a case and several of the basic tools. You will also need the Supplementary Car Kit (W220 589 04 99 00) which contains several crimping die sets and unpinning tools used in cars. You can also get a kit for Flexible Flat Cable (FFC) using part number W211 589 01 99 00, but as this cable type is used only in certain models from around 10 years ago, only a few dealers have made the investment.
And an investment it is, since these tool sets are by their nature expensive to manufacture, therefore expensive to buy. We own a few common styles, and can borrow what we need for those once-a-year jobs. But one thing we’ll never do is cheat: No paper clips or picks for unpinning, no pliers for crimping: It just isn’t worth it. Not only does it result in a poor repair, the liability is simply too great. Oh, and a contact closed with pliers? It usually doesn’t even fit inside the housing, so you’ll only have to cut it off and do it again, but this time the right way.


0 Comments