


Buzz, rattle, ping, squeak, snap, crackle, pop! Customers come into your shop every day making sound effects to try to imitate and explain the noise their Volvo is making.
With any customer complaint, the more information the service adviser can get out of the customer the better, especially in the case of an intermittent or hard to duplicate noise.
It’s important to be on the same page with your customer about their complaint, because when most technicians test drive the vehicle, they may hear multiple noises, many of which the customer may not even hear.
That’s because, over the years and miles that the customer has been acquainted with their Volvo, the parts wear and slowly start making subtle noises that the customer may just get used to.
But then the day comes when a new not so subtle noise rears its ugly head and now it’s your problem.
The most common wear issue that is usually not noticed by the average Volvo driver is when their struts or shock absorbers are worn out.
That’s because in most cases, under normal driving conditions, shocks and struts degrade slowly, and the effects of worn shocks and struts on everyday driving can be very subtle.
And just like your some parts of your body, you don’t know the parts are worn out until your doctor tells you or you start feeling pain.
In this case, you are the doctor and, let’s face it, if you are an auto technician in this day and age you are a doctor!
So When Do You Recommend Replacement of Your Customers’ Struts and Shocks?
Good question. A lot of suspension parts manufacturers recommend strut and shock replacement at 50,000 miles under normal driving conditions. But of course they can be biased because they sell these parts. But there is evidence to support this replacement schedule.
Here is their data behind this theory:
Even on well paved roads the shocks can move up or down 1,500 to 1,900 times every mile. In 50,000 miles that can exceed 75 million cycles. Over time, performance tends to decrease gradually and the motorist usually doesn’t realize how much handling and control is lost. Replacing shocks and struts after 50,000 miles can keep the vehicle performing as well as it was designed and extend its life expectancy.
Well paved roads, is there such a place? Not in most US cities.
So is mileage alone a good enough reason to replace your shocks or struts?
Not always. It depends on how your customer uses their Volvo and, of course, where they drive it.
So how do you feel good about selling shocks and struts that don’t have any outward signs of failure and are just worn and have over 50K miles on them?
You need to interview the customer and ask them about their driving style.
Do they drive in a lot of stop and go traffic?
Worn shocks can increase stopping distance in a panic stop.
Do they drive on the freeway at high speeds?
Worn shocks can greatly reduce the control and handling when changing lanes or swerving to avoid other drivers.
Of course we all know these things, but remember that most of your customers do not know these things and don’t notice the difference in their car’s driving performance until the shocks or struts are replaced.
Remember to check the basics
A lot of Volvo suspension noise complaints can be simple to fix, you just have to look for them.
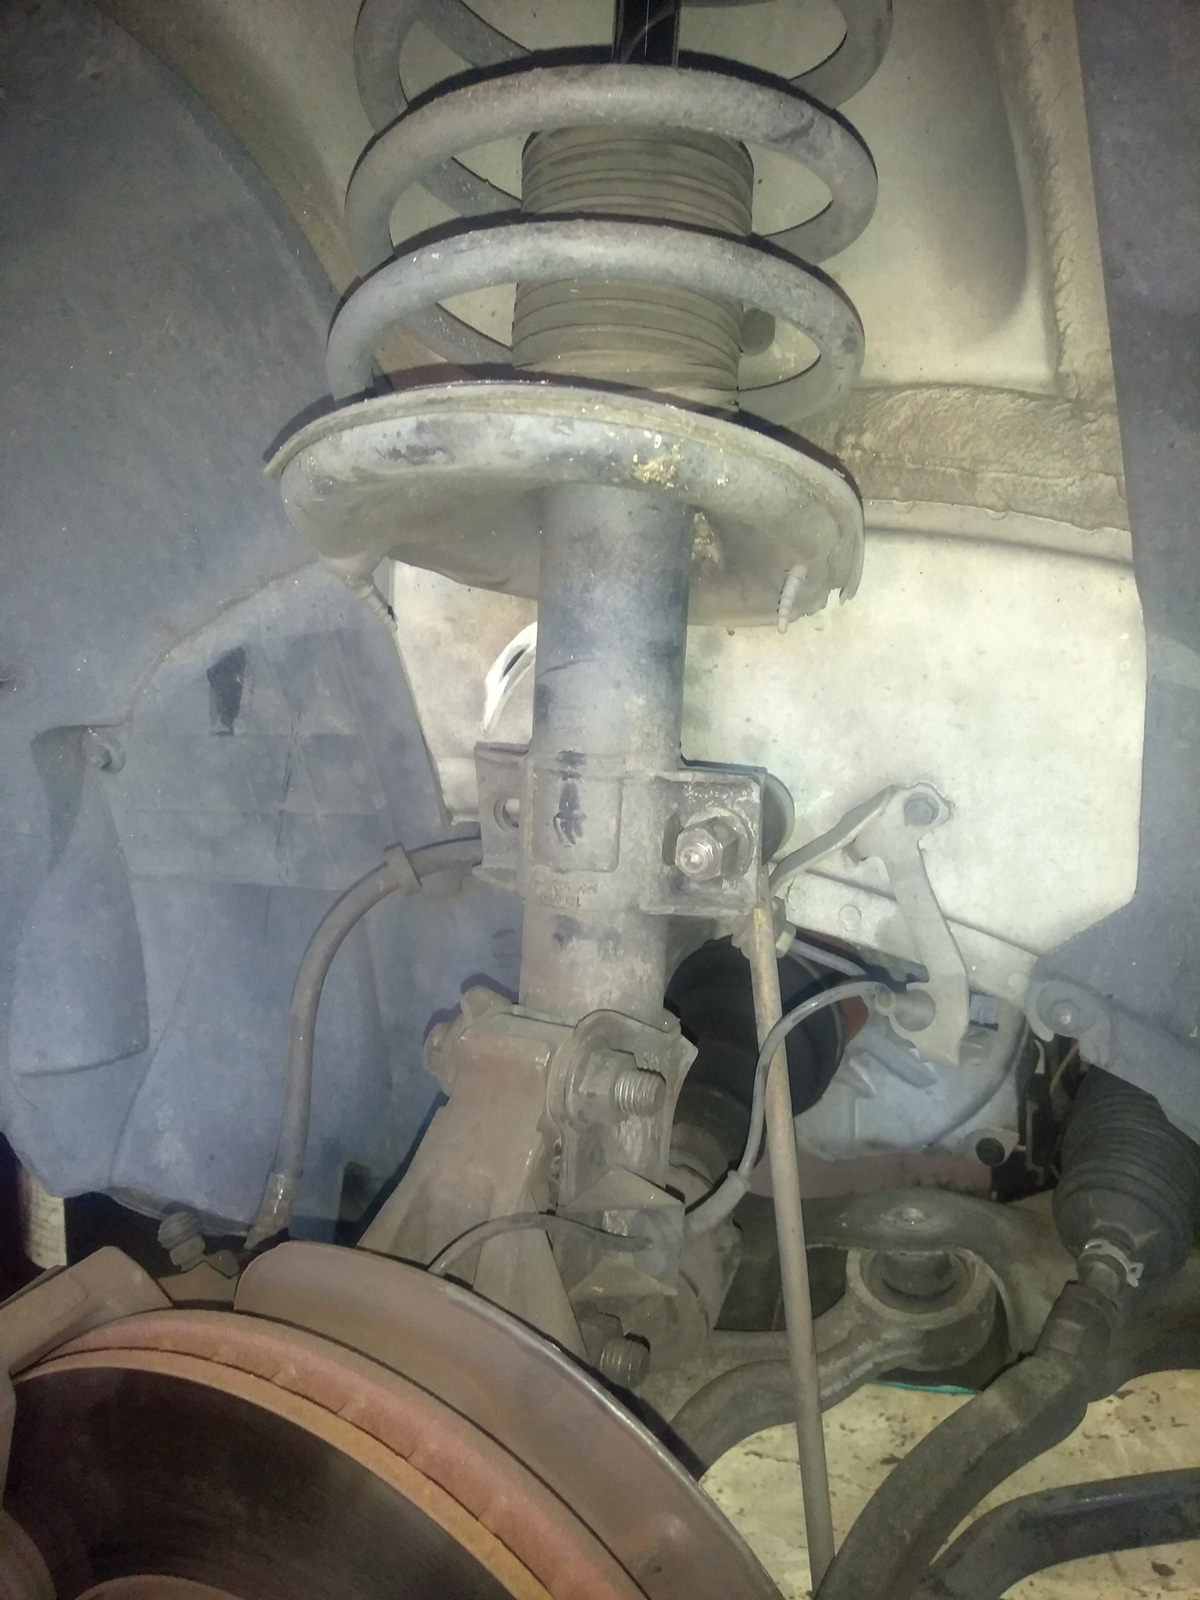
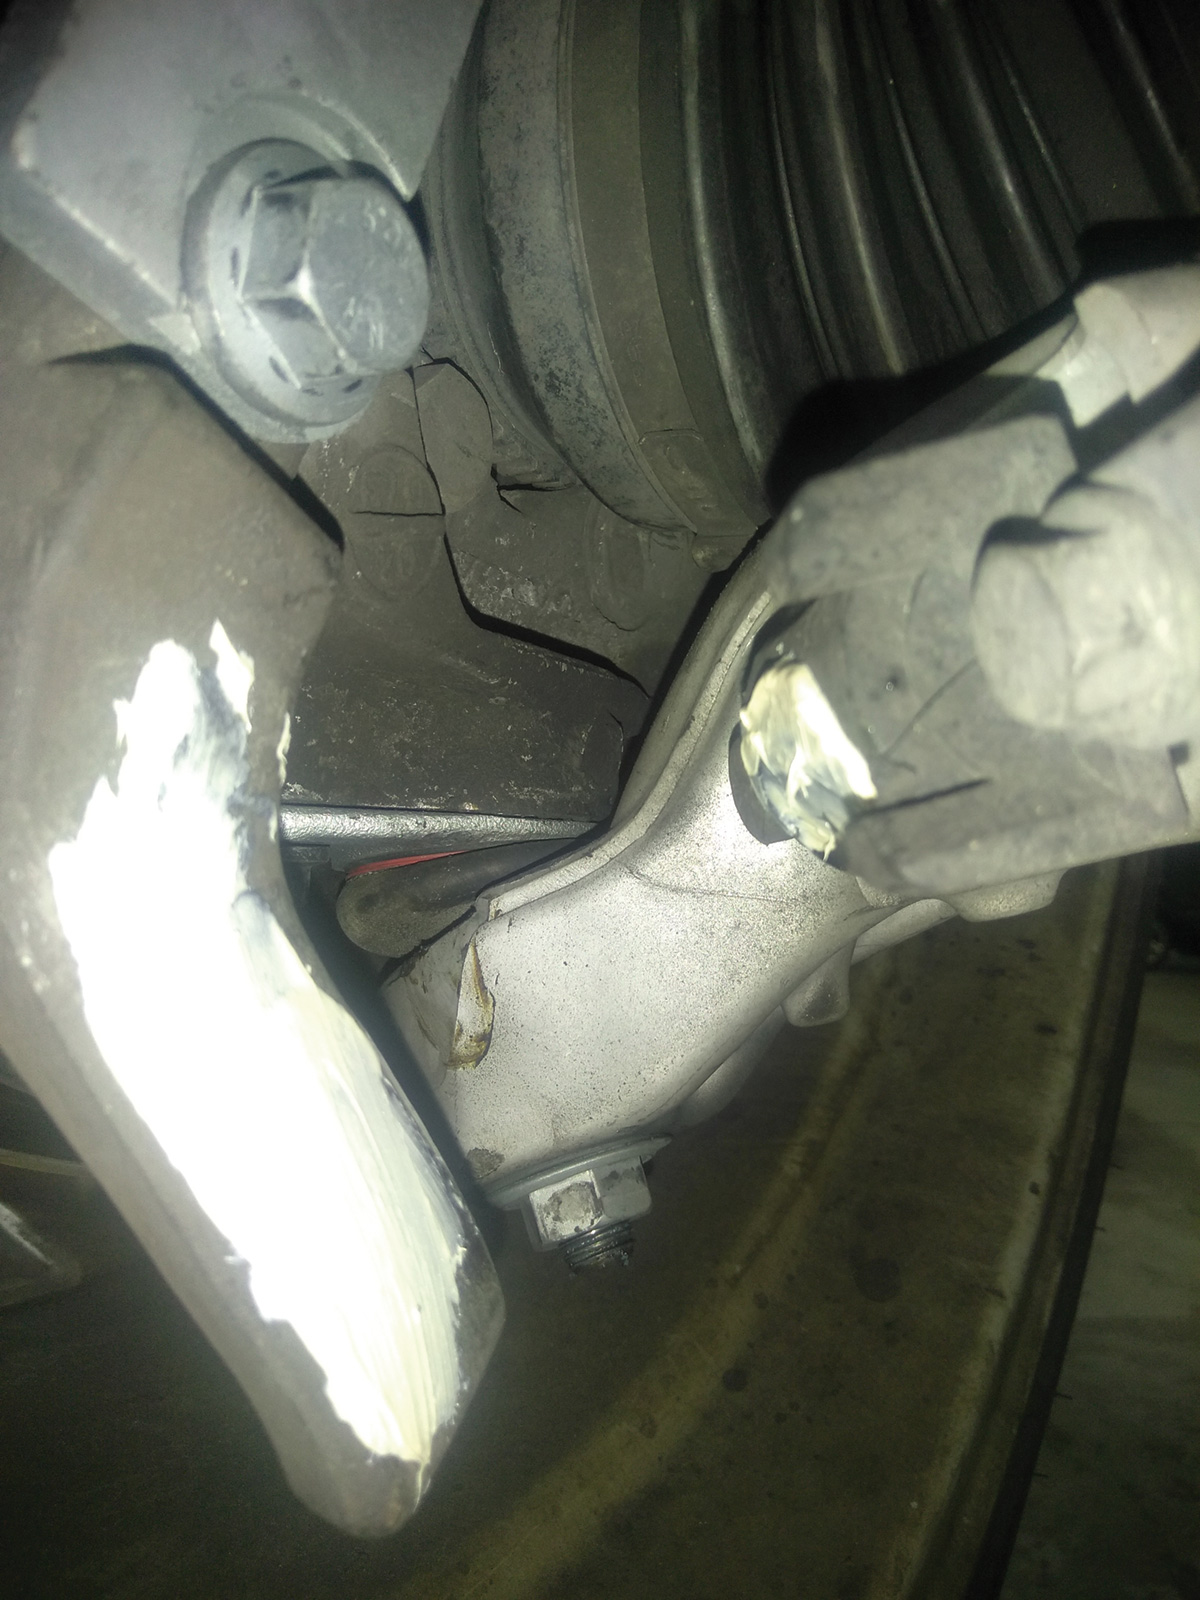
Most Volvo models you encounter at your shop have steering stops (or bump stop limiters) on the lower control arms. Some have replaceable parts that should be changed when they are broken or worn out.
When the front wheels are fully locked to one side, especially when the car is going up a driveway, these steering stops will rub on the corresponding bracket on the lower part of the spindle.
These steering stops need to be lubricated. If they are dry it’s common for them to create a squeaking or rubbing noise that can easily be mistaken for something more serious.
So check that the bump stops are intact and lubricated, especially when trying to pinpoint suspension noises that occur when the wheels are turned.
The best lubricant for the steering stops is a heavy waterproof marine grease, but if you don’t have that you can just use regular wheel bearing grease.
You should make lubing the steering stops part of your regular service procedure on Volvos that have them.
And remember, when you are trying to find an elusive suspension gremlin, don’t count out the possibility of loose suspension mounting hardware. It’s rare on later Volvos but a slightly loosened nut or bolt can make a lot of strange noises, so check that hardware.
And as always don’t forget to check those Technical Journals (TJs).
Volvo has issued several suspension-related TJs over the years on almost all their models.
You can get access to the latest TJs and other Volvo OE information at volvotechinfo.com
You can purchase a three day subscription to access TJs and other Volvo specific technical data.
Common Volvo Suspension Fixes
As your customers’ Volvos age you will start to see some of the not so common parts wear and cause suspension noises and reduced road handling characteristics.
Here is one example: XC90/ S80/ S60 /V70 / XC 70 2001-2013
Don’t Try This One at Home, Kids
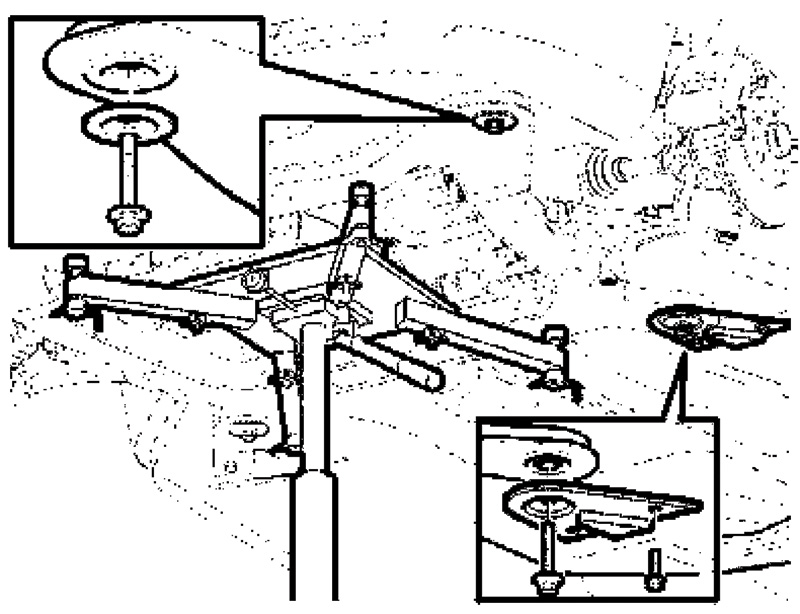
As these mounts wear and crack they can make all kind of noises. They can even affect the alignment and the overall handling of the vehicle.
If the Volvo you are working on has over 100K or has been driven on rough roads these bushings should be replaced.
Volvo has recently issued a Technical Journal (TJ 17644) for some later Volvos that has a “fix” for squeaks caused by worn subframe bushings contacting the rear subframe reinforcement plates.
The fix is to replace the left and right reinforcement plates with updated versions that don’t allow the old bushings to rub and cause noise.
Of course this will only help the noise, not necessarily the movement of the worn bushings
If you do have a Volvo that has subframe bushings that are very worn or cracked and the customer is willing, go ahead and replace them. The new bushings will improve the car’s overall handling.
You will need four new bushings and four new subframe bolts with washers.
One of the bushings, the right rear one, will be different from the other three with an elongated hole to aid in alignment of the subframe when it is installed in the vehicle.
Of course to replace these bushings you will have to remove the subframe and support the engine and transmission.
This is a big job and requires a lift and an engine support system to hold the engine and transmission in the car when you remove the subframe.
Use the lift points that correspond to the engine configuration of the Volvo that you are working on.
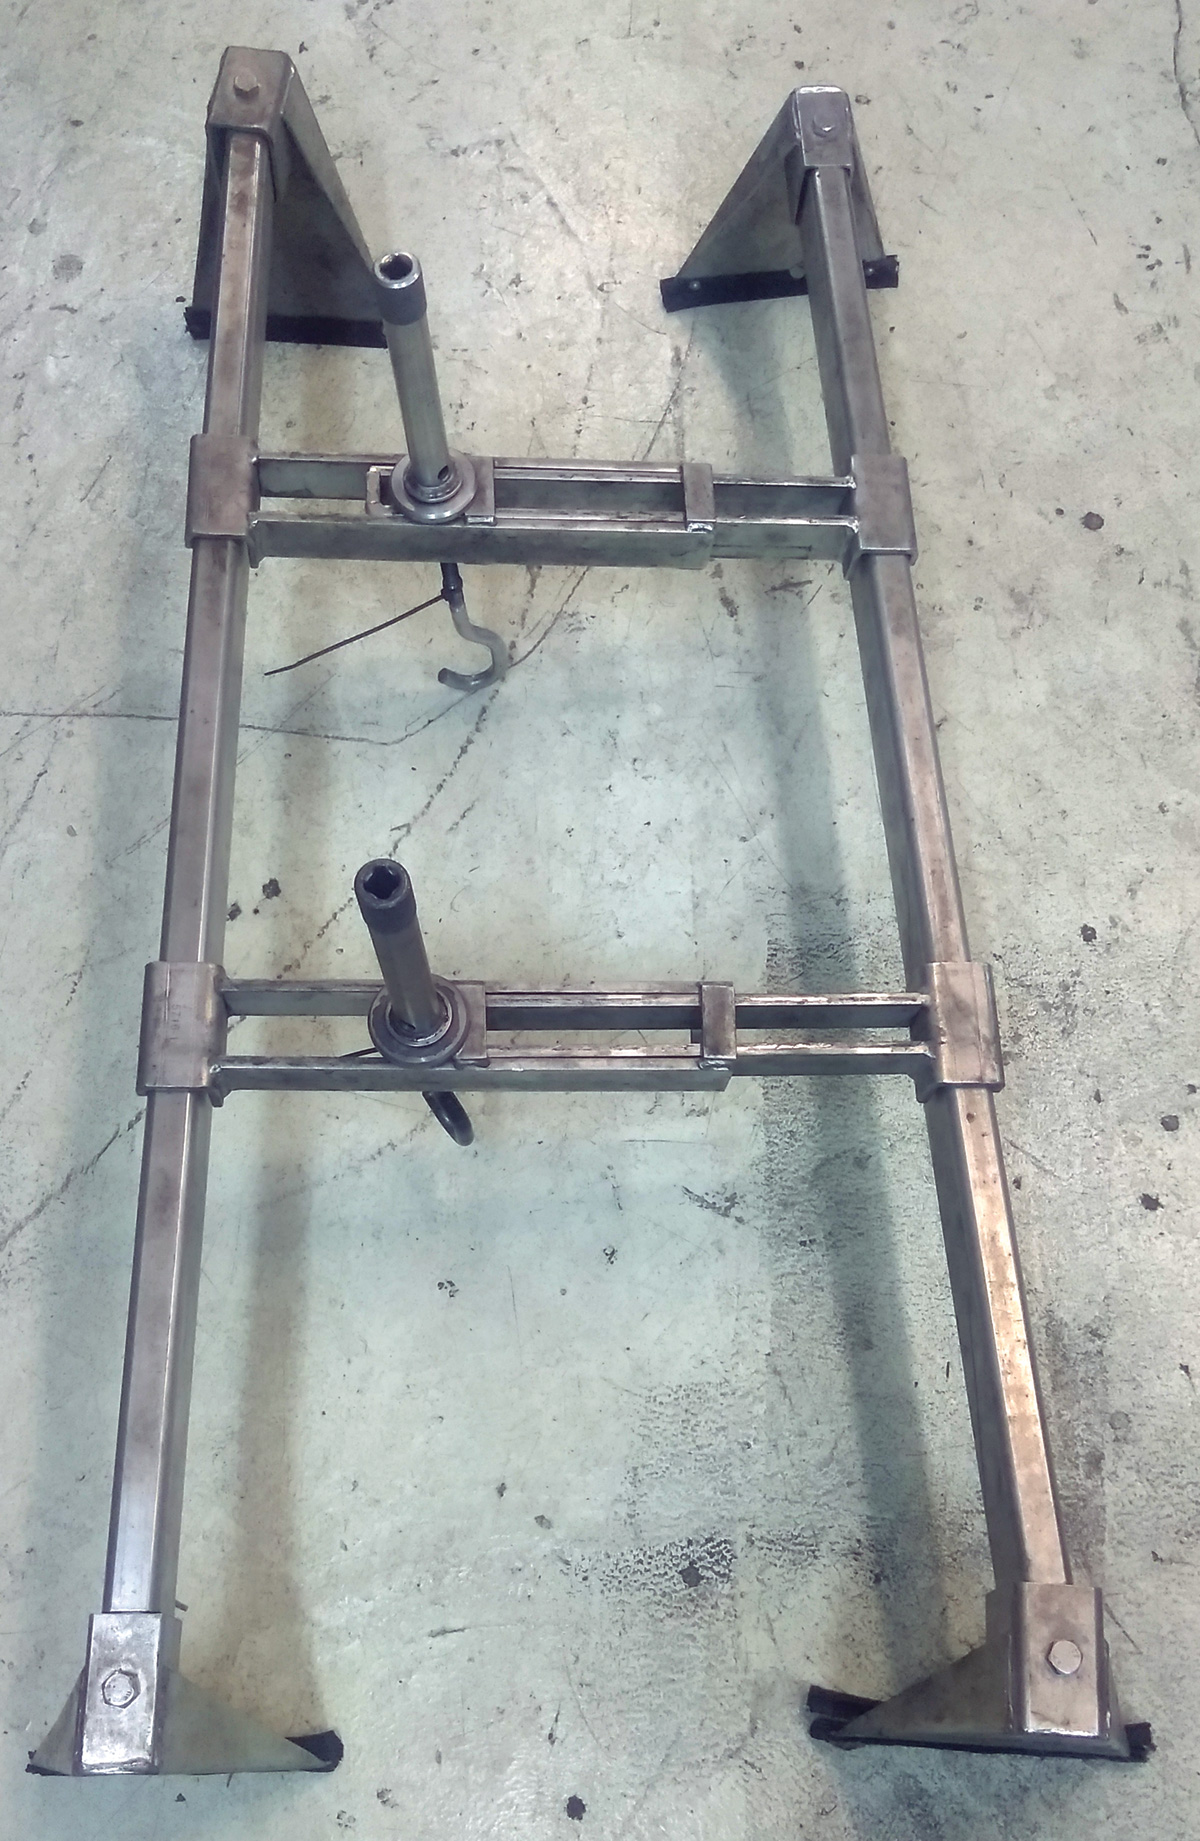
The engine needs to be supported in more than one place, so don’t just use a 4×4 and a chain like in the old days.
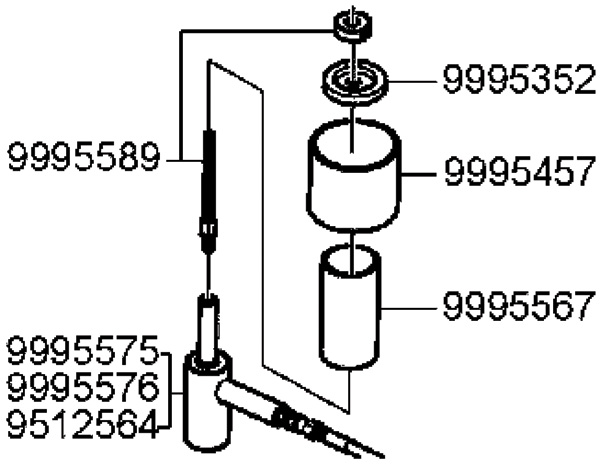
You can purchase the factory Volvo lifting beam set or use your own, just be safe and smart about it.
The part numbers for the factory engine support set are: 999 7070; 999 5716; two of the 999 5460; and 999 5185. You can order these tools from your local Volvo dealer or use the Tool link
on volvotechinfo.com.
Any time you remove the subframe from a Volvo, the car should get a four wheel alignment performed before delivering it to the customer.
When the subframe is removed and reinstalled it will almost always affect the alignment because there will be subtle differences in the angle of the subframe when it is reinstalled.
The instructions for replacing these bushing are about the same on most Volvo models from 2001 to 2013. There are some extra steps depending on the engine, transmission and the year and model of the Volvo you are working on.
OK, let’s start with a test drive before we start the work. Make note of any noises in the front end and go down a flat straight road to see if the steering wheel is straight and make note of any pulling or drifting.
It’s also a good idea to run a scan on the car to make sure that there are no codes stored for things like a bad Steering Angle Sensor (SAS). It’s better to tell the customer before you start the job because you don’t want to get the car back from alignment with a nice shiny new traction control light on. Never happened to you, right?
When your customer is going to have you perform this job, do them and yourself a favor and get them to authorize any other parts that are worn in the front end.
When the subframe is out it is very easy to replace parts like the motor mounts, control arm bushings, C-V boots and axles, etc. So if they’re going to do it, now is the time.
OK, let’s do this!
Put the car up on a lift and, as always, start by disconnecting the battery.
If the car has an upper engine torque mount, remove the crossbar before you install the engine support brackets and hardware.
Make sure the hood is securely open. Worn hood shocks can let the hood fall down onto the engine support and may cause damage to the hood and hood liner. Use a hood prop or a hood clamp tool to make sure there are no surprises when lifting and lowering the car.
The best setup is the Volvo factory one, so if your shop works on a lot of Volvos it’s worth the investment.
You will have to lower and raise the engine slightly, so an adjustable multi-point engine support is needed.
After installing the engine support system the next steps are:
Remove the front tires, and then remove the splash shield.
If this is an XC90, remove the six bolts from the skid plate and lift it up and out to remove it.
The lower control arms can stay attached to the subframe when you remove it.
Remove the anti-roll bar links from the anti-roll bar on both sides. Counter hold the shaft of the sway bar link using a Torx or Allen wrench so that the joint boot is not damaged.
You can remove the bolts at the ends of the C-V axles to make it easier to remove and line up the ball joint during disassembly and reassembly, but it’s up to you. In a lot of cases it’s not a necessary step.
Remove the screw (or nut in some cases) for the drive shaft.
Use a brass drift to knock the end of the drive shaft through the hub.
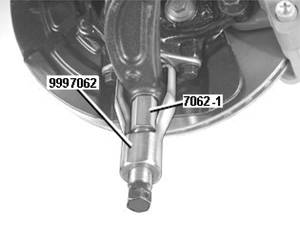
Next remove the nuts from the lower ball joint and separate them with Volvo special tool number 999 7062 or equivalent.
Remove the bolt from the bottom of the front engine mount.
Remove the ground strap that’s bolted to the top of the subframe on the left front side.
Remove the two screws holding the lower torque rod assembly at the transmission.
Remove the power steering oil pipe form the snap fasteners along the right inner side subframe.
Remove the screw clip for the power steering oil return line.
You don’t need to disconnect the steering coupler and oil lines from the steering rack because it can stay in place when you remove the nuts and bolts that attach it to the subframe. You should use a bungee cord or some rope to support it up in the car while the subframe is removed to keep it from hanging all its weight from the steering shaft. Otherwise this can cause damage to parts in the steering column assembly.
Remove the four nuts and screws holding the steering rack to the subframe.
On some models the EVAP canister tube that runs from the canister purge valve to the canister in the rear of the car runs through the right side of the subframe and under the sway bar. You can disconnect this line by finding the small silicone hose coupler that is located just a few inches behind the subframe.
Next remove the rubber hangers that support the header pipe in the rear of the subframe.
Remove the four bolts that hold the exhaust bracket to the subframe.
Next remove the screws that hold the clips for the oxygen sensor wires.
There is a brake line that runs along the back of the subframe. You need to take care not to damage it when removing and installing the subframe.
OK, you’re just about ready to drop that subframe out of the car, but remember it’s heavy and awkward, so don’t just try to lift it out by yourself.
There are a few ways that shops have come up with to support and remove the subframe.
You can just use a transmission jack with extra long brackets that can support the subframe from all four corners.
If you don’t have this type of transmission jack you can use blocks of wood and lower the car down on the lift before you remove the last four large bolts that hold the subframe in the car.
Once the subframe is out of the car you can start working on removing the old bushings and pressing in the new ones.
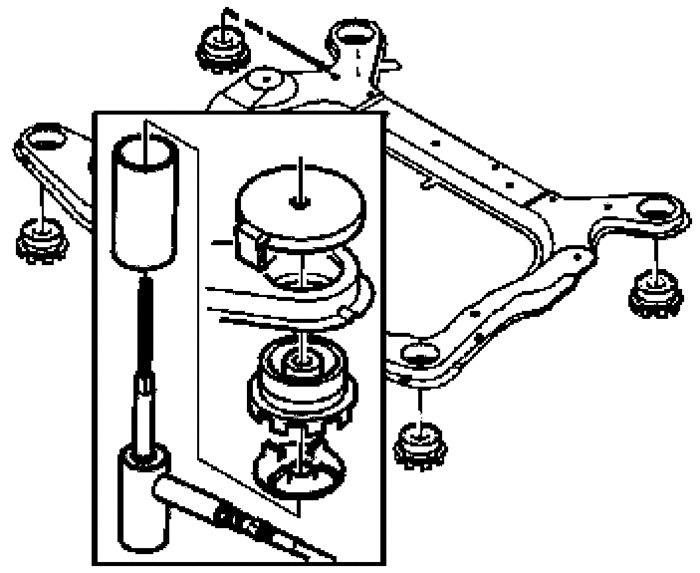
Start by cleaning the area around the old subframe bushing and locating the bushing alignment marks. Use a marker to draw a reference line through all four bushings.
To remove the old bushings you can use Volvo’s press tools if you have them.
If you don’t have the Volvo setup you can use a similar bushing and bearing press tool set; just make sure that the tools don’t damage the bushings when they are pressed in.
After you have all the new bushings pressed in, install the subframe in reverse order.
Lift the subframe up completely, at the same time locating the mounting screws for the steering gear on the subframe and, on right hand drive cars, the screw for the collision protection system.
Loosely install the subframe brackets together with the washers.
Install the four screws for the subframe. Always use new bolts but don’t tighten them yet.
First tighten the screws on the left side of the subframe.
Tighten the bolts to 105 Nm. Angle tighten to 120 degrees.
Then tighten the right hand side to the same values as the left hand side.
Finally tighten the bracket screws. Tighten to 50 Nm.
CAUTION: Tighten the left-hand side first. The subframe guides are on the left hand side.
Always use new mounting bolts and washers when reinstalling.
And folks, use OE Volvo bushings and hardware; this job is too big to take chances with low quality aftermarket parts.
Download PDF


0 Comments