


Auxiliary Belt Service on Volvo 3.0L Turbo (B6304T4) and 3.2L Non Turbo (B6324S) S16 (Short Six) Engines
You may remember the day that you first opened the hood on one of these newer Volvos equipped with the 3.0L or the 3.2L (SI6) six cylinder engine.
At first glance, you may have noticed a few major changes, like no timing belt and the lack of anything familiar about the front of the block where the belts and pulleys usually are on most Volvos.
You may have been taken by surprise to see the belts and all the engine’s accessories were on the back of the engine, squeezed in between the engine block and the transmission.
You may have thought to yourself something like, “This is never going to work,” or “How the heck are you going to change the belts and things like the water pump and power steering pump?” Well, that’s what older Volvo techs said about the first Volvo all aluminum 5 cylinder engines when they came out.
And those engines certainly worked out.
Volvo has had its share of new engine designs over the years since the end of the use of the old “RED” block engines, especially in the last decade. Of course, you may or may not know that Volvo is going back to its roots and using the same size engine in all its cars. Starting with the 2018 model year, most Volvos now come equipped with a 2.0L 4 cylinder engine with different aspiration options.
However, the fact is that the previously used SI6 3.0L and the 3.2L engines have turned out to be very reliable and robust with few major problems, if reasonably serviced. Volvo designed the SI6 (“Short Inline 6”) straight six engine for use starting in their 2007 models, and it was installed in cars you’ll commonly see in your shop.
An evolution of the company’s long-used 5 cylinder modular engine design, which itself was an evolution of the Volvo B6304 straight six engines, the SI6 could be mounted transversely for front wheel drive or all wheel drive applications.
Despite the added cylinder and displacement, the engine remains compact and is in fact 1 mm (0.039 in.) shorter than the previous straight 5.
The engine was initially offered in two displacements, a 3.0L turbocharged version and a 3.2L naturally aspirated version.
Both engine sizes offer variable valve timing adjustment, though only the turbo version varies both the intake and exhaust camshafts.
On top of the variable cam timing used on the intake cam of the naturally aspirated engine, it also features variable valve lift by using Cam Profile Switching (CPS).
Volvo put the accessories between the block and the transmission to make the power train as compact as possible, making it easier to fit it into multiple body types, and the shorter engine allows for improved turning radius.
Changing the Auxiliary Belts on a 2007 XC90 with SI6 3.2L Engine
For a case study we will be using a 2007 Volvo XC90 equipped with the 3.2L SI6 engine.
Changing the belt on this car is very similar to most other Volvos that came with one of these engines with just a few small variations.
The procedure for changing the belts is essentially the same procedure for the water pump, A/C compressor, or any of the auxiliary tensioners.
Even if you are just replacing the belts, it can take some time and is a bit more involved than your usual auxiliary belt replacement job.
Since you will be removing the air cleaner and the ECM that’s mounted on top of it, you should start the job by disconnecting the negative battery terminal.
When disconnecting and reconnecting the battery on a Volvo always follow the Volvo factory battery procedures as covered in TJ 24188.

Next remove the main engine cover by pulling it up and out of the way.
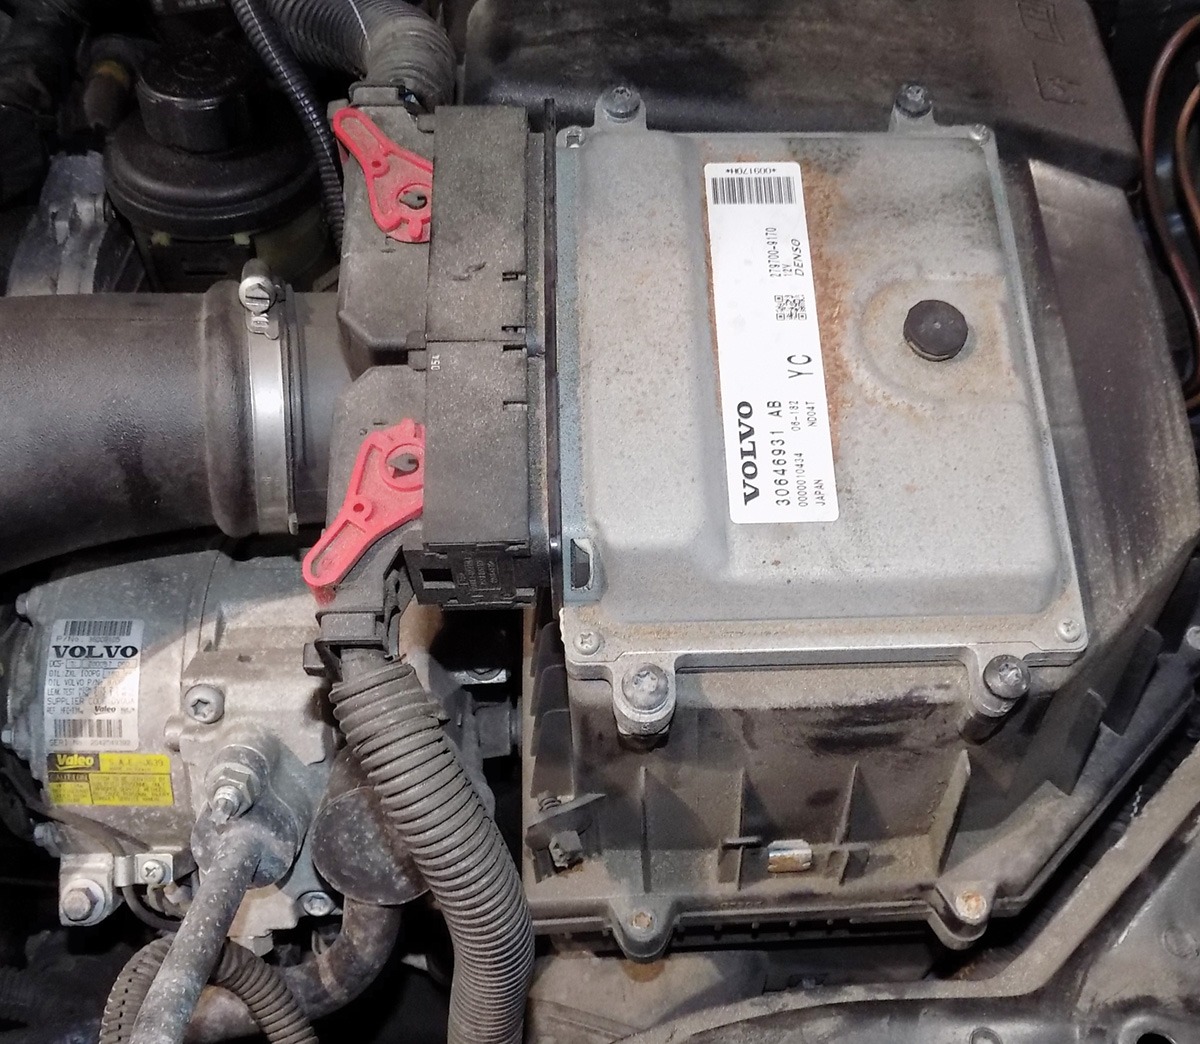
Remove the ECM cover on top of the air cleaner and carefully remove the two harness connectors. Be gentle with the plastic retaining clips; they can be brittle.
Remove the air cleaner box.
You will have to remove the wire harness connector for the main fuse block along with the 12 mm nut that holds the end of the B+ cable in the main fuse block.
Remove the two 10 mm bolts that hold the cold air intake tube.
Remove the nuts for the power steering reservoir so you can move it out of the way.
Next, loosen the clamps at each end of the main air intake pipe that runs from the air cleaner to the bottom of the intake manifold.
Carefully remove the intake pipe by gently twisting and pulling. DO NOT pry at the ends with a screwdriver. This can damage the pipe and may cause unmetered air leaks.
Next you will have to remove the bolts that mount the A/C compressor.
In most cases (except for the replacement of the A/C compressor itself), you should not have to remove the refrigerant charge because you just need to move the compressor a little out of the way to get enough room to remove and replace the belts.
This will also give you a lot more access to the drive belt area. Use a 19 mm box end wrench to slacken the tensioner and relieve the tension on the belt.
Pull the tensioner back until the holes line up in the tensioner arm and the mounting. Then use a 3 mm pin or equivalent to lock the tensioner in position (you can reuse an old timing belt tensioner retaining pin for this).
The next steps will be to remove the bolts that mount the power steering pump. Start with the two small bolts that connect the power steering pulley to the water pump coupling assembly and then remove the four mounting bolts at the rear of the power steering pump.
When you remove the power steering pump from the water pump coupler, remove the pins from the pulley. Rotate the power steering pump upward and rearward.
In some cases, you will have to disconnect the power steering pump high pressure line to move the pump out of the way.
Now that you have removed all of those components, you will be able to remove the old serpentine belt.

When the Belt is Off… Check those bearings
Sometimes it’s hard to tell if the auxiliary belt tensioner or idler bearings are worn just by listening to the engine running. A worn or dry bearing may only make noise intermittently so it is important to spot any potential bearing problems now.
If you find a binding or noisy idler bearing, now is the time to replace it.
And, if the car has more than 100K on it, you may want to advise your customer to replace the tensioner and idler bearings as part of the belt service; this will probably end up saving them some money in the long run.
The idler bearings can fail before the belts do, so don’t take any chances, replace any questionable parts when you’re in there.
It’s more common to have to change the water pump than the power steering pumps on these cars, but in both cases you will have to remove the power steering pump.
So let’s assume that you have removed everything that’s involved in replacing the serpentine belt.
If you started out to replace the water pump, you could add draining of the engine coolant right after disconnecting the battery.
The power steering pump pulley drives the water pump via a spring loaded coupler that is bolted right to the face of the power steering pump pulley. The water pump coupler is delicate and can be damaged if you’re not careful.
When removing the power steering pump
Remove the two screws and poke out the lugs from the power steering pulley. Turn the power steering pump upward and rearward.
When installing
To facilitate fitting of the water pump coupling in the power steering pump pulley, turn the coupling until the spikes are in the eight o’clock and two o’clock position. Make sure that the pins stick out through the holes in the pulley.

Always use a new guide pin when installing the power steering pump.
If you are replacing the water pump, the Volvo pump comes with new hardware and a new plastic guide pin.
Is that vacuum pump leaking?
Well now is a great time to reseal it with all this extra room. Volvo sells a reseal kit for this purpose with everything you will need (Volvo part number 31401556 ).
The 3.0L and the 3.2L SI6 engines both came equipped with a mechanical vacuum pump that is mounted on the rear of the cylinder head and is driven by the intake camshaft. These vacuum pumps can start to show signs of engine oil leaks after many miles of use. You will usually notice oil seeping from the bottom of the pump.
Removing and resealing these pumps is a relatively easy job, made even easier when the other components are out of the way during a belt replacement job. The reseal kit from Volvo comes with everything you need to do the job.
Start by removing the two bolts that mount the pump assembly to the back of the head.
Next, carefully remove the vacuum pump hard line from the pump check valve by squeezing the quick connector tabs on the plastic hose fitting and pulling the hose out towards the rear of the engine.
Now you can remove the vacuum pump from the back of the head by pulling and twisting the pump. Do not use a screwdriver or pry bar for this task as you may damage the machined surfaces. Some oil will leak out of the hole in back of the head, so be ready with a rag. Take the pump to a work bench for disassembly and reassembly.
Clean the oil and dirt off the outside of the pump zousing with parts cleaner and clean rags.
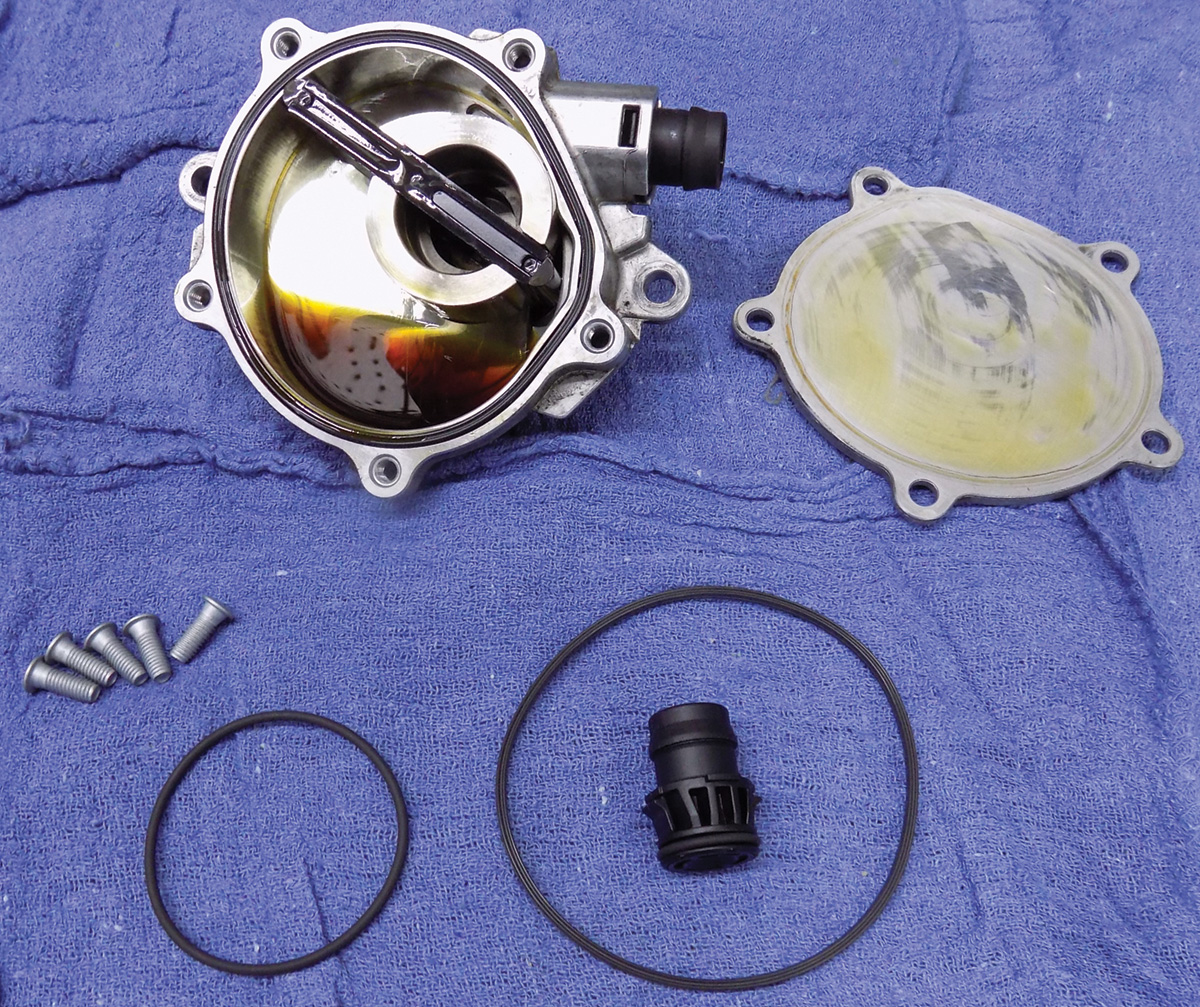
You will need a Torx T25 tool to remove the five screws that hold the pump together. You should be able to remove the screws without putting the pump in a vise, since clamping down on the pump body may cause damage to the pump.
With the five T25 screws removed you can disassemble the pump, making a note of the way the pump parts
are oriented.
Clean the parts and the inside of the pump with a clean rag and spray parts cleaner, then dry the parts with low air pressure.
Inspect all the parts, and make sure they are free of debris before reassembly.
Use the new screws that come with the reseal kit.
Install the large O-ring into the groove in the body of the pump. You can use a little bit of silicone grease to hold the seal in place while you reassemble the two halves of the pump.
Tighten the five new screws evenly in a star pattern (torque screws to 15 Nm).
Next, replace the plastic check valve that attaches to the main vacuum pipe. Note that the new check valve will have a new O-ring installed on it already.
Before you reinstall the freshly resealed pump, install the new O-ring in the groove around the input shaft of the pump. Use a little silicone lubricant on the seal to prevent twisting or damage to the O-ring when it is installed into the cylinder head.
Line up the pump drive shaft with the corresponding grooves in the camshaft and slide the pump in, installing the two hold down bolts and torque them to 17 Nm.
Snap in the vacuum pipe and you’re done.
The idler bearings can fail before the belts do, so don’t take any chances. Replace any questionable parts while you’re in there.
Download PDF


0 Comments