


Codes or No Codes: That is the question. Here’s how to deal with MIL codes and faults.
In this article, we will go over MIL codes and faults and how to deal with them. We will also go over Volvo no-code diagnosis, and how to approach vehicles that come into your shop with no-code driveability problems.
Having a code in the system can sometimes be less daunting but not always. Not having a code and having an intermittent problem can sometimes be a problem. Let’s say a customer comes in with an engine shut-off problem that doesn’t happen all the time. So of course, you will test drive the vehicle to see if you can duplicate the problem.
The first thing to do is to attach a fuel pressure gauge to the fuel rail, usually a Schrader valve hookup. This way you will be able to check pressure while driving, sitting and idling.
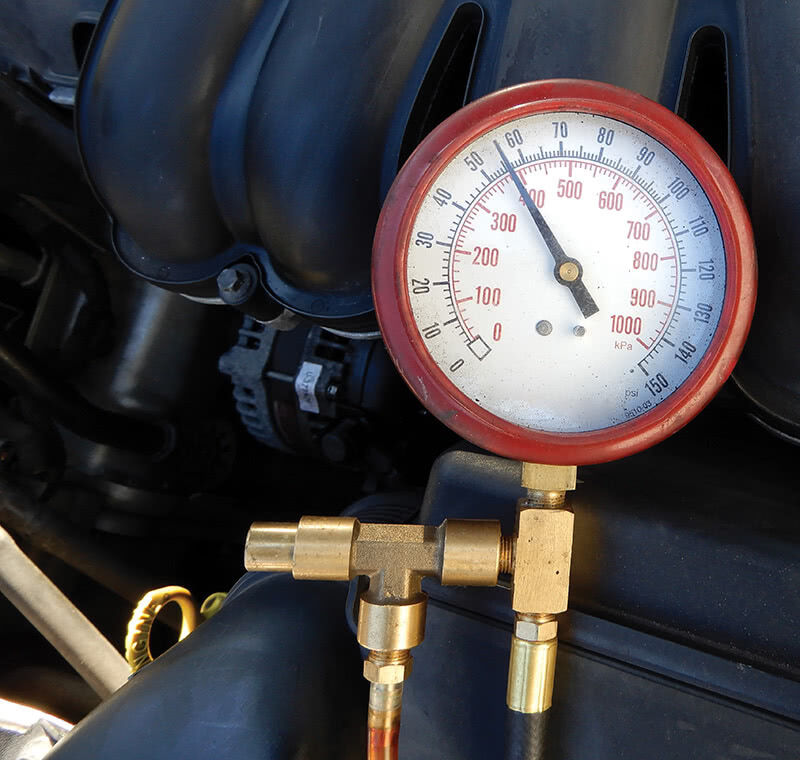
If there is no fuel pressure, then, depending on the model and year of the Volvo you’re working on, you will want to expose the fuel pump connector. Check for power and ground at the fuel pump. If power and ground are present, then the fuel pump is the problem. If no power is present, you will need to check a wiring diagram and also component location in Volvo’s Service, Parts and Diagnostic Application VIDA (Vehicle Information and Diagnostics for Aftersales). The fuel pump relay could be a problem and is a good place to check next.
Check the ignition system for any worn or deteriorated parts like ignition wires, coils or maybe spark plugs. Check the connections at the coil or coils, and check the ignition wire connections. If the vehicle runs with no problem, leave the fuel gauges attached and run the vehicle while checking the fuel pressure gauge.
Alternator codes
Here we have a 2007 Volvo XC90 3.2 L. This vehicle has a couple of codes relating to the alternator. Codes ECM-P050B00 Generator Control Circuit General Electric failure; and ECM-P062074 Generator Control Circuit Mechanical Failure Actuator slipping.
This vehicle has a charging problem; the battery keeps going dead. If the battery is bad, replace it, and if it needs charging, charge the battery.
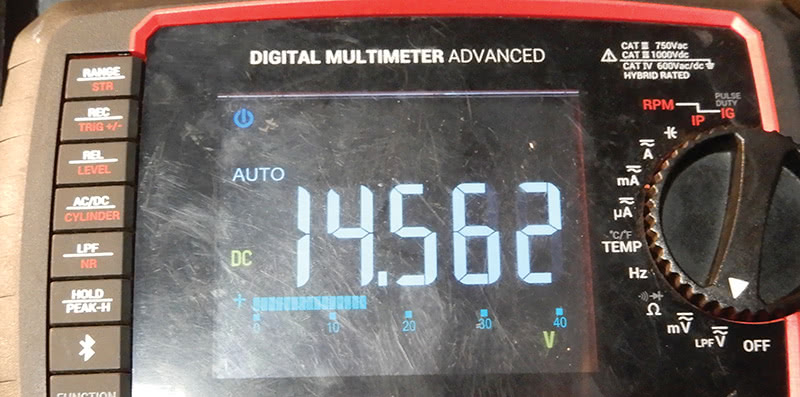
Once the battery is charged up or replaced, let’s check how much the alternator is putting out in voltage. Charging correctly should provide around 13.8 volts. This alternator is not charging, so it’s a good idea to visually check the alternator connections and belt. If the connections look tight and there is nothing out of the ordinary, your problem is the alternator.
Air mass meter codes
These are codes that will show up from time to time, but it’s not always an air mass meter problem. Many times this code points to something else. The air mass meter or sensor measures the flow of air drawn into the engine. Check for air leaks in the system; it would be a good idea to smoke test the vehicle for any leaks. A broken hose or another component could be the problem and setting an air mass sensor code.
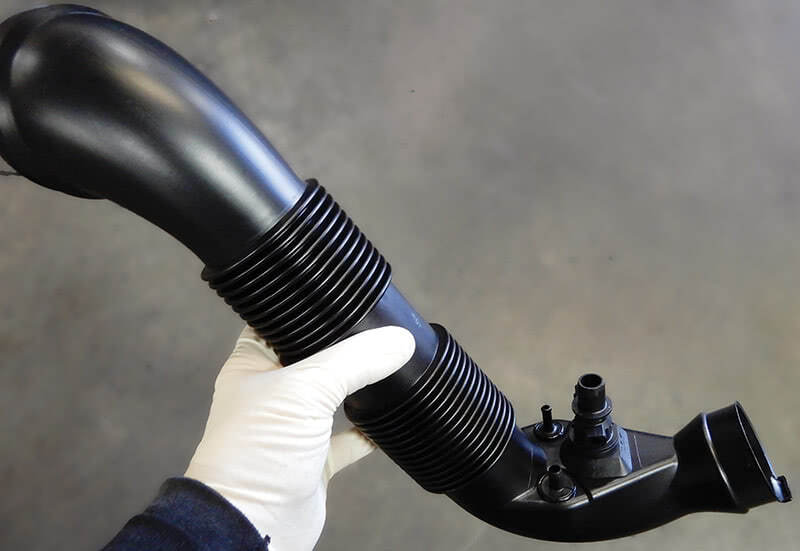
On the Volvo five-cylinder engine, the plastic hose from the air mass sensor to the turbo can set this code. Smoke testing the vehicle can find the leak at this hose, or it could be the electrical valve sensor in the hose not operating correctly.
Make sure to always monitor the system while running using VIDA. Go to Vehicle Communications, ECM, and monitor the system at idle and under load, making sure all components are in spec. Air leaks are usually the problem for air mass sensor codes, so keep that in mind.
Volvo code with signal missing
Here we have a 2013 XC90 CEM Code 1A64, Communication with the Differential Electronic Module (DEM) signal missing. Use the wiring diagrams for support when taking readings. First, you will want to check the traffic load on the CAN cable. Information about CAN troubleshooting can be found in VIDA under Information/Product Specifications/Design and Function/37/CAN.
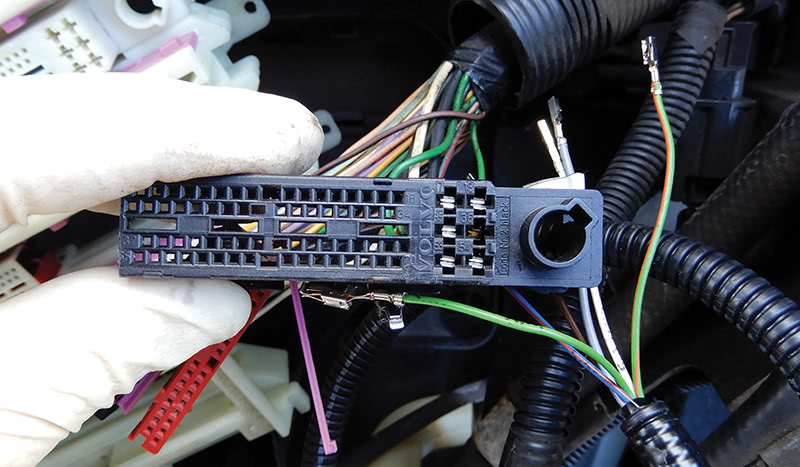
When faults occur on the CAN network, sometimes control modules send faulty messages that interfere with normal communication. When this happens, there is a considerable amount of traffic on the CAN network. Check the load voltage by measuring the average value on the CAN wires in relation to ground.
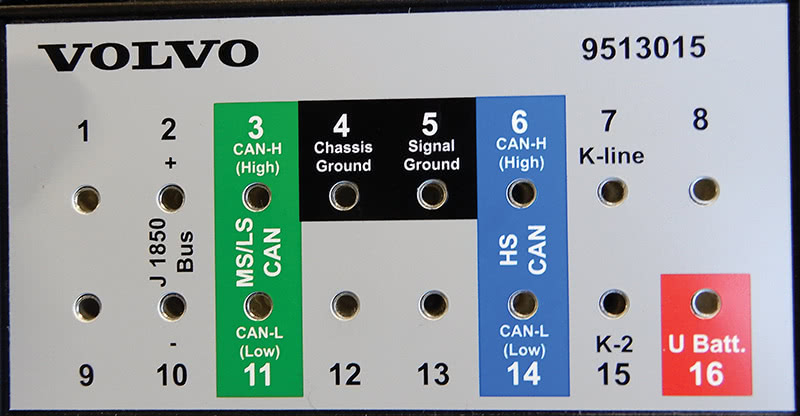
Measure voltage between connections at OBD II.
#6 and #4 ground: The voltage should be approximately 2.8 to 3.2 volts.
#14 and #4 ground: The voltage should be approximately 1.8 to 2.2 volts.
#6 and #14: The voltage should be approximately .55 to 1.4 volts. The voltage is normally between .55 and .90 volts. Higher voltage can mean there is increased traffic on the CAN network.
Using special tool 9513015 and plugging into OBD II will help in diagnosing your problem on the CAN Network.
After disconnecting the DEM, the voltage in the CAN system seems to register correctly. After replacing the DEM control module, adding software using VIDA, and going to Software Profile, the vehicle seems to be driving and operating correctly.
Finding a missing signal on the CAN network can take some time and tease your brain. If the fault cannot be detected through normal troubleshooting, you can diagnose possible interference on the CAN network using the tool DICE Error Frame Finder to register fault messages on the CAN network. Use Volvo tool 9513010 memory card and check out TJ 20402.3.4.
You can set up DICE to become the Error Frame Finder by installing the memory card 9513010 in the back of DICE. Make sure to go through TJ 20402.3.4 for more information.
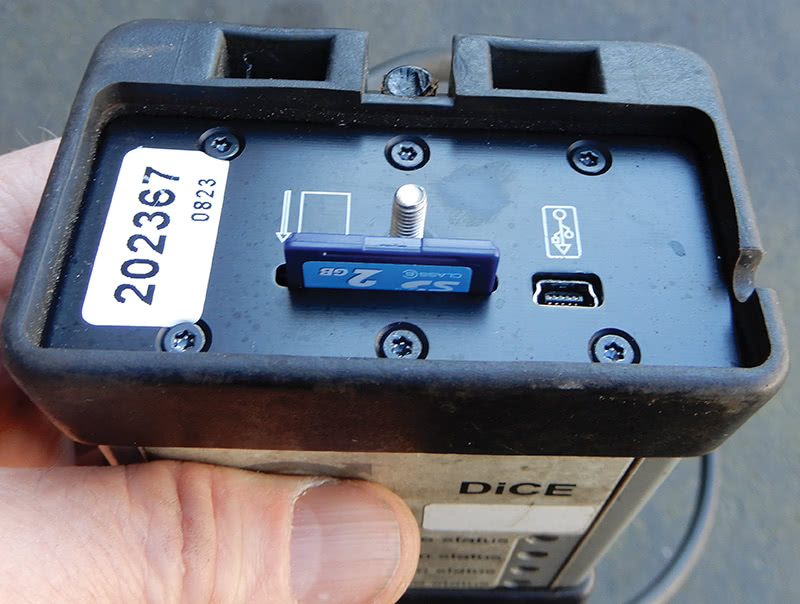
With ignition on, plug in the DICE Error Frame Finder to the OBD II connection. The blue LED indicator flashes to show fault messages. So, if the blue LED light is flashing, there is a problem in a control module. Pulling and checking connections to modules might help in locating the problem. Keep an eye on the DICE blue light indicator.
Control modules can sometimes be difficult to troubleshoot. This could take some time, so let the vehicle sit with DICE connected for a period of time. Try to activate functions in the control module to provoke a malfunction in the system. When the blue light on DICE starts to flash, remove the fuse for the control modules to see if you can locate which one is the problem child. When removing a fuse or power to the control module and the blue light goes away on DICE, this module is more than likely the problem module.
Misfire codes can sometimes be fixed as easily as replacing the spark plugs. It’s a good idea to use Volvo Genuine Spark Plugs since many times an aftermarket spark plug causes misfires or other problems.
Here we have a 2008 Volvo XC70 with random misfire codes. The ECM trouble codes for each cylinder are as follows:
- ECM-P030100, cylinder one misfire
- ECM-P030200, cylinder two misfire
- ECM-P030300, cylinder three misfire
- ECM-P030400, cylinder four misfire
- ECM-P030500, cylinder five misfire
- ECM-P030600, cylinder six misfire
Here are the possible problems:
- Damaged spark plugs
- Damaged ignition coils
- Repeated cold starts when engine temperature does not reach proper operating temperature between starts
- Low fuel level
- Dirty or damaged valve depressor
- Dirty or damaged cam profile solenoid
- Contaminated fuel
- Air leakage
- Damaged VVT unit
- Clogged or leaking injector
- Faulty fuel pressure
- Bad or uneven cylinder compression
You will want to check if there are any other codes in the system that might generate a misfire code, like fuel-related codes, or maybe fuel pressure is too low. Fuel adaption codes may point to possible oxygen sensor problems, faulty ignition coils, or injector codes. You might also find camshaft failures or misadjustment, or possible cam solenoid problems.
With the vehicle connected to VIDA under Vehicle Communications, ECM, you can monitor cylinder misfire and check all related codes in the system.

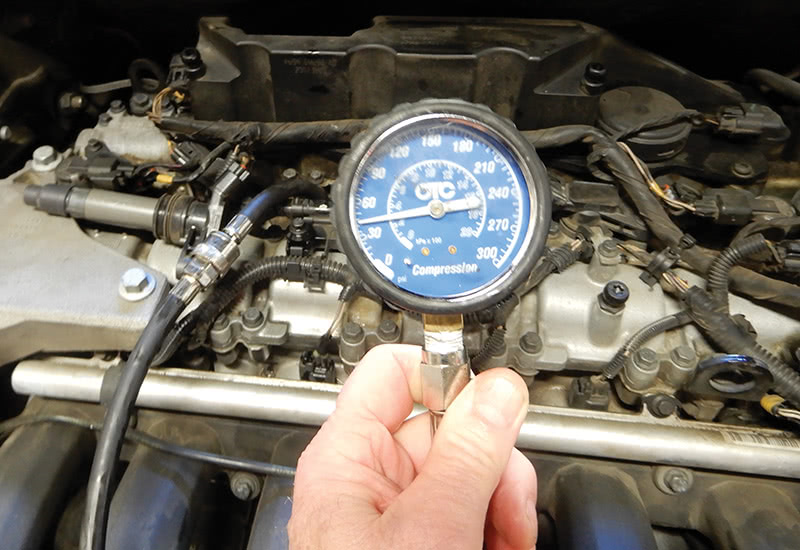
While monitoring the system, you see misfire in cylinders. The first thing to do would be remove the spark plugs and check for any damage or maybe different discolorations on the spark plugs. While plugs are out, take a compression check just to make sure the compression is correct and that cylinders are close in measurement. If compression is good, replace all spark plugs and check again.
If compression is correct and you have replaced spark plugs but still have a misfire, move coils around to see if the misfire changes to a different cylinder. If misfire changes, then you have an ignition coil problem. Replace the ignition coil or coils depending on which one misfires.
After replacing the spark plugs and/or ignition coils, monitor the engine using VIDA to make sure you have no lingering misfire codes.
Fuel pressure code
Here we have a 2016 Volvo Engine B4204T27 with diagnostic trouble code P018C00, low pressure sensor. With VIDA connected, go to Vehicle Communication and check your fuel pressure. If pressure looks correct, check to see if there are any Technical Journals (TJs) about this problem and you will find TJ 33794.2.0.
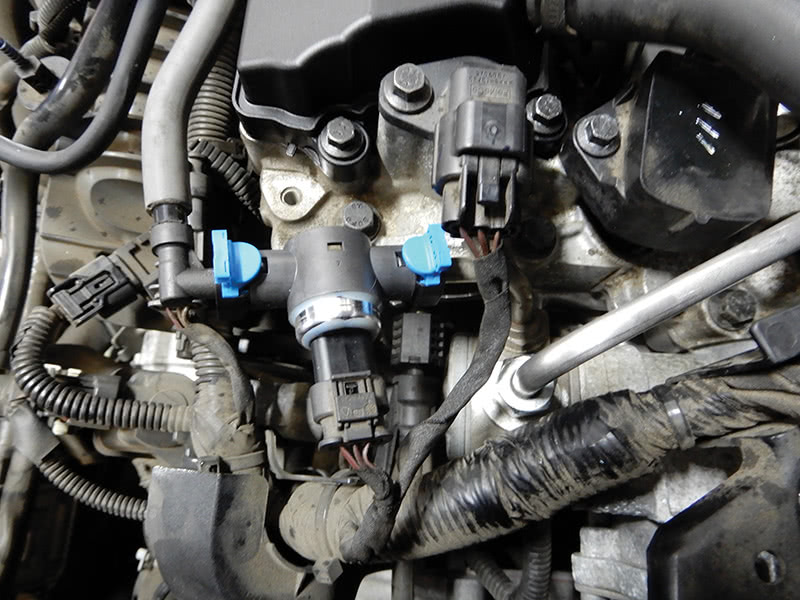
You will need to replace the low pressure sensor kit, the sensor and the feed line. If the vehicle is equipped with a Cooper LPS part number 31478293 or 31405791, it will need to be replaced with a new Sensata sensor part number 31432653 that is included in kit number 32242869. It’s very important to replace the feed line that is in kit part number 31669066 when replacing the sensor.
Now that the sensor and feed line have been replaced, clear codes in the ECM and test drive, monitoring the fuel pressure with VIDA.
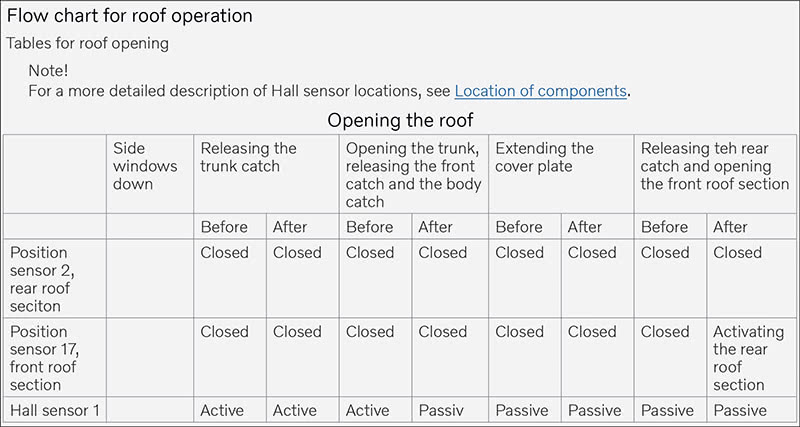
Suppose you encounter convertible hardtops in which the electrical fold-down hardtop cannot be operated and there are no diagnostic trouble codes in the system. Using VIDA with the vehicle hooked up, read the vehicle, and in Fault Tracing, go to Symptom Related Diagnostic Procedures. Here you will see a procedure for checking the electrical convertible hardtop. Usually the reason for the electrical hardtop not operating is a Hall sensor or position sensor out of place.
Make sure the software is up to date, under Checking Software. Select the operation of sunroof tab. Here you can click on Flow Chart for Roof Operation and check the operation of the Hall sensors and position sensors. After finding the problem, be sure to restart the control module and check the system to make sure the convertible top works correctly.
No-code ETM problem
Electronic throttle modules can make a vehicle run poorly, might cause an uneven idle, or the vehicle might die coming to a stop and never set a diagnostic trouble code. You will want to hook up VIDA and, in Vehicle Communications, go to ECM and monitor the system while running. Check fuel pressure and oxygen sensors, and check for anything out of the ordinary.
Check the connections at the fuel sensor, air mass meter and related parts. Smoke test the vehicle to make sure there are no air leaks. It is possible an intake manifold leak could be a problem. After checking basic procedures and everything seems to be good, check the electrical connector at the ETM. Be careful with the connections; the terminals are gold plated and need to be handled with caution. Make sure to check for power and ground, which are probably there with no diagnostic trouble codes.
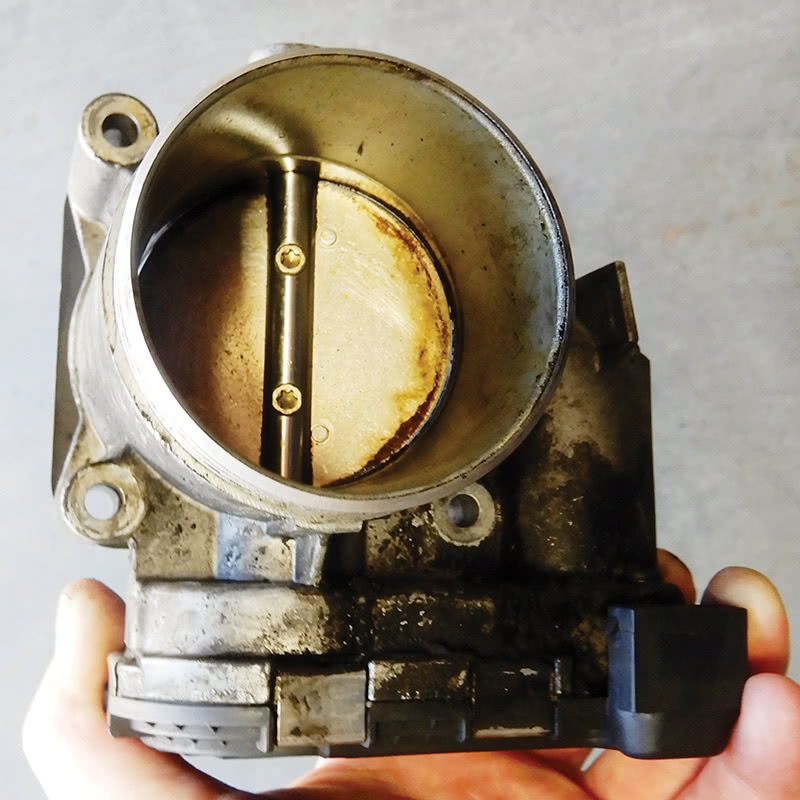
Remove the throttle housing to check for carbon buildup at the throttle plate. If the throttle plate is extremely dirty and the throttle plate has resistance, you might be able to clean the throttle plate and install it in the vehicle to see if there is a difference in the vehicle’s driving performance.
You might be able to feel a difference in the performance, and, if the vehicle is running correctly at startup and after it gets warmed up, you probably touched on the problem. If the vehicle still has a performance problem, replacing the ETM might be necessary to solve your problem. Make sure to check VIDA to see if a software update is necessary for this vehicle.
Having a code in the system can definitely help in identifying and repairing the problem. When you have no code in the system, it can make the problem a little harder to track down. Always start with the basics—power and ground checks, air leaks, fuel pressure and ignition spark. Using VIDA will help you with diagnosing problems in Volvo vehicles.


0 Comments